Using the Cognitive Tutor
1. Overview of the Summer 2004 Tutor Curriculum
The curriculum consists of 7 lessons:- Geometry -- 2-Dimensional Measurement
- Geometry -- 3-Dimensional Measurement
- Probability
- Probability and Odds
- Percents
- Proportional Reasoning
- Algebra (see the Cognitive Tutor Algebra handout)
When you first log in, the first geometry problem will be presented. As you complete each problem, the next problem in the lesson will be presented. There are 72 problems in the curriculum.
You can log out at any time. When you login in again, the tutor will start you up right where you left off.
When you complete the last problem in a lesson, the tutor will automatically log you out. When you log in again the tutor will start you on the next lesson. The tutor will take you through the first six lessons in the order displayed above. (Instructions for completing the algebra lesson are included in the package.)
2. Starting the Cognitive Tutor and logging in (also described in the general instructions)
- To start the tutor, double click on the CVMS Grade 7 icon:
- A login window will appear. Type cvms student1 (Letter capitalization doesn't matter).

- If the tutor says "Error: Unable to find student file. Try entering your name again.", try checking for typos. If you've spelled your login correctly, send e-mail to alps@cs.cmu.edu.
3. Moving and Resizing Windows
Each tutor problem consists of several windows, as shown here. Each of the windows can be moved and resized to fit better on the screen. (Click here for a description of how to move and resize windows.)
4. Completing a Problem
In each lesson, the student enters responses (numbers, algebra expressions, letter, words) in a Worksheet Window and/or in a General Question Tool. In the algebra lesson, the student also uses a grapher tool.
To enter an answer in a Worksheet cell after typing it, press return or click on another cell. Similarly, to enter a typed answer in the Question Tool, press return or click on another line in the tool.
5. Feedback and Mistakes
The tutor provides immediate feedback on each entry- If the tutor recognizes that a typed entry is correct it remains black on the screen after it is entered.
- If you make an error, your entry will appear in red once it is entered (you press return or click on another cell). This is a signal to rethink your answer. Once you understand your error, click in the cell with the incorrect entry and type in the appropriate response. You may need to delete your previous answer first. If you are unsure about your error, try getting a hint from the Tutor.
6. Getting a Hint
Ask the Tutor for help when you get stuck. The tutor has a built-in help mechanism to provide assistance in solving tutor problems. When a user makes a common mistake (e.g. omitting a negative sign before a negative number), hints usually appear automatically, but most often it is up to the user to ask the computer for help when necessary.
You can get a hint from the Tutor in one of the three ways:- Click on the box with the question mark found in the upper left corner of the window you are currently using.
- Select the Hint option from the Tutor menu at the top of the window.
- Use the keyboard shortcut Ctrl-H.

A hint window will appear on the screen with a suggestion about how to proceed.

Hints will help you according to how much and what parts of a problem you have solved. Whenever you would like more detailed hints, click on the three arrows pointing to the right (>>>). To return to a previous hint, click on the three arrows pointing to the left (<<<).
7. Finishing a Problem
To finish a problem, you must complete all the parts of the problem. Select Done when you have completely solved the problem. You can do this in one of the two ways: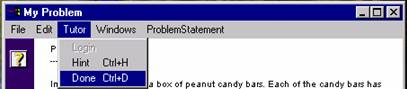
8. Logging out
You can log out of the Tutor at any time. The work you have done will be saved for you until the next time you log in. You can log out of the tutor in one of the two ways:- Select the Quit option from the File menu of any of the problem windows.
- Use the keyboard shortcut Ctrl-Q.

9. Lesson-Specific Problem-Solving Notes
Some general notes on completing the problems in the geometry, probability, percents and proportional reasoning lessons:
You can always ask for a hint if you are not sure what to do or how to answer a question.
If you get stuck in a problem, for example, if the tutor does not give you help on an answer or does not accept a correct answer, send e-mail to alps@cs.cmu.edu.
Two-Dimensional Measure (Lesson 1), Probability (Lesson 3) and Percents (Lesson 5)
These lessons employ the Workwheet Window. In each problem the numbered rows in the Worksheet correspond to a numbered questions in the Scenario Window. Students answer each question in the Scenario by filling in the cells in the corresponding Worksheet row.
Probability and Odds (Lesson 4) and Proportional Reasoning (Lesson 6)
These lessons employ the General Question Tool. In each problems, questions appear in this tool and answers are typed in blank lines next to the questions.
Three-Dimensional Measure (Lesson 2)
This lesson displays a solid object in the Scenario Window and employs two Worksheet Windows and a General Question Tool as shown here:
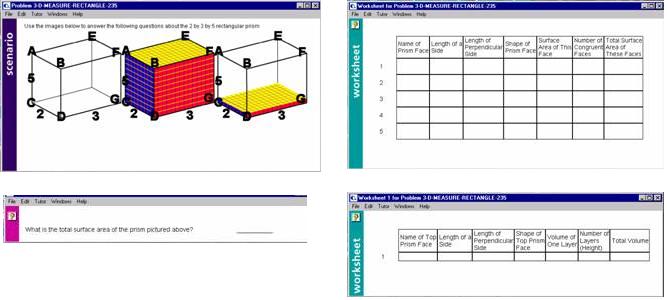
The student uses the larger Worksheet (upper right window above) to label and compute the surface area of different faces of the object. The student uses the General Question Tool (lower left above) to enter the total surface area of the solid. The student uses the smaller Worksheet (lower right above) to compute the volume of the solid.
Moving Tutor Windows
- Click on a window to make it active.
- Place the mouse pointer on the title bar of the window (the top horizontal bar, usually black or dark blue in color).
- Click on the title bar once with the mouse, but do not let go of the click button.
- While still holding onto the click button, move the mouse to the desired location for the window. An outline that is shaped like the current window will appear. Use this to decide on the best placement of the window.
- When the desired location is reached, let go of the clicker on the mouse. The window will reappear in its new location.
Resizing Tutor Windows
- Click on a window to make it active.
- Position the mouse pointer anywhere on the border of the window until the pointer turns into a black double-sided arrow (↔).
- Click on the corner of the window after the double-sided arrow appears, and do not let go of the click button.
- While holding onto the click button, move the mouse in the appropriate direction to resize the window. An outline will appear as you move the mouse; this gives an indication of what the new size will be.
- When the desired size is reached, let go of the clicker on the mouse. The window will reappear with the size you designated.