
|
Running Carmen |
This document is an aid to begin using the CARMEN robot sensing and navigation software, including (but not limited to) the following programs:
The "central" program, IPC, enables communication between these other programs. Information on using and coding with IPC can be found at http://www-2.cs.cmu.edu/afs/cs/project/TCA/www/ipc/ipc.html. A simplistic explanation of IPC: various programs "publish" generated information which is then "subscibed to" by other programs. IPC keeps track of what is published and delivers it to the subscribers.
|
|
|
|
|
|
|
The use of CARMEN will described using four different scenaria: simulating a robot, tele-operating a robot, building a map, and way-point navigation of a robot in a known map. Since CARMEN is modular software, each scenario will involve opening a bunch of different xterms and running different programs.
Parameters for all of the modules are read from the carmen.ini file. You will need to edit this file, adding your own robot and parameter values. The name of your robot in [] square brackets in the param file will be a command line parameter to the parameter server later in these instructions.
1. In window 1, start the IPC central server
cd carmen/bin ; ./central
If you are running programs on multiple machines, then you must specify on the other machines which machine is running central. This is done with the command:
setenv CENTRALHOST [hostname]where [hostname] is the name of the machine on which central is running.
Note: When running displays on off-robot computers, running the display programs off-robot rather than on-robot uses less bandwidth than piping the X display across the network.
2. In window 2, start the parameter server
cd carmen/bin ; ./param_server -robot pearl ../data/thickwean.mapThe command above will start the param_server such that it serves parameters for the CMU robot "Pearl" from the parameter file "carmen.ini" and the map file "thickwean.map." Other command-line options are:
cd carmen/bin ; ./simulator
4. In window 4, start the navigator_panel program
cd carmen/bin ; ./navigator_panelThis will open a graphic display. Place the simulated robot in the map by left-clicking on the "Place Simulator" button, and then left-clicking once on the desired location on the map. Then move the cursor away from the blue dot that appears, in the direction you wish the robot to face. A blue line appears between the cursor (now two curved arrows) and the simulated robot, indicating the facing of the robot. Left-click again to fix the facing of the robot.

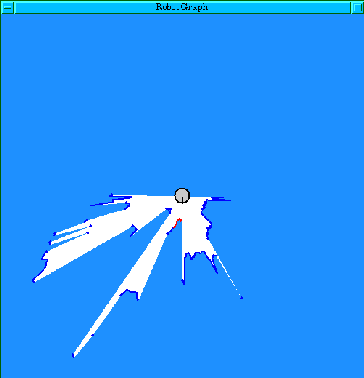
5. In window 5, start the robotgraph program
cd carmen/bin ; ./robotgraphSee the instructions for using robotgraph below to teleoperate the simulated robot. You can also build maps and autonomously navigate the robot as described further below. Maps should look the same as the original map unless there were differences in the parameters used (in either the paramfile or in the vasco program) when creating the original map and the new map. Remember that if you are running programs on multiple machines, you must set the CENTRALHOST environment variable to point to the machine on which you are running central.
1. In window 1, start the IPC central server
cd carmen/bin ; ./central2. In window 2, start the parameter server
cd carmen/bin ; ./param_server [paramfile.ini] -robot robotname3. In window 3, start the base server that corresponds to your robot
cd carmen/bin ; ./scout4. In window 4, start the laser server
cd carmen/bin ; ./laser5. In window 5, start the robot server
cd carmen/bin ; ./robot6. In window 6, start the robotgraph program
cd carmen/bin ; ./robotgraphNote that if you have a pioneer or scout robot, you can run the base_services program instead of steps 3, 4, and 5. It is not yet working with other robot types.
cd carmen/bin ; ./base_services
Here is a bit more detail on the programs to be run.
To turn the robot, use the left mouse button. Clicking near the robot will turn it right or left. To move the robot, click on the robot and drag the mouse pointer in the direction (relative to the "forward" indicator on the screen) you wish the robot to go. The robot indicator will turn red when you click on it, indicating that it is ready to move. The further from the robot you drag the cursor, the faster the robot will go.
Or, if you have properly installed your joystick under linux, you can drive the robot with the joystick.
Alternatively, you can use keyboard commands to move the robot. The following keys will move the robot:
To build a map, you can use either teleoperation or autonomous navigation. However, autonomous navigation requires that you start with a map, so this section describes how to do it with teleoperation. Another way to build a map is with the map editor program.
While the robot is moving, you will need to run the logger program.
Run steps 1 through 6 for teleoperating the robot, then:
7. In window 7, start the loggger
cd carmen/bin ; ./logger [filename].log
[filename] specifies a filename for the sensor log. If the file already exists, the program will ask to overwrite it. If an answer other than "Y" or "y" is given, then the logger will quit.
Drive the robot around, covering your environment, then stop the logger by typing a CONTROL-C in the logger xterm. Before quitting the other programs (or after restarting them at a later time), run vasco on the logfile you created
cd carmen/bin ; ./vasco file.log
This program opens an interface which displays sensor data compiled with raw odometry data, as in this image:

To correct for odometry error, click the "scan match" button on the upper right. After some computation time (progress is indicated on the lower left), the display will change, as in this second image:

This data was generated moving a robot from a lab (center right) into a corridor, up and down the corridor some distance, then back to the lab. The odd "fuzz" in the center of the corridor is actually the legs of people walking by as the data was gathered.
To create the final map to be used with param_server, now click the "Make Evidence Grid" button on the upper right. A new display will open allowing you to adjust parameters for creating the mapfile. At first, you should stick with the defaults.

When you click "Okay," that display will disapear, a new one will open and the map will form as you watch.

Note that the data which showed the people walking through the image has not effected the final map. To save this as a map, klick on the "File" menu and save as a ".map" file.
This file can then be used through your param_server program to allow for localization and autonomous navigation through the area you mapped.
This begins as if you were teleoperating the robot, but with a change in the param_server options to add the map file, and with other programs added.
1. In window 1, start the IPC central server
cd carmen/bin ; ./central2. In window 2, start the parameter server
cd carmen/bin ; ./param_server [paramfile.ini] -robot robotname mapfile.map3. In window 3, start the base server that corresponds to your robot
cd carmen/bin ; ./scout4. In window 4, start the laser server
cd carmen/bin ; ./laser5. In window 5, start the robot server
cd carmen/bin ; ./robot6. In window 6, start the robotgraph program
cd carmen/bin ; ./robotgraph
7. In window 7, Run the localizer
cd carmen/bin ; ./localize8. In window 8, Run the path planner
cd carmen/bin ; ./navigator9. In window 9, Run the path planner graphics module
cd carmen/bin ; ./navigator_panelHere is more detail on the new programs.
You can now control the robot using the navigator. You can then left click on the map to give the robot a goal. Select the "Go" button to send the robot from its current location to the selected goal. Select the "Stop" button (the same location as the "Go" button) to make the robot stop at any time.
