|
This document
applies to version 0.56 of Anaconda.
- Introduction
- Icon
anatomy
- Built-in
icons
- Using
custom icons
Introduction
This document
represents an addendum to the Anaconda manual and should be used
by anyone who wants to extend the capabilities of the Visualizer
without writing plug-ins for it.
Anaconda contains
an agent desktop that displays a graphical model of a running
multi-agent system and its temporal behavior, including message
traffic and communications inspection. Part of this model is built
dynamically by a number of visualization components. Since we
allow developers and users to add their own images to the agent
desktop in the form of agent icons, we need to describe the specifications
for such icons, in order that the automatic model generation works
properly. Every icon incorporated into the system will have to
abide by the guidelines described in this document.
Icon
Anatomy
Before we
describe how to create custom icons for Anaconda, we need to explain
how the icons are used within the application. This will give
help you gain more control over how your agent is represented
in the system, and will eliminate confusion regarding dimensions
and icon placement.
Each icon
is composed of a face and a label. In smaller icons, the label
might not be visible. It is up to the Visualizer to decide how
much space is given over to each icon, based on the total space
that is taken up by the icons, including their faces and labels,
plus any additional padding. By default, padding is set to two
pixels, but it can be more for visualizations where proximity
is not vital for scalability.
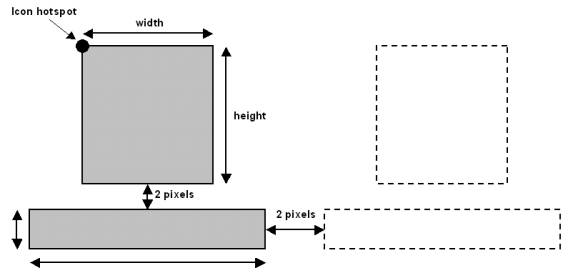
The
image displayed above shows the anatomy of an icon as used by
the Anaconda agent Visualizer. Even though the icon management
system will allow you to assign an icon that has a different height
than width, automatic layouts do not take non-cubic shapes into
account and the longer of the two dimensions (width or height)
will be used to calculate the total space taken up by the face
of the icon. Likewise, we strongly recommend that you supply icons
with the dimensions described here.
Between
the icon face and its label is a two pixel separation. This separation
actually exists around the entire icon border, making the total
size of the icon ((width+4)*(height*4)).
As
can be seen from the diagram above, each icon has a hotspot. This
point on the icon face is used for placement purposes and has
no direct impact for icon builders. In future versions of the
Anaconda application, this point will be used to give visualization
designers a point of reference on the agent desktop. Note that
the hotspot is the upper left hand corner of the icon face, minus
the padding.
Within
the Visualizer, 4 icons sizes are possible. These four sizes are:
16x16, 32x32, 48x48 and 64x64. We encourage you to supply the
full-range of icons, and not only the 64x64 or 32x32. Without
the smaller icons as options for an agent, the Visualizer will
revert back to default icons when the desktop is scaled. Developers
are encouraged to provide versions of their icons in all sizes,
if possible. Below is a graphical representation of the icon sizes
and their properties.

In
all versions of the icon except for the 16x16, a label will be
placed below the face. However, since the Visualizer applies bounding
box constraints on the agent when in automatic layout mode, the
label will be truncated if the agent name is more than 12 characters
long. For example, the agent name: interface_agent_12
would appear as: interface_a
Built-in
icons
Using
Custom icons
If
you decide to add custom icons to the Visualizer, then follow
the icon specifications listed above. The current version of the
application only supports the Windows bitmap format images (*.bmp).
In future versions we intend to support other widely used graphical
formats.
Other
than dimension restrictions the designer is free to build icons
as s/he wishes. Images can be submitted containing, 2, 4, 256,16
bit, 24 bit and more colors. Transparencies are not supported
at this time and each icon will be displayed as is. The Anaconda
application comes with an archive that contains the built-in
icons (shown above) as Windows bitmap images. You can use these
files to create your own.
|
