| |
Our site is under construction and the information will be updated as we continue to test the prototyping machines
Operating the CNC Mill VMC 4000
Safety Instructions
You need to wear Goggles
Its important that you test your part with Machine Wax first, then use your final material.
If you use metal you need to use lubricant.
Keep the door of the Benchman closed at all times.
Steps for operating the CNC Mill VMC 4000
- Take the G Code file (.txt or nc) to the Benchman computer by means of a floppy Disk or CD.
Open Benchman 4000 software (the shortcut is on the desktop)
Open your G-Code file

- If the lower left corner displays a red rectangle, it is an error message
- Turn on the CNC Mill machine
- Home the machine
Setup > set-Check-Home > Quick Home

- Setting the position of the tool and the plate
- For incremental motion:
- Use the Manual Control XYZ or
- Use the keypad
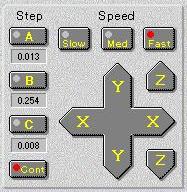
- To move the tool to a desired position
go to position X-Y-Z
The plate moves in the X-Y direction and the tool moves in Z direction only
you can also test the zero position with this command
- To set the dimensions of the initial block
Make sure to set units in the benchman.
Verify program -> stock for (to set the dimensions of the block)

- To simulate the G-Code program
Program > Verify program
You can also use other simulator, but there might be inconsistencies with the benchman

- To fix the block on to the table
- Option 1 (if the block is small)
use the built in clamp to fix the block
Use parallels to align the block and level it properly to be parallel to the X-Y plane
- Option 2 (if the block is large) you clamp it directly to the table with the small movable clamps
make sure it is aligned to the x-y axes with the table
 
- Set the zero-in x y z direction
- For the x and y, use the indicator tool tip
set the spindle to spin
lower the tool and move it (in the x or y direction) in tiny increments until it touches the material
when it touches it, the indicator tip will shift. we take this position as zero and
take the (1/2 of) the diameter of the indicator tool as an offset. .1 inches
 
- For the z, we place a thin metal strip under the tool and bring the tool down (manually in very
small increments) until it touches the strip and we cant move the strip anymore. we take into
account the thickness as the offset. .002inches

- To start press the cycle start button.

- In case of emergency stop the program
- Emergency stop (stops the spindle and the program)
- Cycle stop (you can start and stop anytime).

- If your G-code has tool change, it will ask you to change your tool.

- When you start cutting, it will cover the the block with fine (almost powdered) residue of material.
You can vacuum that residue out, if necessary.
|
