|
Rapid Design through Virtual and Physical Prototyping |
 | |
|
| |||
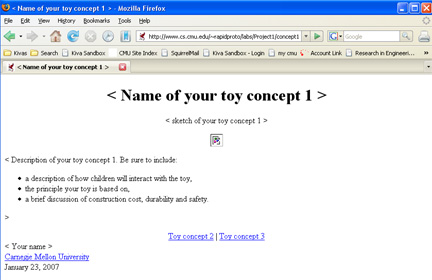
Using Dreamweaver to Make Web PagesIn this lab, you will learn how to create web pages using Dreamweaver. First, we will look at how HTML works, then we will use Dreamweaver to create web pages. Open the rapidproto folder that you made during the first part of this lab. You should see a folder called labs. Open this folder. Drag the folder Project1 to your desktop. 1. HTML: HyperText Markup LanguageNow, double click on concept1.html. The file should open in Firefox or whatever you have set as your default browser. Because of the way I inserted the images, you will probably have a missing image marker instead of a placeholder for the sketch of your toy concept. (We'll fix this later.) During this lab, you will personalize this file as you learn how to make web pages. 1.1 Viewing the sourceFrom Firefox, select View -> Page Source. (If you are using Internet Explorer, select View -> Source.) In the text window, you will see what is being displayed in the browser. Your page source window should contain the following information: <html> <head> <title>< Name of your toy concept 1 ></title> <body bgcolor="#FFFFFF" text="#000000" link=blue vlink=purple> <center> <h1>< Name of your toy concept 1 ></h1> </center> <center> <p>< sketch of your toy concept 1 ></p> <img src="file:///C:/WINDOWS/Desktop/cropped.gif"><p> </center> <p>< Description of your toy concept 1. Be sure to include: <ul> <li>a description of how children will interact with the toy,</li> <li>the principle your toy is based on,</li> <li>a brief discussion of construction cost, durability and safety.</li> </ul> ></p> <center> <a href="./concept2.html">Toy concept 2</a> | <a href="./concept3.html">Toy concept 3</a> </center> < Your name ><br> <a href="http://www.cmu.edu">Carnegie Mellon University<>a><br> January 23, 2007<br> </body> </html> Notice that the HTML file contains only text. HTML is a markup language; that is, it uses formatting tags to tell the browser how to display the text. <B> means start making the text bold. </b> means end making the text bold. <a href="http://www.cmu.edu"> means here is a hyperlink reference to a file stored on the server www.cmu.edu. When this text is selected, the browser starts up the hypertext transfer protocol (http) and finds this file on the World Wide Web using the URL (uniform resource locater). </A> marks the end of the text that is linked to the specified URL. 1.2 Relative Addresses - This is really important!Open concept2.html a new browser window. Notice that the sketch shows up in this page. View the source for the concept2.html page. Look at the html that links the image to the page. <img src="images/cropped.jpg" ><p> says display an image (<img>); the source file is "images/cropped.jpg" Notice that the source is just a file name. This means that when the page is loaded, the browser will look for the image file (cropped.jpg) in the folder images. This works since the file (concept2.html) and the folder (images) are stored in the same folder. The address "images/cropped.jpt" is relative to the address of the main file, concept2.html. In the concept1.html file, the link looks like: <p><img src="file:///C:/WINDOWS/Desktop/cropped.jpg" width="640" height="11"> The browser will look for the image file, cropped.jpg, on the desktop of the local c drive.� The second link won�t work if the page is accessed from a remote server, because it is highly unlikely that there is file called cropped.jpg on the local desktop.
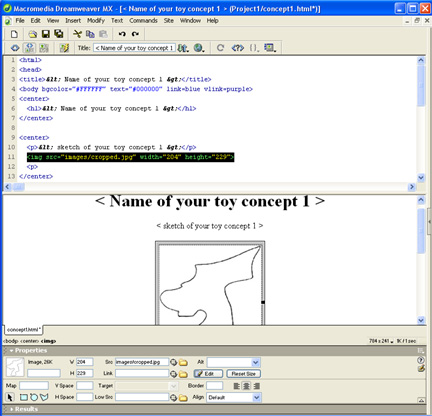
Therefore, when you make a web page, you need to know where your images are, and you need to make sure that the browser will have access to them. The easiest way to achieve this is to put all your images in one folder and put that folder in the same folder as your web pages. If you aren't used to making web pages, this may seem a little obscure, but we will come back to it at the end of the lab, because you need to understand this concept for your web pages to work for this class. Look at some of the other markers. <p> is a paragraph mark. <BR> is a line break. <center> means center text until a </center> is encountered. Notice how the < and > are displayed in the browser. Since the angle brackets tell the browser that a markup is starting, you can't put a bracket in the text without doing some work.� Also, HTML browsers ignore blanks spaces in HTML files, so if you want a blank space in your file, you have to use HTML is case insensitive. You can start bold text with <b> and end it with </B>. However, file systems are case sensitive. When you put file references into html, you must be sure that they are identical to the file names. You do not have to learn to write raw HTML code; however, sometimes, when your page isn't doing what you want, looking at the source file can help you figure out what's wrong. In addition, knowing that the images are not actually in the html file can help you understand why you need to copy images to the same folder as the source file. 2. Creating HTML files using DreamweaverOpen Dreamweaver from the Programs -> Desktop Publishing menu. Select File -> Open and open concept1.html. The file should look approximately the way it does in your browser. Take a few minutes to look through the menus and toolbars in Dreamweaver to get an idea of what you can do with this application. 2.1 Inserting linksIn Dreamweaver, select the text Carnegie Mellon University. In the format toolbar at the bottom of the Dreamweaver window, click on the folder icon at the end of the Link box: You will get a file dialog box. Notice that you can make a link to another file either on your computer or to a URL. If you make a link to a file, be sure that the location of the file is relative to the current document. We will enter the CMU URL (http://www.cmu.edu) in the URL: box. After you press OK, the text will be underlined - but if you put your mouse over the text, you will see it is not an active link that you can click on. Dreamweaver is an editor, not a browser. To see what your page will look like, save your file (File -> Save), then go to your browser and press the Refresh tool button. Check your link in the browser to be sure that you entered it correctly. If you didn't already have a browser open, you could select File -> Preview in Browser in Dreamweaver. Go back and look at the format toolbar at the bottom of the page.� Notice that you can select text and change its formatting using these tool buttons. 2.2 Inserting imagesNow let's fix the image which appears as a broken link.�Select the broken image icon in Dreamweaver. As soon as you select the image, the Properties panel at the bottom of the Dreamweaver window changes to show you the properties of the selected item. Click on the folder at the end of the Src box in the Properties panel. You will get a file dialog menu that lets you preview and select images. Notice at the bottom of the file dialog menu, you can see the name of the file that will be inserted. You can also select whether the file location should be relative to the current document or relative to the site root. Be sure the link is relative to the document. Navigate to the images folder, find an image file you want to insert, and then select it. The new image will replace the bad link.� To confirm that your image is inserted correctly, select View -> Code and Design. You will see both the preview of the web page and the code that is generating it. Check to be sure that the path for the image source is just the folder of images. With the image selected, look at the format toolbar. You can change how the image is aligned and the size of the box used to display the image. To see how the size works, in the format box, enter half the current height. Also note the box labeled Alt: Whatever you enter in this box is displayed when the image doesn't load. People working over slow connections often turn image loading off. They then selectively load images depending on the alt text. Browsers for people with impaired vision often read the alt text, and some browsers display the alt text when the mouse hovers over an image. So, you should always put a descriptive message in the alt box. To see what your web files look like to someone with poor vision or to someone who uses a page reader, download the free adesigner tool.
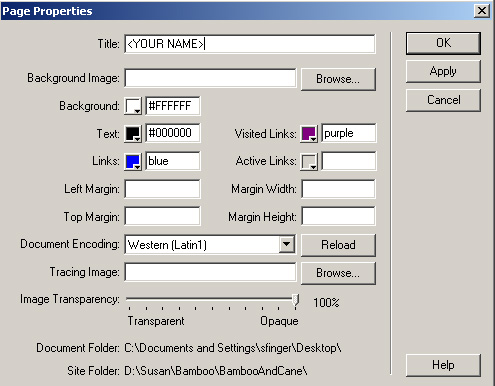
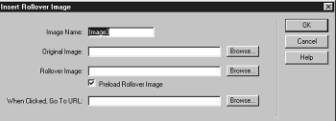
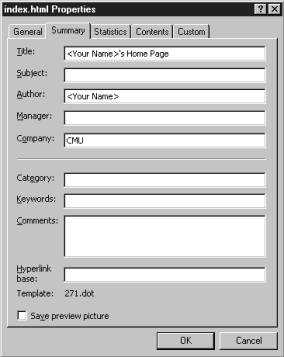
2.3 Viewing the sourceTo see what your html file looks like so far, save your file. Press the double bracket (< >) tool button (underneath the File pull down menu). The HTML code will appear in the editing window. Look at the HTML file and see what lines have been added since you last looked at your file in Notebook. To get back to the browser view, press the tool button with a picture surrounded by text. 2.4 Giving your page a titleWe have been using the tool buttons to make changes, but Dreamweaver also has pull down menus.� Most commands are available both in a toolbar and in a menu.� Select Modify -> Page Properties. You will get the following dialog box: In this dialog box, change the title of your page to your name and make the background color white (or some other color of your choice). You can also insert a background image, change the colors of the text, links, visited links etc. If you insert a background image, or change the background color, be sure that the text color contrasts highly with the background.� Each monitor is slightly different.� What looks cool on your computer may be unreadable on another. Note: What you see in the browser is approximately what your file will look like to someone else.� However, you should not become obsessive about getting the exact formatting or color shade.� Your page will not look the same on every computer for every browser.� Try looking at the same page in Netscape and in Internet Explorer.� My pages look different between Mozilla running on my Linux workstation and Mozilla running on my PC. 2.5 Rollover graphicsDreamweaver has many built in tools that will help you make interesting looking web pages (but you still have to supply interesting content). We will look at the tool that lets you create rollover graphics. You can explore the menus to find out how some of the other tools work. In an empty part of your file, select Insert-> Image Objects -> Rollover Image. While you have this menu open, look at the other kinds of objects you can work with in Dreamweaver. After you select the Rollover Image tool, you will get the following dialog box: Notice that you enter the paths for two files, the original image, which is displayed most of the time, and the rollover image, which is displayed when the mouse is over the image. Also, notice that you can specify another link or file to open when the image is clicked. For the regular image, browse to image67.gif. For the second image, browse to image67b.gif. Save the file. Go to explorer and press the refresh button. See if your rollover image works. 3. Checking for relative addressingWe will now test to be sure you have created a web page with relative addressing. Drag the Project1 folder to your My Documents folder. Double click on concept1.html. If the images are displayed correctly, your web page has relative addressing. Drag the images folder out of the Project1 folder onto your desktop. Reload concept1.html. All the image links should be broken because the browser can no longer find the image folder relative to the current page.
4. Creating your Project 1 web pagesPlease keep the folder structure and file names that I have given you. Also be sure to give each toy concept page a descriptive title. I have an emacs macro that goes through all your pages, pulls out the toy names from the page titles and links them into a table of all the class toy concepts. Be creative in the toys, not the file names or the folder structure. You need to create digital copies of your sketches. You can either scan them in or take a digital picture. If you don't have access to either of these, let me know. I have a scanner in my office and many of the department clusters have scanners. Once you have a digital image, you should use Photoshop, or similar application, to crop, clean up, and optimize the size of your file. (Photoshop has a "File -> Save for web" command that does a reasonable job of reducing the file size while maintaining the image quality.) Put all your images in the image folder before you start to make your web pages.Keep the Project1 folder in your local space until you are done with your web pages. Delete any extra files that are not referenced by your web pages. When you are done, move the Project1 folder to your folder in the class afs space. After you move your folder, substitute your andrewid in the following link: http://www.cs.cmu.edu/~rapidproto/students/<yourandrewid>/Project1/concept1.html Check to be sure that all your pages load correctly. If they don't, delete the folder from the afs space (keeping your local copy). Fix the errors locally, then move the folder back to the class space. Repeat this until everything works. Be sure that your toy concepts are explained well and that you have answered all the questions.5. Creating HTML files using Word (Undesirable)You can use Word to create simple web pages. I will show you how to do it because it is an application that you are all familiar with, but you should be aware that Word makes large, ugly HTML files and is limited in the number of HTML functions it provides. Word itself has many browser-like features built into it now. Start Word and open the file concept1.html. In the File Open window, select Files of Type: All Web pages: Notice that when you edit html files in Word that the menu bars a slightly different. 5.1 Inserting linksGo back to your file in Word. Highlight the text Carnegie Mellon University. Select Insert - Hyperlink. You will get the following dialog box. In the box for the link, type: http://www.cmu.edu (Even though some browsers do not require that you enter "http://" you should always enter a complete address so that your page will work no matter what browser someone is using.) Click OK. You now have a link. Click on the link. The default browser will start with the CMU homepage displayed. 5.2 Inserting graphicsYou already know how to insert graphics into a Word document. The clipart folders are sometimes omitted from the clusters because of the amount of space they take up, but you should find some sample images in your My Pictures folder. In Word, select Insert - Picture -> From File. When you single click on a file in the left-hand window, you will see a preview in the right-hand window. Pick a clip art picture to insert into your web page. 5.3 Saving as HTMLWhen you have a preliminary version of your web page, select File - Save as HTML. Don't worry if your page isn't done we aren't going to keep this version. If you look at the top of your Word window, you will see <YOUR NAME> is in the blue bar at the top of the window. This will be the title of your page on the web. To change the title, select File -> Properties. In the dialog box, you can enter a new, or more complete, title for your page in the Title box. After you press OK, the name at the top of your window will change. (You can also change the title in the Save As Web Page dialog box) Open concept1.html in explorer. It should look almost identical to what you see in Word.
|