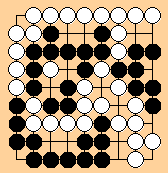
Diagram 1:

(B) Black corner group;
(W1, W2) Two adjacent white groups, so that Black can kill either while letting the other live (as in standard example, accompanying the rules and posted here several times);
(B1, B2) Two one-eyed black groups with 15 internal liberties each, adjacent to W1 and W2 respectively.
So the situation is that Black can choose whether to kill W1, letting W2 live, so that B2 dies, or to kill W2, with W1 living and B1 dying. White can force Black to make this choice by filling in the liberties of B1 or B2.
If the position is left like this at the end of the game, then all the stones are alive, so it is a big seki.
For B cannot be captured. If Black captures W1 (resp. W2), that enables White to play a new stone that can not be captured where B2 (resp. B1) is now. B1 cannot be captured, and so it is alive; B2 cannot be captured, and so it is alive. (White can guarantee to capture either B1 or B2, but that is irrelevant, as in the standard example from which this position derives.)
Although it is not a matter for the rules, it is of some interest to consider the correct play here. If Black captures W1, so that B2 dies (or captures W2, so that B1 dies) it works out that Black is 9 points worse off than leaving the position as a seki, so Black should not do this. If White starts filling the liberties of B1 or B2, I think Black need not carry out a capture until White has reduced the liberties to 3; White has lost 12 points, compared with Black's carrying out the capture immediately, because of the liberty-filling moves, so White is 3 points worse off than leaving the position as a seki. So both players should leave the position as it is.
Let me repeat that the previous paragraph is a matter for the players to decide during the game, not a matter of rules. (The most interesting position so far as the rules are concerned appears when White has reduced the liberties of B1 or B2 to 4. This is somewhat subtler than the initial position, but it still works out as a seki, and White has no better move than to continue reducing the liberties to 3 -- White has already lost more than 3 points in captures while filling the liberties, so having gone this far it is correct for White to continue.
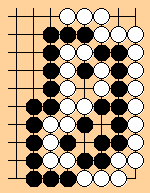
Diagram 2:

Lower left has
-
(W) White group in a dead bent-4 shape (bent 5, with black stones at both 1-2 points);
(B) Adjacent one-eyed black group with 15 internal liberties;
Elsewhere there are two large non-removable ko threats for White.
If the position is left as it is at the end of the game, the white group is dead and the black group is alive. The black group has plenty of liberties, so White cannot capture it before the corner group dies. As always -- the main point of the complication of the rules -- the external ko threat makes no difference, since during the resolution of life and death after the game one can not recapture a ko until one has passed (for that particular ko), so Black can carry through the capture of the white group, simply answering the would-be ko threats if White plays them.
The best play during the game -- again, this is not a matter for the rules -- is for White to fill the liberties of the black group. When it is down to 6 liberties, Black will have to carry out the capture of the corner. Now White _can_ use the external ko threats, since this is happening during the game; the ko, with the black and white groups both at stake, is slightly bigger than the ko threats, so Black should ignore the first ko threat and win the ko. Compared with leaving the position as it is, White is better off by the value of the ko threat and its followup, less 7 points because White has played 7 more extra stones than Black in the corner.
Diagram 3. Molasses ko
It was shown to me by T. Mark Hall and named by Fred Hansen in an article in the American Go Journal. Consider Ing rules. Is it a fighting ko or a balanced ko? Hansen got it from Andre Engels, who commented:
-
From:
Andre Engels <csg419@wing.rug.nl>
Subject: weird kos / news archives
Date: Fri, 28 Oct 1994 12:06:24 GMTIt's white's move.
White is in atari. The only way to do something about it is to take the ko [W1]. Now black is in atari, and since he does not want to play the ko (let's say neither player has sufficiently big ko-threats), he takes the 2 stones [B2]. White is in atari again, and takes the second part of the 2-stage-ko [W3]. Black has no good local move (black has no local move other than auto-atari in fact), so he tenukis [B4]. If white would tenuki also, black can take the ko, and will have a favorable 2-stage ko, so white throws in a stone in the 2-point hole [W5]. Black is in atari, and takes the ko [B6]. White is in atari, and takes 2 stones [W7]. Black is in atari, and takes the second stage of the ko [B8]. White plays tenuki, since he has no good move [W9]. Black throws in [B10], to avoid the unfavorable ko.
And now we're back at the beginning.
The strangest thing here is not that the series takes 10 moves, there are more ko-like situations that take more than 2 moves, but that during each cycle both players tenuki once. This, for one thing, means that under normal Japanese ko-rule or super-ko-rule the game will in fact carry on while the cycle is being played, each 'normal' move however needing 5 moves in total, during which 4 stones are captured. And one has to watch out that one's opponent does not suddenly have enough ko-threats. But in principle, the game could slowly (very slowly, and using very many stones) go on till the endgame, and after the last normal move has been played, the ko is still lying there.
Diagram 4. Triple hot stones