Lab 7: Investigating Single-Sign On with Tamper Chrome
In this lab we will investigate CMU’s single sign-on service using Tamper Chrome, a Chrome extension to let you intercede and see all requests that occur in your browser. The goal of today’s lab is to learn a bit about single sign-on services and get practice using Tamper Chrome.
CMU’s Single Sign-On
CMU makes use of a single sign-on (SSO) service to control access to all of its web applications. The CMU identity provider makes use of the Security Assertion Markup Language (SAML), a standard for SSO.
Take a moment to see how it works from a user’s perspective:
- Visit the CMU canvas website on your own. You can type in the URL if you’d like: canvas.cmu.edu
- If you were automatically taken to Canvas and didn’t need to login, then logout (Account -> Logout) and try again.
- Notice that after you visit the canvas URL, you are automatically redirected to a different service, login.cmu.edu.
- Go ahead and login as required.
- Notice that now you have been redirected back to canvas.cmu.edu automatically, but you are logged in.
- Logout. (Account -> Logout)
It is important to note that at no point did you send your username and password to canvas.cmu.edu. Instead, you only sent them to login.cmu.edu.
Intro to SAML
SAML is an SSO standard that is used to transmit a user’s identity from an identity provider (such as login.cmu.edu) to a service provider (such as Canvas). It does this without requiring the service provider to see the user’s login credentials, and without requiring the service provider and identity provider to directly communicate during authentication. All communication is actually routed through the user’s brower. For more details, visit this basic SAML tutorial.
The general workflow for authentication is as follows:
- The user connects to the service provider (SP) and requests access.
- The service provider generates an authentication request (SAML AuthNRequest) for the identity provider (IdP). The SP redirects the user’s browser to the IdP, and the redirect includes the AuthNRequest embedded within.
- The IdP authenticates the user using whatever means it wants. In the case of CMU it uses your AndrewID and password as well as DUO authentication.
- Once the user authenticates successfully, the IdP generates a response (SAML Response). The IdP redirects the user’s browser back to the SP, and the redirect includes the response embedded within. In CMU’s case, the response includes the AndrewID of the user that was successfully authenticated.
- The SP verifies the response and logs the user in as appropriate.
Observing SAML Using Tamper Chrome
Now that you know a bit about SAML, let’s use Tamper Chrome to analyze a login session.
Installation
The first step is to install Tamper Chrome.
- Install the Tamper Chrome Extension.
- Install the Tamper Chrome Application.
- Restart Chrome.
Configuration
Let’s configure Tamper Chrome and capture a SAML login session.
- In Tamper Chrome, open a new tab.
- Open the Chrome Developer Tools (Usually three dots -> More tools -> Developer tools)
- On the top menu bar in the window that appears choose the “Tamper” tab. (You may need to use the » arrows to see it.)
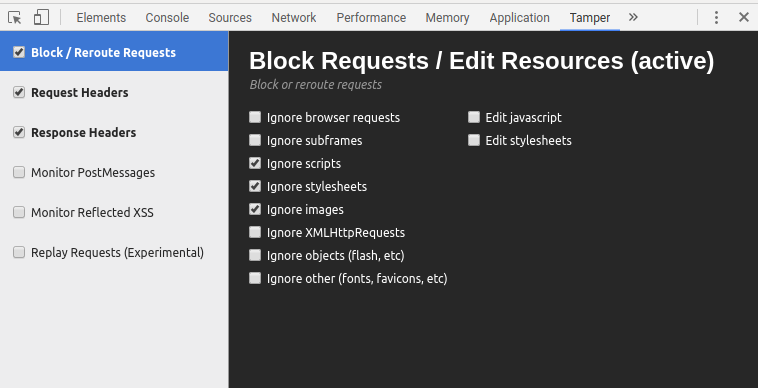
- Check the boxes next to “Block/Reroute Requests”, “Request Headers”, and “Response Headers”. Then, to make your life easier, in each of those menu areas also check “Ignore scripts”, “Ignore stylesheets”, and “Ignore images”. Here is a sample:
Intercepting a Login Session
Now that Tamper Chrome is enabled for that tab, you can proceed to connect to Canvas and login as usual. You’ll notice that Tamper Chrome intercepts every request/redirect and requires you to explicitly allow it. Use this opportunity to analyze the requests. You should try to find the SAML AuthNRequest and the SAML Response. They are base64 encoded, so they will look like strings of random characters. After you find them, save copies of both inside a text editor.
Warning: During the process your password will appear in one of the intercepted Tamper Chrome requests. So, don’t this with a friend looking on…
This process may take you some time. There is a lot going on during the process, most of which isn’t relevant to what we are studying today. Feel free to ask the instructor to verify if you’ve found the request and response.
Once you finish, you can close the tab. (Which should disable Tamper Chrome automatically.)
Analyzing the Request and Response
Now that you have the base64 encoded request and response, let’s decode them so you can take a look at them. Base64 is a standard for encoding binary data using printable characters.
- Check your Request and Response. They are likely URL encoded (look for %2d or other similar strings). If so, you need to decode them using the URL decoder under the Decoder table of TamperChrome.
- Visit the SAML Online Tools page. Under code/decode, choose Base64. Take your SAML Request and use their tool to base64 decode it. You should see the XML version of the request. Take a look at it. What sort of information does it contain?
- Use the same tool to decode the response. You’ll notice that instead of getting out a nice XML document, you get binary junk. That’s because the response was compressed before being encoded. Luckily, the SAML Online Tools have something else to handle this for you. Choose “Base 64 Decode + Inflate”. Use that to decode and decompress your response. The response is significantly more complex than the request. See if you can answer the following questions:
- What information is included?
- What steps are taken to prevent an adversary from forging a valid response?
- Where is the AndrewID?
- Advanced: Whose certificates are included? How can you decode them to inspect them?