
Goal:
Our main goal was to design and build a toy that not only appeals to children but also engages in their curiosity to learn
How to Build:
Tools needed: wood, tape, quarters, coat hangers, ping pong balls, string, drill, glue, cardboard boxes
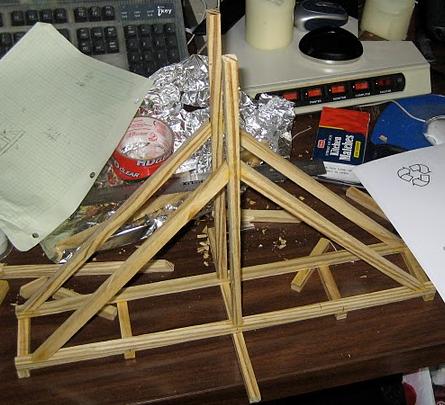
Most of the trebuchet consists of pieces of wood about 3/8 X 3/8 inches thick. These pieces of wood are attached by wood glue. The two main parts of the structure are the base and the arm. In the base, there are two vertical pieces of wood which have a hole (about 1/8 inch in diameter) drilled into the top part of each piece. In the arm, there are multiple holes drilled along one of its ends. The arm and base are connected by placing the arm between the two vertical pieces, aligning holes together, and sliding a piece of a coat hanger through them. The arm contains a clip that serves as a hook which is located at the very end of the arm (the end with the holes) and also a counterweight (made up of quarters wrapped up in electrical tape) which is located on the opposite end of the arm. The trebuchet launches a projectile, which is basically a ping pong ball attached to a piece of string containing multiple loops. The string is connected to the arm by placing one of the loops around the hook. Also, on the base, there is release mechanism connected at the bottom of the base, made up of a bent piece of a coat hanger.
Construction Process:
Prototype 1
This model centered around simplicity and ease of construction to prove that we could make a small scale working trebuchet.
It was made by using a 2x4 pine board as the base and screwing 2 vertical beams onto it to hold the throwing arm. The throwing arm was made from a small strip of wood with holes drilled along its length for adjustment. A counterweight was constructed from a soup can filled with rocks. This was made in less than 2 hours with available materials.
This allowed us to get a physical feel for the model and play with it. We decided that we could drop a few of the adjustable features to make it simpler for children to use.
Prototype 2
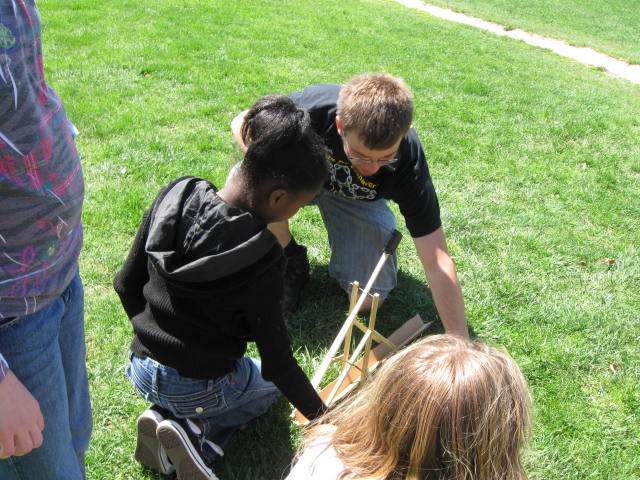
This model was made for children to test. It is created from wooden frame, glued together in the style of actual trebuchets. The throwing arm was of the same design, but had a fixed counterweight made of metal. The weight was adjusted by moving where the arm was attached to the base. Release pin angle was changed through a large clamp style paper clip. This model also had a hook that would hold back the armwhile the children loaded it.
We found that having to move the entire throwing arm when wanting to adjust the weight length was a bit too much for some children, who had issues with lining up the holes. We also found that we needed a better release mechanism.
Prototype 3
This uses the same base as the second iteration, but with a metal arm. The counterweight was a block of steel that we machined a slot in so it can slide over the arm. Holes were drilled in the block to put in pins to hold the weight on the arm and another hole was tapped to allow a lock screw to be added. The arm was made from 1/2" aluminum U-channel welded to an aluminum rod. A plare was added at the end for the connection of the release pin that would be bolted on.
How it Works:
The trebuchet launches the projectile as a result of the counterweight creating a moment about the point of rotation. The string is first attached to the hook. The arm is set so that the side connected to the string is directed downwards. While holding this side down, the arm is set by attaching the release mechanism to the arm. To release the ball, one must press down on the release mechanism. This allows for the arm to be free, causing the counterweight to go downwards while the other end moves upwards, launching the ball in the process.
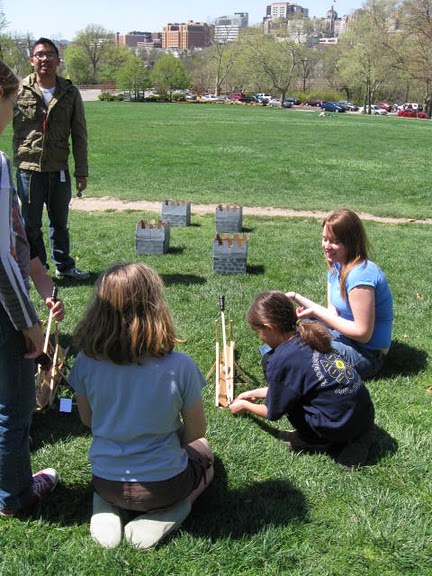
There are three aspects of the toy that can be manipulated: the length of the string, projectile hook to fulcrum length, and the sling hook angle. To change the length of the string, simply attach a different loop to the hook. To change the fulcrum length, pull out the coat hanger piece, choose a different hole in the arm and align it correctly, and then re-insert the coat hanger. To change the hook angle, just readjust the clip to a different position. Changing the settings of the trebuchet will affect the distance that the projectile travels. The ultimate goal of the toy is to manipulate these settings in order to aim and hit a target, in this case a small castle.
What We Learned:
We didn't learn much in the simple constrcution of the trebuchet. However, when the children came to do our activity, we found many of the kids neglected the castles and just played around with the trebuechet to try out the various settings. In retrospect. the game was not necessary and the children really just wanted to play around with launching things.