Building an Electric Motor
An activity designed for teachers who would like to demostrate, simply and cheaply, the basic concepts of electric motors. This activity is safe and affordable, and is suitable for children after the age of 8.
Background
Electromagnet
An electric motor is any kind of device that converts electrical energy (what
runs through the power lines), to mechanical energy (something that can turn
a wheel), usually by employing a concept called electromagnetism. When a coil
of insulated wire is coiled around an iron core, such as a nail, a strong magnetic
field is created that transforms the nail into a magnet. As you will see, when
the un-insulated parts of the coil you will make contact with the paper clips,
current flows through the coil, making the coil into an electromagnet.

(When attached to the battery and makes a full circuit)
Electric Motor
Since opposite signs of a magnet attract, the coil we will create tries to align
(line up) itself with the magnet that we will place on the side of the battery.

When the coil turns to face the magnet, the attraction is eliminated because,
as you will see, half of the insulation on one side of one of the wire leads
will be stripped; thus, current is not allowed to flow, and the coil does not
act like a magnet.

However, the coil continues to rotate because of the momentum it gained before (when it was magnetized).
When the coil finishes one full rotation, the cycle starts over again because the non-insulated part rotates, current flows, and the coild becomes magnetized and attractive to the stationary magnet.
How to Build an Electric Motor
Materials Required:
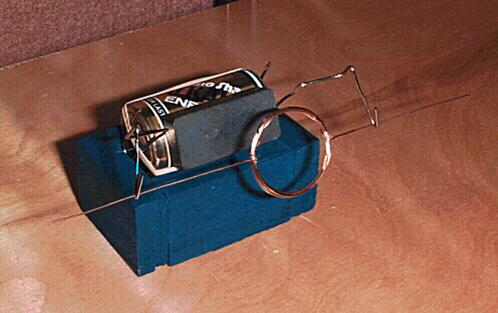
1 D Cell Alkaline Battery, or 4 AA batteries with a battery holder
1Wide Rubber Band
2 Large Paper Clips
1 Rectangular Ceramic Magnet
Heavy Gauge Magnet Wire (the kind with red enamel insulation, not plastic coated)
Optional: Glue, Small Block of Wood for Base, One Toilet Paper Tube (for
coiling the wire), Fine Sandpaper (for stripping red insulation)
Instructions:
1) Leave 3 inches from the end of the wire (for a tail) then start wrapping the wire around a toilet paper tube (or a size similar to that of a toilet paper tube's circumference). Wrap it 7 times around the toilet paper tube. Cut the wire, leaving another 3 inch tail on the opposite side of the original tail. Wrap the tails around the coil so the coil is held in place.
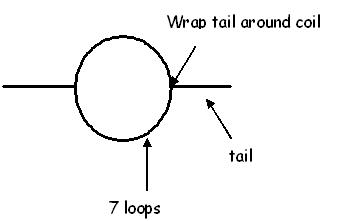
2) On one tail, use sandpaper or whatever's available to completely remove the insulation from the wire. Leave about 1/4" of insulation on the end and where the wire meets to coil. On the other tail, lay the coil down flat and lightly sand off the insulation from the top half of the wire only. Again, leave 1/4" of full insulation on the end and where the wire meets the coil.
3) Bend the 2 paper clips into the following position.

4) Use the rubber band to hold the paper clips on the 2 ends of the battery.
(the side that's longer goes on the battery end)
5) Put the magnet on the side of the battery where the paper clips are sticking out
6) Place the coil on the paper clip ends and watch.
If completed correctly, the coil should spin indefinitely. You may need to adjust the level of the paperclips so that it spins on a level surface.