| Viewing Diagnostic Reports |
When iSite has been integrated with your institution's RIS, the system provides access to diagnostic reports. These reports are stored in iSite and are linked to individual patient exams. In this scenario, iSite knows if a report is available or not. If a diagnostic report is present for a particular exam, the report button will be red. If not, the button will be gray.
At some institutions iSite Enterprise has not been integrated with the RIS and, instead, it must query a Reports Broker to see if a diagnostic report is available. When iSite is configured to work with a Reports Broker, all report buttons are white. To learn more about viewing diagnostic reports from a Reports Broker, see the Reports Broker section below.
![]()
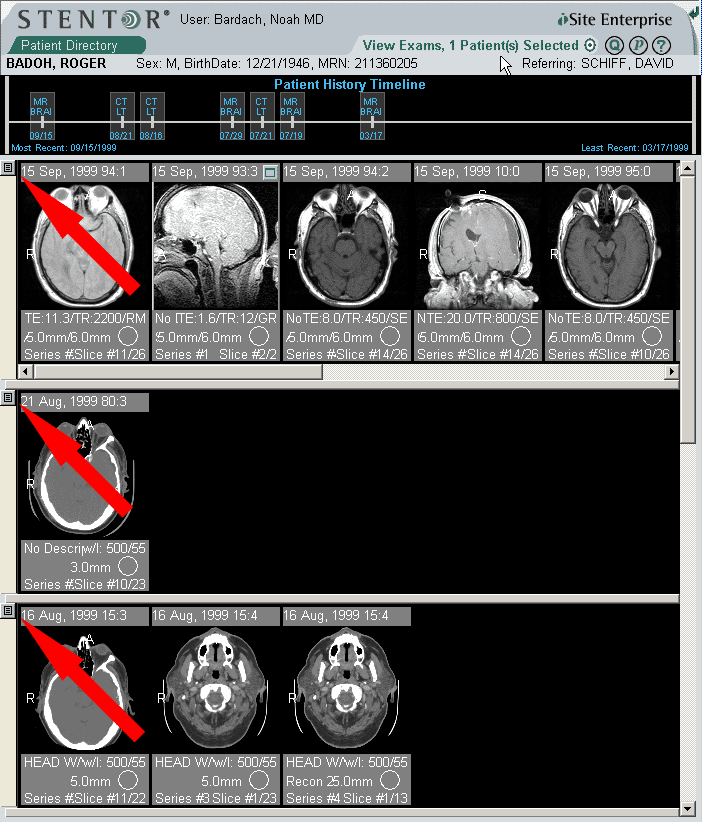
To view the report associated with a particular exam, click the small
rectangular button ( ![]() ) in the upper left-hand corner of that
exam-row as shown
below. Please note, if no report is available or if your institution does
not digitally archive its reports, the small rectangular button will NOT
appear.
) in the upper left-hand corner of that
exam-row as shown
below. Please note, if no report is available or if your institution does
not digitally archive its reports, the small rectangular button will NOT
appear.
This small button has two states, each one corresponding to the status of the
Diagnostic Report in question. When the button is red, as above, the Diagnostic
Report for the particular exam being viewed is available. When the button is
grey ( ![]() ), iSite has been unable to
perfectly match a report with the exam being viewed and will provide a summary
of diagnostic reports for the patient being viewed (see the Diagnostic
Reports Summary Window section below).
), iSite has been unable to
perfectly match a report with the exam being viewed and will provide a summary
of diagnostic reports for the patient being viewed (see the Diagnostic
Reports Summary Window section below).
When the Report Button is clicked, a pop-up window will open at left, displaying the exam's diagnostic report, if available.
The type of information provided in the report will vary from institution to institution. However, certain information, such as the the patient's name and ID number, will always be displayed when available.
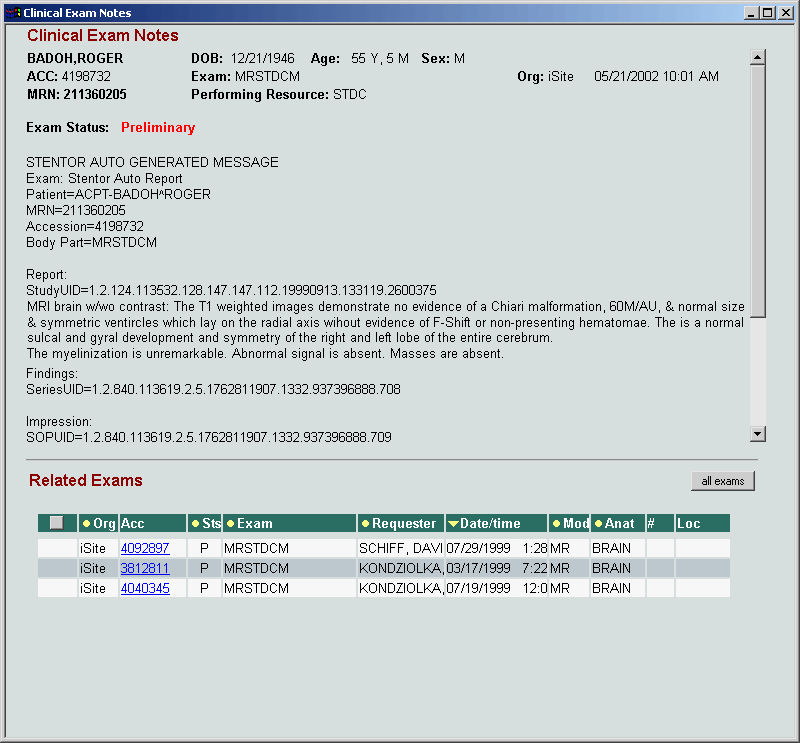
Navigate through the report using the scroll bar at right. There are several sections of information including the Report, Findings, Impression, participating radiologists' contact information, Diagnosis, History, Comments and the contact information of the Requesting and Attending Physicians.
If related exams are present on the iSite server, these will be listed below, as seen above. This list of exams is interactive. The list can be sorted by clicking a column head. An exam's report can be viewed by double-clicking that exam entry.
If you wish to view a list of all exams belonging to the patient in question click the "all exams" button. To toggle back to a list of only related exams, click the "related exams" button.
When you have finished reviewing the report, close the window by clicking the close button at upper-right.
Reports Broker (PACSBroker)
This section applies only to users who's institution employs a Reports Broker. You can tell this by looking at the color of the report buttons. If the buttons are white, as seen below, iSite is working with your institution's Reports Broker.

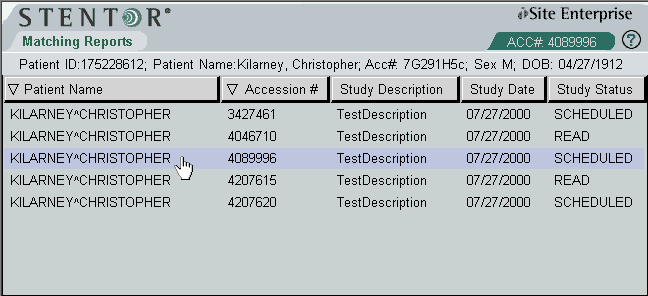
To see if a diagnostic report is present for a given exam, you must query the Reports Broker. Simply click the white button. iSite will query the Reports Broker for reports with matching patient information. The following screen will appear:

The window contains two separate areas, a Matching Reports tab where report listings are displayed, and the Open Report Tab, where the reports you have selected are viewed. Access either area by clicking on the tab. Please note that the Open Report Tab won't appear until you have selected a report to view, as seen in the image below.
If you have selected multiple reports, you can switch between them by right-clicking the Open Report Tab and selecting the desired report's ACC# from the list.
The window contains a list of all diagnostic reports found for the patient that you have been viewing. These reports are listed in descending order by study-date. The list can be sorted by clicking any of the column-headers. The arrow displayed in the sorted column header indicates whether the list is sorted in ascending or descending order. You can switch between ascending and descending order by clicking the sorted column-header. Please note that there is a chance that no matches will be found.
If the patient ID, exam date and accession number of one of the listed reports matches those of the exam that you were viewing, that report listing will be automatically highlighted. Still, in order to avoid viewing an erroneous report, it is recommended that you confirm that the report you are looking at matches the patient and images you are viewing.
To view the report you have chosen, you can simply double-click the listing. The following window will appear:
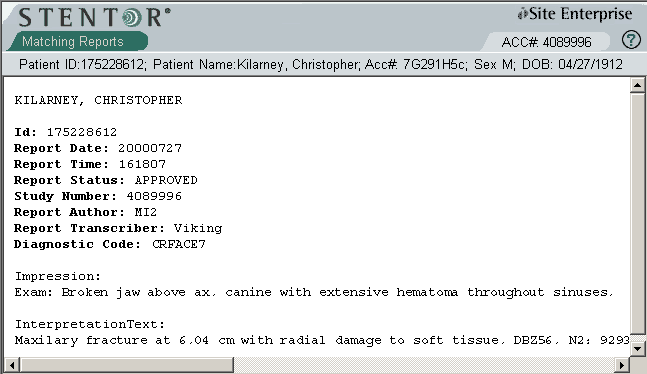
If you would like to view other reports, you can return to the Matching Reports Tab and double-click those listings as well. To switch back and forth between diagnostic reports that you have selected, simply right-click the Report tab and select the desired report.
The report can easily be printed, even if it cannot be seen in its entirety on the screen. Simply right-click the report and select "Print."
![]()