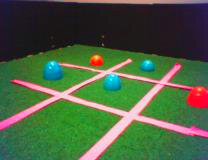
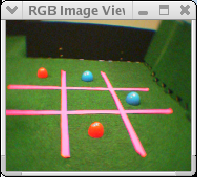
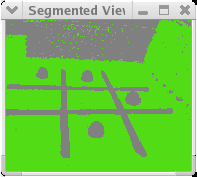
Exploring Tekkotsu Programming on Mobile Robots:

Color Image Segmentation: EasyTrain and EasierTrain

Prev: Vision
Up: Contents
Next: Blob detection

Contents: How it works, Collecting images, EasierTrain tool, Installing a threshold file, Testing the threshold file, Camera settings,, EasyTrain tool, Additional features, Advanced segmentation, References

How Segmentation Works

Color image segmentation simplifies the vision problem by assuming that objects are colored distinctively, and that only gross color differences matter. It therefore discards information about color and brightness variations that provides many valuable cues about the shapes and textures of 3D surfaces. But the resulting simplified (and impoverished) image can be processed very rapidly, which can be important in mobile robot applications. Using the CMVision package (see this IROS 2000 paper by James Bruce, Tucker Balch, and Manuela Veloso), the robot is able to perform color image segmentation at its full frame rate of 30 frames per second.

Robot camera image (YUV) Intensity information Color segmented image
converted and displayed as RGB (Y channel from YUV) eliminates texture, shading

Notice that the green carpet in the camera image at left has a grainy texture, and parts of it are in shadow while other parts are lit more directly. These distinctions have been eliminated from the color segmented image at right; every pixel recognized as "carpet" is the same shade of green. In fact, there are only five colors in the entire image: green, blue, orange, pink, and gray. The gray denotes "unclassified" pixels that don't match any of the other color classes.

The theory behind color image segmentation on the robot is nicely covered in lecture notes by Donald Spletzer at Lehigh (link). Here we focus on how to use this facility in Tekkotsu. Basically, you create a threshold file that specifies how color space should be divided up into a handful of color classes. This will depend on the specifics of the objects and lighting conditions of your application. For example, in some applications you may need to dstinguish between pink and red objects. In others, where an object you're using looks pink under bright light but red in lower light, you may wish to have only one color class for pinkish/reddish things.


Collecting Sample Images

In order to create the threshold file, you will need a set of sample images to run through the segmentation training tool. These should be images of the actual objects you want the robot to use, taken from the robot's camera, under whatever lighting conditions you expect to encounter in your application. You can collect these images using the ControllerGUI's Raw Cam function. But first, you will need to change some parameters of Raw Cam in order to get full camera resolution and avoid any loss of data. You can do this by typing commands in the "Send Input" box of the ControllerGUI, but this can be tedious if you have to do it more than once. We have instead created a ControllerGUI script called "Take Snapshots" to set these parameters automatically. It's listed in the scripts box in the lower right-hand corner of the ControllerGUI window. Here is how this was done:

How We Created the "Take Snapshots" Script

  1. Boot the robot, start Tekkotsu, and start up the ControllerGUI.

  2. Click on the "Add" button in the ControllerGUI to add a new script.

  3. In the dialog box, change the script Title to "Take Snapshots", and erase whatever text appears in the Commands box.

  4. Paste the following lines into the Commands box:

    !set vision.rawcam_interval=1000
    !set vision.rawcam_transport=tcp
    !set vision.rawcam_y_skip=1
    !set vision.rawcam_uv_skip=1
    !set vision.rawcam_compression=none
    

  5. Click on "Okay" to create the script. Its name will now appear in the Scripts menu in the ControllerGUI window.

Normally images are transmitted from the robot to the Raw Cam viewer at low resolution, and with JPEG compression, in order to achieve the maximum frame rate. And because errors and dropped pixels are tolerable in a video application, UDP is used as the transport mode. The above script changes all these parameters so that we can take pictures at maximum resolution, with no compression artifacts, and using the TCP protocol to prevent dropped pixels. The frame rate is dropped to 1 per second to minimize network load, since we're only interested in still images anyway.

You can execute the "Take Snapshots" script by double-clicking on it. Once this is done, you're ready to collect some sample images. You should include images of all (and only) the objects you want the robot to be able to recognize, and the lighting conditions should match those you expect the robot encounter.

Capturing Images

  1. Create a directory to hold the images you'll be storing.

  2. If the Raw Cam viewer is currently running, deactivate it by clicking on the ControllerGUI's Raw Cam button.

  3. Double click on the "Take Snapshots" script item to run the script.

  4. Open the Raw Cam viewer.

  5. If you're going to use the EasierTrain tool (recommended), skip this step, but for EasyTrain, change the display mode from RGB to YUV by clicking on the YUV button in the Raw Cam window. This will make all the colors look funny, but turning off RGB conversion provides more accurate color data for constructing the threshold file, since the robot camera sends YUV images.

  6. Use the Head Controller to point the camera at your sample objects.

  7. Click the Freeze Frame button. The button below should change its name from "Save Image Sequence" to "Save Image". This is very important: if you don't freeze the frame, you'll end up storing a whole sequence of images, which will fill the directory with lots of files.

  8. Click the Save Image button. Store the image in the directory you created. You can use any name you like, but the extension should be ".PNG". Do not use ".JPG" because JPEG compression will introduce undesirable artifacts.

  9. Click the Unfreeze button, move the camera or the objects, and repeat the above two steps to freeze the frame again and take your next image. Repeat as desired.

  10. Before shutting down, take a look at the images you stored. On Linux you can do this with a program such as "display" or "gimp". On Windows machines or Macs, go to the folder and double click on the filenames.

Explore more:

  1. Create a script called "Take Realtime" that undoes the effects of the "Take Snapshots" script. It should set the rawcam interval to 0 msec (maximum frame rate), the transport mode to UDP, the y and uv skips to 2 (half resolution), and the compression to "jpeg".

  2. After restoring the rawcam settings to their default values, try experimenting with different values of rawcam_y_skip while observing the image in the Raw Cam viewer. Legal values are integers between 1 and 5, with 1 meaning full resolution, and 5 meaning 1/32 resolution (2 to the 5th power).

  3. With rawcam_y_skip set to 1, try experimenting with different values of rawcam_uv_skip. How do the effects of changing the color (uv) resolution differ from changing the intensity (y) resolution?


The EasierTrain Tool

EasierTrain is a tool for quickly training a color segmenter. It was developed by Michael Gram and Nathan Heithoff at Rensellaer Polytechnic Institute. It segments the training images automatically and only requires the user to label regions with their correct colors. The segmentation can be modified by adjusting a threshold slider.

Running EasyierTrain

  1. Collect some training images as PNG or JPG files and place them in a directory that contains nothing else, e.g., ~/myimages.

  2. Create a fresh directory to hold the color name and threshold files that will be created by EasierTrain. Since you might want to experiment with multiple versions of the segmentation settings, use a name like ~/seg1 for the first version.

  3. To start EasierTrain, type:
    cd ~/seg1
    ~/Tekkotsu/tools/EasierTrain ~/myimages
    

  4. Choose the first color you want to train. Click on a region in the image, and the corresponding region in the segment outline should assume that color.

  5. Shift-click on additional regions that belong in the same color class. You don't have to click on all of them, just a representative sample.

  6. Control-click to deselect a region if it was selected by accident.

  7. Use the Next and Prev buttons to cycle through all the images in your images directory so you can select representative regions of the current color from these images as well.

  8. When you've selected all the regions you want to use, click on the Add button to create the color class, and then set its name in the Palette window.

  9. Click the Save button to save your work.

  10. Choose a new color class and click (not Shift-click) on the first region to begin defining it.

  11. When done, click Save and then Quit to exit.


Installing a Threshold File

EasierTrain stored three files named default.tm, default.col, and default.et. The .tm file is a binary file that describes which color class each pixel of color space falls into. The .col file defines the names of the color classes and the representative RGB value for each class, used to display segmented images in the Seg Cam viewer. The .et file records the regions selected from the training images to define the color classes, and is only used by EasierTrain, not by Tekkotsu.

In order to use your new threshold settings, you must install the .tm and .col files on the robot. You should start by renaming them to something other than "default".

Threshold File Installation Procedure

  1. Let's assume that you've renamed your threshold file to called mygame.tm. Copy the mygame.tm and mygame.col files into your project/ms/config directory. You can copy the mygame.et file there too, to keep all three together.

  2. Edit the project/ms/config/tekkotsu.xml file to tell the robot to use the new threshold and color name files. You can check what files the robot is using by going to Root Menu > File Access > Tekkotsu Configuration. From the edit menu, select "vision". Then, check the "colors=" entry to see the current .col file, and click on "thresh" to see the current threshold file. Do not click on "Save" to save the configuration file, because that will erase all the comments in the file and leave it in a not very readable state.

  3. Use the "getmyfile" script on the robot or "sendmyfile" script on yuor workstation to copy your modified tekkotsu.xml onto the robot in the project/ms/config directory.


Testing the Threshold file

To try out your threshold file on the robot, kill and restart the ControllerGUI. Then run Tekkotsu and call up the Seg Cam viewer. If the segmentation results are not what you wanted, save some more sample images, and use them to go back and adjust the threshold file until the results are to your liking.


Adjusting the Camera Settings

The robot's camera has software-adjustable gain and shutter speed settings. You can experiment with them using the Tekkotsu console. Type "set Drivers.Camera" to see a list of current camera setings. The settings available depend on the kind of robot you are using. In general, higher gain will brighten the image but also increase the noise level. Choosing a slower shutter speed will also brighten the image, but at a cost of increased motion blur.

Explore more:

  1. Call up the Raw Cam viewer and try changing some camera parameters to observe their effects. You can check motion blur by waving your hand in front of the camera.

  2. How do these parameter changes affect the Seg Cam image?


The EasyTrain Tool

The EasyTrain tool is more complex than EasierTrain, but gives you greater control over the segmentation. It uses five windows, as shown below. The Control window allows you to define new color clases, and save the collection of color classes in a file. The Color Spectrum window displays every pixel from every training image in a two-dimensional color space with hue along the horizontal axis and intensity along the vertical. The RGB Image View window displays the raw camera image; this is always displayed in RGB format so it looks normal to our eyes, even though the data is actually encoded in YUV space. The Segmented Image View window shows how the image would be segmented by the robot given the current set of color class definitions. Finally, the Thumbnails window displays thumbnail versions of all your sample images, so you can switch images by clicking on a thumbnail. You can also use the arrow keys in any window to move between images.


In the example above, the user has defined a new color class named "green", and circled the corresponding region of color space in the Color Spectrum window.

Running EasyTrain

  1. EasyTrain must be run from the directory containing the code. So to begin, cd to the directory Tekkotsu/tools/easytrain.

  2. Assuming your sample images are in the directory /tmp/mypics, type the following to invoke EasyTrain:

    java EasyTrain -isYUV /tmp/mypics/*.png
    

  3. Use the arrow keys or the thumbnail window to navigate through your images.

  4. When you're ready to define a new color class, click on "<add new>" in the Control window, and type in the new color class name.

  5. In the Color Spectrum window, click and drag the mouse to encircle a region in color space. Note the results in the Segmented View window.

  6. If you don't like the region you drew, you can just draw another one and it will replace the original. You can also click on the Undo button or type ^Z (control-Z) to undo the click and drag. If you're mostly happy with the region but want to add or subtract a little bit, you can do that by holding down the shift key (to add) or the control key (to subtract).

  7. Repeat the process to define all the color classes you need. Use the arrow keys to check the segmentation of your sample images. To go back and modify a previously-defined color class, click on the name in the Control window.

  8. When you're done, click on the Save button and specify a directory and filename for your threshold file. Don't bother supplying an extension. EasyTrain will actually store three separate files, and it supplies the extensions automatically.

  9. Click on the Quit button to exit. If you want to make further modifications later, run EasyTrain again and use the Load button to reload your threshold file.


Additional Features of EasyTrain

Examining individual pixels: If you move the mouse around in the RGB Image you will see the cursor is a black cross-hairs symbol. If you move the mouse in the Segmented Image the cursor is a black arrow. At the same time, a little white box cursor will appear in whichever of these two windows the mouse is not presently in. This allows you to match any segmented pixel against the corresponding raw pixel. And another white box cursor can be seen in the Color Spectrum window, indicating where that pixel falls in color space.

Keyboard commands: Ctrl-Z is "undo". Ctrl-Shift-Z is "redo". Ctrl-A is "select all", and Ctrl-D is "clear selection". Window scaling: "+" to enlarge, "-" to shrink, and "=" to return to normal size (equal to the image resolution.) The arrow keys move between images.

Other image formats: Although it's best to run EasyTrain on YUV images in PNG format, it is possible to use other formats. You can use JPEG images, although these are not preferred due to the possibility of compression artifacts changing the color values. Also, you can use RGB images instead of YUV, by substituting the -isRGB switch when EasyTrain is invoked. You cannot mix YUV and RGB images in the same run.

Selecting image regions: For difficult segmentation problems, it may be desirable to focus on just a subset of the pixels in your training image. You can do this by clicking and dragging in the RGB Image View window to select regions of interest. Once you do that, only pixels that fall within these regions will be displayed in the Color Spectrum window. (To view all pixels again, turn on the "all pixels" checkbox in the Control window.) You can define as many regions of interest as you like, for for each color within each image. The region information is stored in a .areas file associated with each image, e.g., for img001.png and threshold file "mygame", the .areas file would be called img001-mygame.areas.

If you're using an AIBO, one thing you'll notice about the ERS-7's camera is that there is noticeable chromatic aberration in the form of a bluish tinge visible in the corners of the image. This makes color segmentation harder than on earlier AIBO models.

Realtime mode: If you turn on the "Realtime" checkbox in the Control window, EasyTrain will continually resegment the image as you draw new polygons in the Color Spectrum window. This is computationally expensive, so you won't want to do it on a slow computer. But it can be useful if you are trying to correct a segmentation problem by making small additions or deletions to the polygon defining a color class.


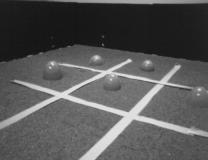
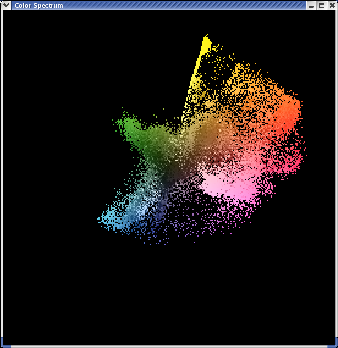
Using other color spaces: The Color Spectrum window normally displays data in HSB (Hue, Saturation, and Brightness) space, but you can use other color spaces if you prefer. The available choices are: YUV, HSB, rg, xy, and Lab. For a little more information about these spaces, see the help file (click on the Help button in the Control window); for a lot more info, see the FAQ by Charles Poynton below.

At right are the pixels from the sample images we used before, but redisplayed in YUV space.

You can do color segmentation in any color space, but EasyTrain cannot translate the polygons you draw in one color space into another space. So if you define some color classes and then switch to a different color space, the program displays a warning that the previous color selection information will be lost.


Advanced Segmentation Techniques

The 7general.tm threshold file created for the AIBO ERS-7 provides noticeably better segmentation than what can be achieved with the single color space approach. Here is how 7general.tm was created: a collection of images were classified in each of HSB, xy, and YUV color spaces. The EasyTrain color specification files for each of these spaces are provided in project/ms/config/eastryn/*.spc. (The corresponding threshold files can be regenerated by loading each of the .spc files into EasyTrain and then clicking 'Save' within the GUI.)

Each of these color spaces gives pretty good results on its own, but as a post-processing step, the Vote tool (Tekkotsu/tools/seg/Vote.java) was used to combine their results into a single threshold file, which yields the 7general.tm you see in ms/config., e.g.:

$ cd Tekkotsu/tools/seg
$ java Vote  /path/to/7gen-*.tm  ../../project/ms/config/7general.tm


References

Prev: Vision
Up: Contents
Next: Blob detection


Last modified: Sun Jan 23 23:45:47 EST 2011