NAO Software 1.12 documentation

Home | Site map | Index
« previous | up | next »

Menus, Panels and Toolbar in a glance

Main window

At startup, the following interface is displayed.

../../_images/chore_main.png

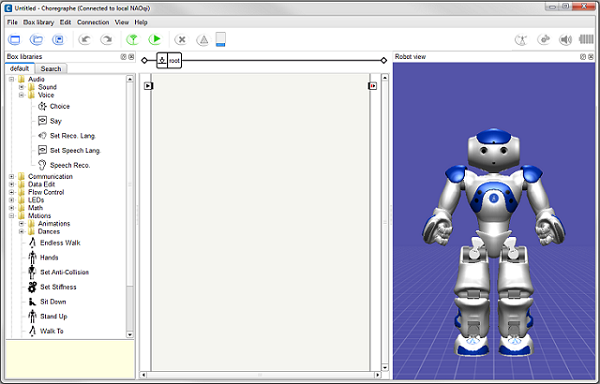
This interface contains a menu bar, a toolbar and several panels.

Panels

By default, 3 panels are displayed:

  1. The Box libraries panel
  2. The What is the Flow Diagram panel
  3. The Robot 3D view
../../_images/chore_interface.png

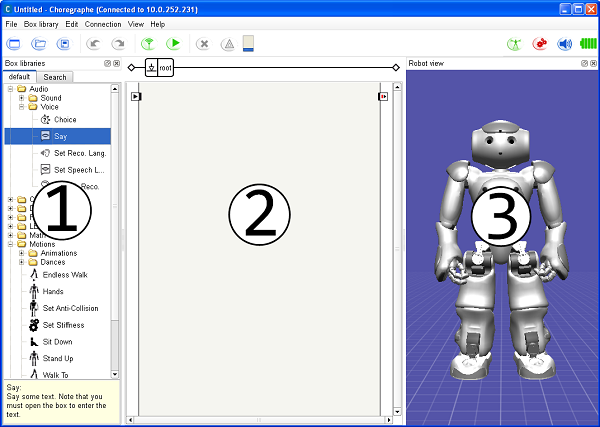
You can move any panel by clicking on the title of the panel and drag and drop it onto the desired location.

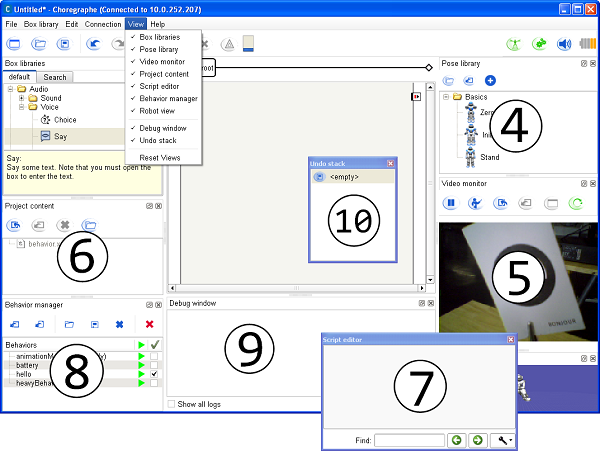
You can find more advanced panels in the View menu:

  1. The Pose Library panel
  2. The Video Monitor panel
  3. The Project content panel
  4. The Script Editor panel
  5. The Behavior Manager panel
  6. The Debug window
  7. The Undo stack panel
../../_images/chore_interface_advanced.png

Menu Bar

File menu
This menu enables you to create, open, save and import a Project. You can also exit the application through this menu.
Box library menu
This menu enables you to create, open, close and save box libraries.
Edit menu
This menu enables you to undo and redo last actions made in the diagram. You can also access to the preferences of the application through this menu. For further details, see the Choregraphe Preferences section.
Connection menu

This menu enables you to connect to and disconnect from a robot. For further details, see the Connection widget section.

Once you are connected to a robot, you can also:

  • play and stop the opened behavior.
  • display or hide the Debug window when an error occurs in the behavior.
  • transfer files between your computer and your robot. For further details, see the How to download and upload file on NAO section.
  • update NAO’s system (in Connection > Advanced) with a new version of its software. For further details, see the How to update NAO system section.
View menu
This menu enables you to manage the displayed panels. Indeed in this menu you can select the ones you want to hide or display, and even reset your workspace layout to default (i.e. only displaying the Box Library panel, the Flow Diagram panel and the Robot 3D view).
Help menu
This menu enables you to see the statistics of the current behavior (number of boxes, number of lines, etc) and to access to the general documentation, the documentation about Choregraphe and the API reference. You can also get some information about the version of Choregraphe you are currently using through this menu.

Toolbar

../../_images/chore_full_toolbar.png

The buttons of the toolbar below the menu bar are shortcuts to actions that you will often need while creating behaviors in Choregraphe.

Button(s) Function
../../_images/chore_bluebuttons.png Create, open and save a project.
../../_images/undo_redo_buttons.png Undo and redo last actions made in the diagram.
../../_images/chore_greenbuttons.png

Connect to a robot, play and stop the opened behavior.

For more information about the connection, see the section about the Connection widget.

../../_images/chore_yellowbutton.png See the warnings and the errors that can occurs during the execution of your behavior.
../../_images/chore_blue_indicator.png ../../_images/loading_indicator_grey.png ../../_images/loading_indicator_blue.png

Progress bar that indicates the behavior loading when you click on Play. This indicator can be:

  • Mainly grey: the behavior is not loaded.
  • Moving up and down: the behavior is loading.
  • Blue: the behavior is loaded.
../../_images/animation_mode_button_green.png ../../_images/animation_mode_button_orange.png ../../_images/animation_mode_button_red.png

Activate / deactivate the animation mode which enables you to easily manipulate the robot and store its position (For more information, see How to use animation mode). This button can be:

  • Green: the animation mode is deactivated.
  • Orange: intermediate state where the animation mode is either loading or unloading.
  • Red: the animation mode is activated.
../../_images/chore_asserv_button.png ../../_images/stiffness_button_orange.png ../../_images/stiffness_button_red.png

Set on/off the stiffness of all the joints of the robot. This button can be:

  • Green: no joint is stiffened, the robot doesn’t move.
  • Orange: intermediate state depending on the stiffness value.
  • Red: all the joints are stiffened, the robot is able to move.
../../_images/volume_button.png Enables you to set the volume of NAO’s speakers.
../../_images/battery_level_green.png ../../_images/battery_level_orange.png ../../_images/battery_level_red.png

Indicate the level of NAO’s battery. This indicator can be:

  • Green: the level of the battery is almost at its maximum.
  • Orange: the level of the battery is medium.
  • Red: the level of the battery is very low and your robot is going to shutdown in few minutes if you do not plug it in.
« Your first steps in Choregraphe | Getting started | Box libraries panel »

Quick search

Enter search terms or a module, class or function name.

  • Show Source

Table Of Contents

  • Site map
  • Release notes - 1.12
  • NAO
  • Software
    • Software Requirements
    • Choregraphe overview
    • Monitor
    • NAOsim
    • NAOFlasher
    • Choregraphe User Guide
      • Getting started
        • Your first steps in Choregraphe
        • Menus, Panels and Toolbar in a glance
        • Box libraries panel
        • Flow Diagram Panel
        • Robot 3D view
        • Connection widget
      • Mastering the main objects
      • Advanced panels
      • How to ...
      • Customizing Choregraphe
      • Debugging
      • Choregraphe Tutorials
      • Troubleshooting
  • Programming Guide
  • References
  • Glossary
  • Legal notices

On this page

  • Menus, Panels and Toolbar in a glance
    • Main window
    • Panels
    • Menu Bar
    • Toolbar
« previous | up | next »