Assigned: Monday, January 13, 2020,
Due: Monday, January 27, 2020 at 1:30pm.
See the homework policies, especially the late policy.
The first homework in this course will be to implement a node drawing editor using any libraries you want in Java or JavaScript. There are fairly strict requirements that the editor must meet, plus some optional features. In the rest of the homeworks in this course, you will be designing and implementing a toolkit, but this first assignment is aimed at using and evaluating existing GUI toolkits.
You can use any tookit, framework or library for this assignment, and any example code you can find, as long as it isn't an exact implementation of this benchmark. If you are concerned that code you find makes the assignment "too easy", please ask the professor. I anticipate that you should need to write about 300 to 800 "lines of code" (more on what that means below).
While you are implementing the Node Editor, you will need to keep track of your activities and progress, so you can write a report, which you will turn in along with your implementation. See the description below for what needs to be in the report.
1. Select a Language, IDE and Toolkit
The first step is for you to pick a programming language to use. The language must be either Java or JavaScript, since those are the languages you can choose from in the rest of the course.
Then you need to pick how you are going to develope your code, which usually involves an Integrated Development Environment (IDE). If you are programming in Java, you need to either use Eclipse or IntelliJ or Visual Studio Code (VS code). If you are using JavaScript, then you might want to use VS Code, but whatever else you want to use for JavaScript is fine. For JavaScript, your code must work on Chrome, which is the browser that I will be grading with. Whatever your tool, you might need to download and install various plugins to make it work better - be sure to keep track of what you install so you can report them in your report.
Then, you need to select one or more toolkits in that language to use. For example, for Java, a good choice would be Swing, but you could also use awt or swt. Or you can choose to use the lower-level graphics2D mechanisms. You cannot use Android because I need to run your code on my PC (without needing to install an Android simulator).
In JavaScript, there are many more choices. I used html+CSS+SVG, and the library svg.js from https://svgjs.com/docs/3.0/. You could also (or instead) use jquery, angularJS, constraintJS, and/or ReactJS, and any others. I do not recommend trying to use a raw html Canvas and just writing code to draw on the Canvas, because that will be a lot more difficult.
New! If you use ReactJS or other library that requires a server side (nodeJS) or other special configuration, be sure to provide complete instructions for how I should install the libraries and run your system.
You only have two weeks to do this assignment, so you should probably pick tools that you already know, if possible.
The assignment will be graded out of 100. The implementation will be 85 points and the report will be 15 points. Any extra credit will be added onto that. In addition to checking whether your implementation meets the requirements, I will also be checking on the usability of your implementation, so keep that in mind as well.
Note that this assignment uses "box" and "node" interchangeably.
2. Requirements for the Editor
This section provides the detailed requirements for the what the node editor must do. An example is shown below in Figure 1. Section 3 below lists additional optional requirements that you can meet for extra credit.
Before you start, be sure to see the what you need to keep track of in Section 4 while you are doing the assignment.
- You are creating an editor for drawing boxes. The boxes can optionally be rounded rectangles, like in the figures, or just regular rectangles.
- The user must be able to draw new boxes, where the user can drag out the desired size of new boxes. The specific interaction technique for dragging out the size of the new box is up to you.
- Each box must have its name centered at the top. The names are just "Box n" where the "n" is a monotonically increasing number. If boxes are deleted (see requirement 10), you should not reuse that number (note that "Box 2" was deleted from Figure 1).
- There should be a way for the user to select among at least 4 different outline styles. For example, Figure 1 shows a menu of 4 line-styles at the left. It should be clear which line style is selected -- Figure 1 uses an outline around the current style. It is fine to use built-in widgets or your own widget for this, and the design is up to you.
- When the user creates a new box, it should use the currently-selected line style. For example, in Figure 1, Box 6 was just drawn using the thickest line style (which is the currently selected line style).
- All the boxes should be filled with white (not see-through). Note that Box 3 in Figure 1 hides the overlapped parts of Box 1.
- Newly created boxes should be on top of all older boxes. So Box 5 is on top of Boxes 1 through 4, but below Box 6.
- The user should be able to select a box by clicking on it.
- The currently selected box must be shown in some way, which is up to you. For example, you could change the color of the outline or fill style, or, optionally (see below), display selection handles on the selected box (see Figure 2).
- The line style menu should change to show the line style of the selected box. For example, if the user selected Box 3 in Figure 1, the line style menu at the left should change to have the dashed line be selected.
- There should be a way to move the selected box. Obviously, its label should move with it.
- There should be a way to delete the selected box. Figure 1 shows an html button at the bottom left, whose action is to delete the selected box, but you can use any interaction technique you want. Box 2 was deleted in Figure 1.
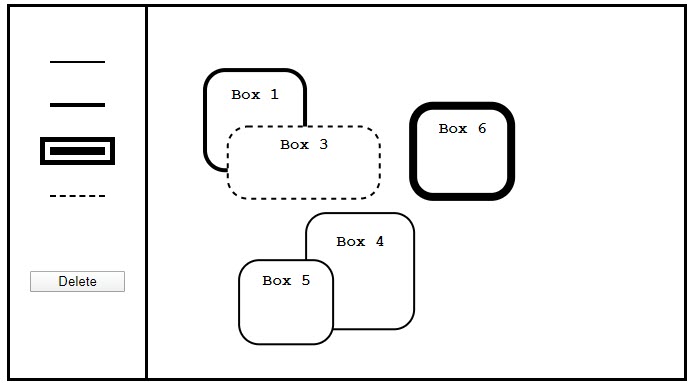
Figure 1: A possible solution for the required part of homework 1. No boxes are selected in this screen shot.
3. Optional (Extra Credit)
Here are some extra features you can add for extra credit, with the number of possible extra points for each.
- Provide a way for users to select the color of the fill style (instead of white) and/or of the outline (instead of black). -- up to +2 extra points
- Provide selection handles, as in Figure 2, to show which box is selected. -- up to +5
- Provide a way for users to resize a box. -- up to +5
- If you provide both selection handles, and have resizing work appropriately from each handle, that would be an additional +2 points (+12 total).
- Provide various other operations, such as bring-to-top or bottom, undo, etc. -- up to +5

Figure 2: Optional selection handles. Box 3 is selected, and the user is about to resize it from the rightmost selection handle, which is shown with solid black as feedback.
4. Keep Track
Before starting and while you are doing this assignment, you will need to keep track of a variety of things, as described here. This will be valuable in evaluating the quality and difficulties of using the tools you selected. All of the answers to these questions will go into your final report. You might consider this like keeping a diary during your work.
- Which language and toolkits did you decide to use?
- What specific versions of the language and toolkits, if that makes sense (otherwise, just say "the current version")? Please give a URL if it is a less-known toolkit.
- Whether these tools were ones you had used in the past, or new to you. If new, are they similar to tools you previously used?
- What IDE or other tools you use for code editing, debugging, etc.? Again, please give the version and URLs if it isn't obvious.
- Be sure to keep track of what plugins you add to your IDE to make it work better for you, List the name and version of each plugin, a few words about what it is for if it isn't obvious from the name, and a URL if appropriate for where you got it from.
- How much time did you spend doing various activities doing the homework? Please try to be quite accurate in timing how long each activity takes.
Here are some specific activities to keep track of:
- Time for reading the documentation for the tools before you got started with coding. (This might be zero if you already knew the tools, and just started designing.) Please break this down by tool, to the extent possible. For example, time learning about the editor, separate from time learning about a toolkit.
- Time thinking about the design.
- Time actually typing in the code.
- Time using the documentation or other web sources to look up things and figure out how to do things while you were coding.
- Time debugging the code to make it work.
- Time on other activities (what?).
- What specific references you used to learn about the tool (names of websites, books or manuals, on-line documentation, etc.)? Be sure to include complete references such as the full URLs. However, you do not need to list every Stack Overflow page you used, but instead just note the general sources. If you find a blog post or article that is helpful, please do include its full name and URL.
-
The amount of code you wrote to make this assignment work.
-
For example, the number of lines of Java or JavaScript code, plus the number of lines of html and CSS code that you wrote.
- Count only actual code lines - not comments or whitespace.
- Most IDEs have a line count mechanism, or a plugin. For example, I used LineCount 0.1.7 for Visual Studio code: https://marketplace.visualstudio.com/items?itemName=yycalm.linecount
- If you use a tool that generates code (such as a GUI builder or resource editor), note separately how many lines it generated for you.
- Do not include the lines of code in libraries you use but did not write. For example, if you use svg.js, do not include the lines in that file in your count.
-
For example, the number of lines of Java or JavaScript code, plus the number of lines of html and CSS code that you wrote.
5. Write a Report
In addition to turning in the code of your implementation, you will also need to write a small report and turn it in. The report needs to be in pdf or Microsoft Word format. I will make comments on your report using the "comment" feature of those formats.
The report will have 3 main sections:
- A user manual - how to draw, move, resize, change line style, delete, etc. in your editor. Be sure to describe anything extra that you implemented. This can be just a few sentences, since there isn't much to describe.
- All the information from the "Keep Track" section above. You will lose points if any of the requested information is missing. However, this doesn't need to be very long since most questions can have very short answers, sometimes just a number.
- A short discussion about how hard this assignment was. What was easy and hard to implement from the specification, and why? What did you learn new for this assignment that you hadn't used before? What was hard and easy to learn about how to do things and why (if you already knew the tool, then say that and also try to remember back when you didn't). What is your evaluation of the tools you used? If any of your numbers from 5-2 are interesting, you should explain why. I expect this part to be about a paragraph or two, but you will get extra credit for a longer and more thoughtful evaluation and discussion.
Please name your report: HW1-lastname-firstname-report.xxx, for example: HW1-myers-brad-report.pdf.
6. Turn in
Zip up all of the files for your implementation, including all source code, pictures, any binaries, etc. Be sure all the files needed by the code are there. For html+JavaScript, be sure all references are relative so that the project will work on my machine. For Java, include all the project so I can import it into the IDE. This will include both the *.class binary files and the *.java source code files. It is not sufficient to just send me a link to an on-line source - it needs to work off-line locally on my PC.
Include your report in the zip file. Upload this to Canvas in the "homework 1" area for this course. Please name your zip file HW1-lastname-firstname.zip, for example: HW1-myers-brad.zip.