Setting Up VS Code and Claude Code
Note: This handout is very detailed and many of those details are important. If you don’t read carefully, you will accidentally set things up incorrectly and have a very hard time correcting the mistakes.
Contents
Part 1: Setting Up Python
This course uses Python 3.14. If you already have a Python 3.14.x version installed, you can skip this part.
-
Download the most recent version of the Python 3.14 installer.
-
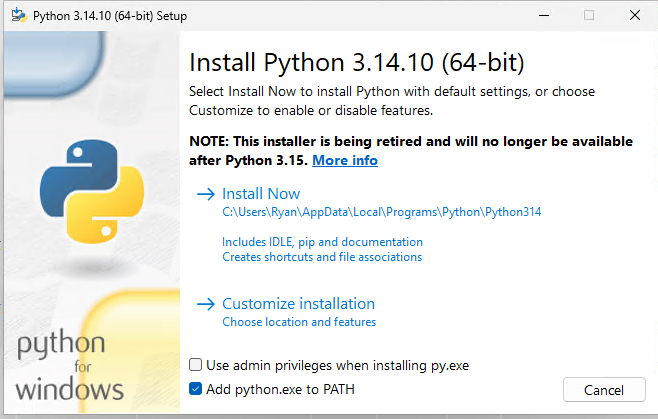
Windows: The first page of the Python installer has a checkbox labeled ‘Add python.exe to PATH’. Select it.
-
After the installation finishes, restart your computer.
Part 2: Setting Up VS Code
-
Download VS Code from here and install it.
-
Start VS Code. There is no need to sign in at this time.
-
Click the ‘Extensions’ tab on the left toolbar.

-
Type ‘Python’ into the search bar and install the extension by Microsoft named simply ‘Python’.
- Note: You might see slight differences from this screenshot (colors, icons, etc.).

-
Type ‘multi-command’ into the search bar and install the multi-command extension.

-
Create a new folder named “15-112” anywhere on your desktop.
- Note: To create a folder, open “Finder” (Mac) or “File Explorer” (Windows) and go to “Desktop”. Press
cmd+shift+n(Mac) orctrl+shift+n(Windows) to create a new folder, type “15-112”, and press “Enter”.
- Note: To create a folder, open “Finder” (Mac) or “File Explorer” (Windows) and go to “Desktop”. Press
Part 3: Setting Up cmu_graphics
-
In VS Code, choose the “Terminal” menu from the top menu bar and select “New Terminal”.
-
Windows: In the terminal that appears at the bottom of the screen, type
pip install cmu-graphicsand press “Enter”. -
Mac: In the terminal that appears at the bottom of the screen, type
pip3 install cmu-graphicsand press “Enter”.
Part 4: Setting Up helloWorld
-
Going back to VS Code, click “File” on the menu bar at the top of the screen.
- Click “Open Folder”, navigate to your new 15-112 folder, and open it.
-
Click the “Explorer” icon on the left-hand side (the two-page icon). This opens a pane showing all the folders and files in the folder you currently have open.

-
Create a new blank file called helloWorld.py in your 15-112 folder.
- To create a new file within your project, right-click anywhere within the highlighted region below, select “New File”, type “helloWorld.py”, and press “Enter”.
- Alternatively, click the “New File” icon in the top right of this section.

- Note: In general, end your file names with “.py” so that they are treated as Python files.
-
Copy and paste this Python program, which displays “Hello World” using cmu_graphics, into helloWorld.py.
-
Look at the status bar at the bottom of the window for the Python version VS Code is using. If it says ‘Python 3.14’, you’re set! If not, click on that text. When the dropdown appears, select the version starting with “Python 3.14”.
-
Press
cmd+shift+p(Mac) orctrl+shift+p(Windows) to open the ‘Command Palette’.
-
Type ‘settings’, then click ‘Preferences: Open User Settings (JSON)’ (or ‘Preferences: Open Settings (JSON)’ if you see that instead).
-
Paste these settings into the page that opens (replacing any settings already there) and save.
- To save, choose File → Save in the top left, or press
cmd+s(Mac) orctrl+s(Windows).
{ "window.zoomLevel": 0, "editor.fontSize": 18, "terminal.integrated.fontSize": 18, "python.terminal.executeInFileDir": true, "python.terminal.launchArgs": ["-i"], "python.linting.pylintEnabled": false, "editor.quickSuggestions": { "other": false, "comments": false, "strings": false }, "editor.acceptSuggestionOnEnter": "off", "editor.quickSuggestionsDelay": 10, "editor.wordBasedSuggestions": "off", "editor.parameterHints.enabled": false, "editor.rulers": [80] } - To save, choose File → Save in the top left, or press
-
Press
cmd+shift+p(Mac) orctrl+shift+p(Windows) to open the ‘Command Palette’ again, type ‘Keyboard Shortcuts’, and click ‘Preferences: Open Keyboard Shortcuts (JSON)’. (Be careful here: do not choose the option about default keyboard shortcuts.) -
Paste these settings into the page that opens (replacing any settings already there) and save.
- To save, choose File → Save in the top left, or press
cmd+s(Mac) orctrl+s(Windows).
[ { "key": "cmd+b", "command": "runCommands", "args": { "commands": [ "workbench.action.terminal.kill", "python.execInTerminal" ] } }, { "key": "ctrl+b", "command": "runCommands", "args": { "commands": [ "workbench.action.terminal.kill", "python.execInTerminal" ] } } ] - To save, choose File → Save in the top left, or press
-
Now re-open
helloWorld.pyin your editor window and pressctrl+bto run it. (From now on, usectrl+bto run your Python programs.)
Part 5: Setting Up Claude Code
-
Open the Extensions view in VS Code again.
-
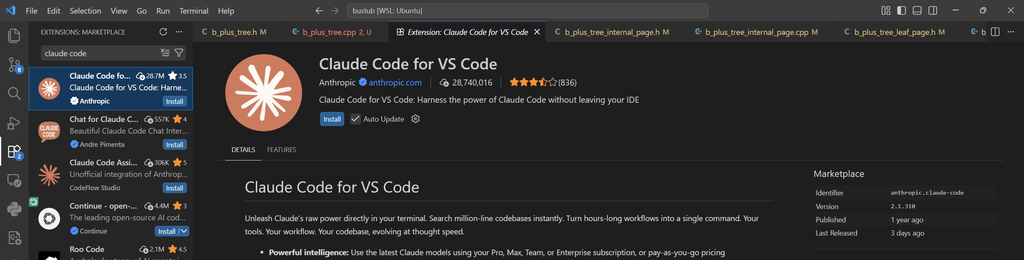
Search for ‘Claude Code’. Select the extension published by Anthropic, then click Install.
-
With your 15-112 folder open, open a Python file. Click the Claude spark icon (top right or in the Activity Bar).


-
Click “Claude.ai Subscription” and complete the browser sign-in.

Part 6: Setting Claude Code to Manual Mode
For your term project, it is very important that you understand every line of code that Claude writes for you. The best way to do that is to inspect every change it proposes and accept each one manually.
-
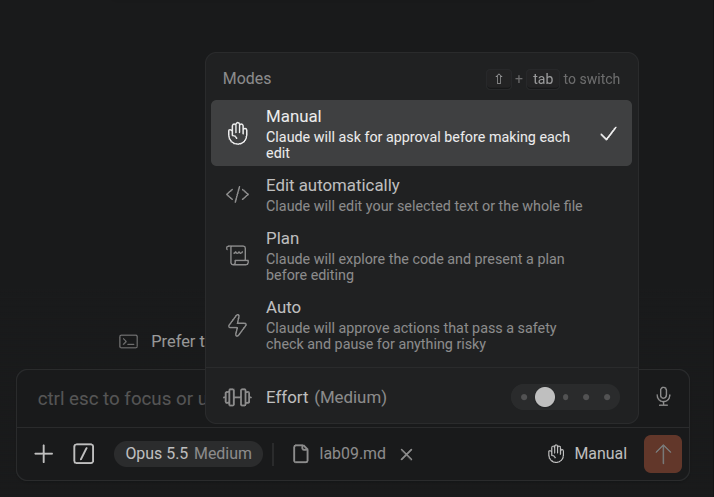
In the Claude Code panel, find the permission-mode label below the chat input.
-
Click the mode label. From the list, select Manual.
-
Do not select ‘Edit automatically’, ‘Accept edits’, ‘Auto’, or ‘Bypass permissions’. Those modes do not pause for your approval before each edit.
-
Before you send a prompt, check that the mode below the text box says Manual. Repeat this check in every new session.
Part 7: Reviewing a Claude Code Edit
- Open
helloWorld.pyand make sure you can run it before asking Claude to edit it. - Ask Claude: ‘In helloWorld.py, add a print line that says Setup complete.’
- Claude should show a side-by-side diff. Read the old and proposed code carefully before taking any action.
- Choose Accept if the edit is correct, or Reject if it is not. Then run the file again to check the result.
Part 8: Setting Up Git
-
Visit GitHub and sign up for an account if you don’t already have one.
-
If you haven’t already done so, submit your GitHub username using this Google Form. Double-check the spelling: the course staff uses it to give you access to your repository.
-
Windows: Visit the Git download page, choose the Standalone Installer, and install it. (During installation, use all the default options.)
-
Mac: In VS Code, choose Terminal → New Terminal, then enter
xcode-select --installin the terminal that appears at the bottom of the screen. -
Close VS Code, then re-open it.
-
Press
cmd+shift+p(Mac) orctrl+shift+p(Windows) to open the ‘Command Palette’ again, typegit, and chooseGit: Clone. On the next menu, chooseClone from GitHub. -
VS Code will ask you to sign in to your GitHub account. Do so.
-
When VS Code asks which repository to clone, enter
https://github.com/15-112-Fall-2026-Qatar/lab-sample. -
Choose a local folder to hold the cloned files.
-
After the clone completes, choose Open when VS Code asks whether to open the cloned repository.
-
Run the file
labSample.pyusingctrl+b.