Deliverable 09 - Fall 2025
Due SUNDAY, November 2, 2025 by 11:59PM Eastern STANDARD Time
(You get an extra hour this weekend!)
PREPARING YOUR HANDIN FOLDER...
FIRST: Create a folder or subdirectory in your 15-104 working area on your computer or in your Andrew private folder for handin-09. You will put all of your work inside this folder and then compress or zip it to create handin-09.zip to submit to Autolab.
Conceptual Questions
THERE ARE NO CONCEPTUAL QUESTIONS TO ANSWER FOR THIS DELIVERABLE DUE TO THE WRITTEN EXAM
Technical Assignment 09: Animation Walk Cycle (3 points)
In this Assignment, you are asked to write code to animate a walking character with sprite images. (You are provided, below, with the necessary sprite images for the character facing to the right.) The final goal of this Assignment is to create a scene where eight characters walk from left to right or right to left on alternating walkways, reversing direction once they go off the canvas. Here is a short video of what this might look like:
Here is the source image for the walk cycle of the animated character we’ll be using:

The individual frames of this animation can be found in this Imgur.com album. There are 8 frames, which are provided to you as .PNG images with transparent backgrounds.
Start with the following code:
var walkImage = [];   // an array to store the images

function preload(){

    // These URLs are for the individual walk cycle images,
    // stored in the imgur album http://imgur.com/a/85DTu
    var filenames = [];
    filenames[0] = "http://i.imgur.com/svA3cqA.png";   // first contact
    filenames[1] = "http://i.imgur.com/jV3FsVQ.png";   // first recoil
    filenames[2] = "http://i.imgur.com/IgQDmRK.png";   // first passing
    filenames[3] = "http://i.imgur.com/kmVGuo9.png";   // first high-point
    filenames[4] = "http://i.imgur.com/jcMNeGq.png";   // second contact
    filenames[5] = "http://i.imgur.com/ttJGwkt.png";   // second recoil
    filenames[6] = "http://i.imgur.com/9tL5TRr.png";   // second passing
    filenames[7] = "http://i.imgur.com/IYn7mIB.png";   // second high-point

    // Load each image into the walkImage array using the filenames
    for (var i = 0; i < filenames.length; i++) {
        walkImage[i] = loadImage(filenames[i]);
    }
}

// Constructor for each walking character
function makeCharacter(cx, cy, cdx, right) {
    var c = {x: cx,
             y: cy,
             dx: cdx,
             walkingRight: right,
             imageNum: 0,
             stepFunction: stepCharacter,
             drawFunction: drawCharacter
         }
    return c;
}
Programming Instructions
-
Create a global array to hold the eight characters, initially empty.
-
Write code to model each character as an object. You will need three methods, one of which is given for you (see above):
-
makeCharacter – (given above) a constructor that creates and returns an object representing a walking character. Each walking character has the following properties:
- x – a Number representing the horizontal location of the center of the character, given by parameter cx
- y – a Number representing the vertical location of the center of the character, given by parameter cy
- dx – a Number representing the horizontal velocity of the character (delta x), given by parameter cdx
- walkingRight – a Boolean representing whether the character is walking toward the right or not, given by parameter right
- imageNum – a Number that indicates which of the positions the character is in, corresponding to an image number, or index, into the walkImage array (default: 0)
- stepFunction – a reference to a function that updates the walking character for the next frame
- drawFunction – a reference to a function that draws the appropriate image for the walking character in the correct position
- stepCharacter – a method that updates the walking character for the next frame, has no parameters (see instructions below)
- drawCharacter – a method that draws the walking character, has no parameters (see instructions below)
-
makeCharacter – (given above) a constructor that creates and returns an object representing a walking character. Each walking character has the following properties:
-
You will start by making one character emerge from the left edge of the canvas, walk across the bottom path, and then disappear off the right edge. Once this happens, you will reset its x position so that it repeats this path.
- setup – Create a canvas of size 500 x 900 with a frame rate of 20. Set the image mode to CENTER (see the p5.js reference). Then construct and store in the array one character so that it starts at position (-100, 750). This is the bottom character in the scene. It should have a dx of 10, facing right, in the contact position (image #0).
- draw – Create a light gray background. Then draw the 8 blue lines using a helper function drawLines (see bullet below). Then draw the character stored in the array. Call the character’s step function first, then its draw function.
- drawLines – For this helper function for the draw function, the lines extend from x = 0 to x = 500, and the lines are drawn at y = 50, 150, 250, 350, 450, 550, 650, 750 and 850.
- stepCharacter - For this method, increase the image number by 1 (modulo the number of images) so that the character will be drawn in its next walking position. Update the x position of the character using its dx value. Then check to see if the character is off the right side of the canvas. If so, then reset the x position to be -100 so it is off the left side of the canvas, walking again to the right each time it's updated.
- drawCharacter - For this method, draw the image using the walkImage array (using the image number as the index) at the character's x and y position.
- setup – Create a canvas of size 500 x 900 with a frame rate of 20. Set the image mode to CENTER (see the p5.js reference). Then construct and store in the array one character so that it starts at position (-100, 750). This is the bottom character in the scene. It should have a dx of 10, facing right, in the contact position (image #0).
-
Next, modify the setup function to add three more characters, moving from left to right along with the first character. The additional characters will start at (-100, 550), (-100, 350) and (-100, 150), and you will store these in the array with the first character. For the draw function, you will now update and draw four characters. You might want a loop now to avoid writing a lot of duplicate code.
If you can get all four characters to walk along their initial paths from the left side to the right side, and then re-emerge on the left side, then you will get 2 of the 3 points. Save your sketch under the name sketch-v2.js as a backup to show us your work up to this point.
-
Next, you will add four more characters (to your array) that start off of the right side of the canvas and walk toward the left, emerging on the right again. Start these characters at (600, 50), (600, 250), (600, 450) and (600, 650). You will need to modify the setup and draw functions here.
The characters are drawn using the drawCharacter method. In order to get the characters to walk to the left, you will need to do some clever programming, since we haven't given you the images facing left. Essentially, when the character is supposed to walk to the left, you should change the coordinate system so that the origin is in the top right of the canvas and x should increase going right to left. You can do this by using translate(500,0) to translate the origin to the top right corner of the canvas. Then you can use scale(-1, 1) to flip the x axis. (It’s as if you’re looking at the canvas from behind!) The dx for your characters should remain the same, but their x coordinate should change. Modify the drawCharacter method so that if it's drawing a character facing right, it draws the image as usual, but if the character is facing left, it translates the origin to (500,0), scales by (-1,0) and draws the image. Remember that when you do the translation and scaling, you should do them in between push and pop function calls since you don’t want to permanently change the coordinate system.
If you successfully complete this step, you will get 2.5 out of 3 points. Save your sketch under the name sketch-v3.js as a backup to show us your work up to this point.
- Finally, you will update the program so that when each character leaves the edge of the canvas, the character reverses its direction. This requires an update to the drawCharacter method. If you successfully complete this last step, you will reach the 3 point level. Your final working project should be titled sketch.js.
Style and Documentation
Be sure to follow our coding style guidelines and document your code for anything that doesn’t seem obvious. Poor style and minimal/no documentation can lead to a 1 point deduction.
Open-ended Project 09: Computational Portrait (3 points)
In this creative Project, you will create a computational portrait, using some kind of original surface treatment (such as a “custom pixel”) of a hidden underlying photograph.
Here are some examples of using an image (or video capture) to use pixel values to control other elements to make an abstract portrait:

Danny Rozin, Wooden Mirror - the angle of the pieces of wood are tilted toward or away from an overhead light based on the brightness of pixels in the image of the observer

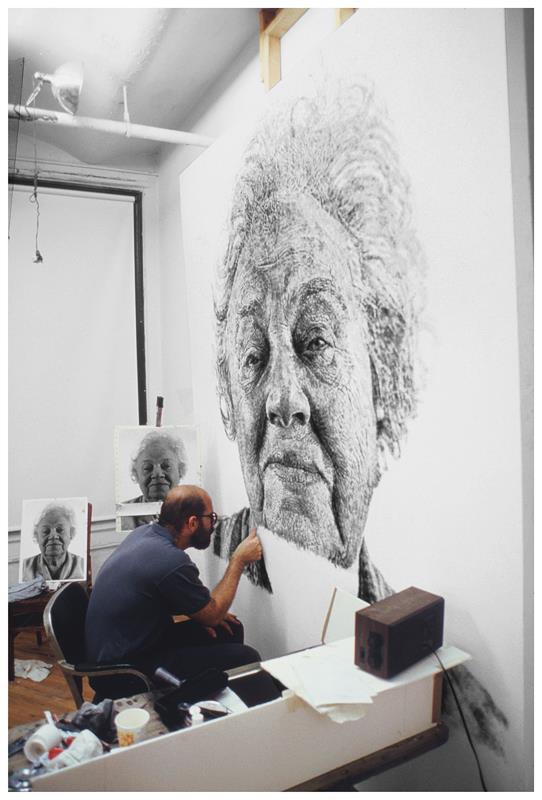
Chuck Close created a 12 foot high portrait of his wife's grandmother, Fanny, created with thumbprints of various darknesses.


Ryan Alexander allows fungus-like filaments to grow according to forces from an underlying image. It turns out that those filaments are actually strings of words.
Requirements
- The portrait must be an un-retouched photograph of a person that you can access on imgur.com. Ideally, it should be a photograph of you, although you may use a photograph of another person if you do not want to upload your photo to imgur.com. It may not be a faculty member, TA, celebrity, politician, or religious figure. Think about finding a photograph that will express something artistic when you convert it. Do not upload a photograph of someone you know (family, friends) without their permission. The photograph should focus on the face only. No additional body parts below the shoulders.
- Students whose faith prohibit the representation of sentient beings are excused from the first constraint, and may create a representation of an animal instead, or make some other proposal by arrangement with the instructor.
- You may not display the original photograph in unaltered form at any time. You may only display the portrait generated from it.
- You must use an actual photograph as a starting point for a computational interpretation; you may not synthesize a portrait “from scratch” (as you did in your Variable Faces project).
- Dimensions may be no larger than 480×480 pixels, though smaller canvases are fine.
- In a comment in your program, write a sentence or two reflecting on your process and product.
- In order to earn 3 points, you must show creativity in your portrait representation. Simply duplicating what you see in the example code will not earn full credit.
Sample Code
We highly recommend you look at Dan Shiffman’s great p5.js Pointillism Example for a start.
Handing in your work
Your handin folder handin-09 should have the two folders described above.
You will zip up the handin-09 folder and submit this to Autolab. Your overall folder organization should look something like this (indentation indicates subfolders):
  handin-09
    andrewID-09-assignment
      index.html
      sketch.js
      sketch-v1.js
      sketch-v2.js
      sketch-v3.js
    andrewID-09-project
      index.html
      sketch.js
NOTE: You might not have all of the backup versions shown if you don't complete the technical assignment.
Once you are ready to submit, zip (compress) the handin-09 folder (which will likely be named handin-09.zip) and hand in the ZIP FILE into the Deliverable 9 submission area on Autolab. Once you handin, check your handin history and click on the magnifying glass to look at what you submitted to make sure it looks right. IF YOU SUBMIT THE WRONG ZIP FILE, YOU RISK GETTTING A 0 ON THIS DELIVERABLE!
You may submit as many times as you’d like (in case you find inspiration and want to improve your work) up until the deadline. If you submit up to one day late, even if you submitted on time, you will be marked late. We only grade the final submission you upload to us via Autolab.