Deliverable 08 - Fall 2025
Due Saturday, Oct. 25, 2025 by 11:59PM
PREPARING YOUR HANDIN FOLDER...
FIRST: Create a folder or subdirectory in your 15-104 working area on your computer or in your Andrew private folder for handin-08. You will put all of your work inside this folder and then compress or zip it to create handin-08.zip to submit to Autolab.
Conceptual Questions
In this part of the deliverable, you will download this Word file that contains 4 questions about concepts taught in class. You may download it anywhere on your computer. You should fill in your answers in the spaces provided, and include your name, andrewID and section letter at the top of page 1.
Once you are finished with this part of the deliverable, print/save it as a PDF and store this PDF in your handin-08 folder with the name andrewID-08-concepts.pdf. For example, if your andrewID is acarnegie, then you would save the PDF under the name acarnegie-08-concepts.pdf.
Technical Assignment 08: Mixies (3 points)
This Assignment is to be submitted through Autolab. Its purpose is to practice use of while loops, use of random numbers, use of arrays and use of images on your canvas.
An “Exquisite Corpse“, also known as an exquisite cadaver (from the original French term cadavre exquis), is a method by which an image is collectively assembled. Often, a simple set of rules is devised that allows each contributor to add his or her contribution without knowledge about how the final composition will appear. For example, one person might draw the head of a creature, while someone else would draw the body, while a third person might add the feet. The Exquisite Corpse was a popular parlor game in the Victorian era, and was rediscovered by Surrealist and Dadaist artists in the early 20th century as a quasi-algorithmic generative technique for creating surprising new forms. Below is a set of exquisite corpse artworks by artists (and brothers) Jake and Dinos Chapman, from the collection of the Tate Museum, London.

And here's an interactive exquisite corpse installation by Professor Golan Levin (2007).

(Watch a YouTube video about the installation.)
In this assignment, you will create an interactive exquisite corpse software, using the circus characters from a set of “Mixies” cards from 1956:

Courtesy of Meg Richards (former student and CMU staff member), we have been generously provided with scans of her collection of Mixies cards, which were produced in 1956 by the Ed-u-Cards Manufacturing Company. In these cards, a figure of a person or animal was cut into three pieces and each placed on a card. The deck consisted of 12 heads, 12 bodies, and 12 feet, which players could mix up in different ways. The box states that the game can generate “1001 funny figures,” but in fact, there are 12 x 12 x 12 = 1728 unique combinations. (Perhaps 727 of them are less funny than the others.)

You can find all of the image assets on imgur.com. Here are the links in the form of JavaScript arrays. You can paste this into your sketch program:
// these three arrays, bodyLinks, feetLinks, and headLinks can be
// used to access images for Technical Assignment 8
var bodyLinks = [
    "https://i.imgur.com/5YM2aPE.jpg",
    "https://i.imgur.com/oKtGXfd.jpg",
    "https://i.imgur.com/Kvg75bG.jpg",
    "https://i.imgur.com/0FGzErn.jpg",
    "https://i.imgur.com/MJmlPt5.jpg",
    "https://i.imgur.com/VvX0k8e.jpg",
    "https://i.imgur.com/rLIOBoG.jpg",
    "https://i.imgur.com/q03Gko3.jpg",
    "https://i.imgur.com/BWpN5SP.jpg",
    "https://i.imgur.com/ft10TV3.jpg",
    "https://i.imgur.com/CGCZliN.jpg",
    "https://i.imgur.com/qrlc4dK.jpg"]

var feetLinks = [
    "https://i.imgur.com/oNSO0T6.jpg",
    "https://i.imgur.com/OWGETX7.jpg",
    "https://i.imgur.com/Zp29aVg.jpg",
    "https://i.imgur.com/AXLWZRR.jpg",
    "https://i.imgur.com/wgZq717.jpg",
    "https://i.imgur.com/sGVMEMw.jpg",
    "https://i.imgur.com/hfbrynH.jpg",
    "https://i.imgur.com/OOASUMM.jpg",
    "https://i.imgur.com/aqtIXi0.jpg",
    "https://i.imgur.com/Eu6ruPo.jpg",
    "https://i.imgur.com/mTSipwg.jpg",
    "https://i.imgur.com/1GzC4Zz.jpg"]

var headLinks = [
    "https://i.imgur.com/gBCZVuM.jpg",
    "https://i.imgur.com/YLOXAdH.jpg",
    "https://i.imgur.com/my3TqY7.jpg",
    "https://i.imgur.com/lvtIB9s.jpg",
    "https://i.imgur.com/gvDBfhO.jpg",
    "https://i.imgur.com/JEuJ2ER.jpg",
    "https://i.imgur.com/SbBOG1V.jpg",
    "https://i.imgur.com/cuJ5Ao1.jpg",
    "https://i.imgur.com/dqHjjig.jpg",
    "https://i.imgur.com/mcFUcHf.jpg",
    "https://i.imgur.com/0XKU9Dx.jpg",
    "https://i.imgur.com/sD1ArAR.jpg"]
You will draw a set of three (random) cards, one head, one body and one feet to form a mixie body. When you click the mouse inside any of the three displayed cards, you will generate a new random card for that position. If the three cards form a regular normal character (matching head, body, feet), you will flash a green border to show that they match. Your initial output will look something like this:

Program requirements
This assignment is broken down into parts so you can work on each step to get something working before moving on to the next step. Do not try to solve this entire problem in one sitting. Work on each step and make sure it's correct. Then make a backup of your program and then continue on to the next step. If you make a mess of your program, you can always go back to the prior backup you saved!
-
Make your sketch to simply select and draw a random card for each part of the character: head, body feet.
- Include the global arrays with the URLs as given above. Note that these are arrays of strings. They're not the images themselves.
- Create global arrays (initially empty) called headImages, bodyImages, and feetImages. These will hold (references to) the image objects of cards.
- Create global variables to store the indices of the images for the three cards you randomly select (not the images themselves).
- Write a preload function that loads the images from the URLs in the arrays headLinks, bodyLinks and feetLinks into the arrays headImages, bodyImages and feetImages, respectively. Note that you can do this with just a small amount of code. If you write more than about 5-7 lines of code, you are probably doing something wrong.
- Set up a canvas of size 200 (wide) by 450 (high), where each card will be displayed as 200 (wide) by 150 (high). In your setup function, initialize your index variables with a random index for each of the image arrays, respectively.
- Write a draw function so that it draws three images on the canvas like in the example above using the random indices you've stored. Note that you are initializing the head, body and feet arrays in the setup function, so when the draw function repeats, it will just draw the same images again and again, so the image should look static.
- Test your program so you see a new random character, each made up of a head, body and feet, each time you reload the browser, and then save a copy of the sketch file as sketch-v1.js .
-
Update your sketch so that if you click the mouse inside any of the three images, a new random image for that part is displayed. You should NOT pick the same random image as you had before. (That is, for each click, the image MUST change.)
- Add a mousePressed function that first checks to see if the mouse was clicked inside the region of the canvas for each of the three images. If so, the function resets the corresponding index variable with a new index for the image for that part of the character. Note that if you just pick a random index, you might pick the same one as the one you currently are using. (HINT: Set up a variable for the random index of the new image, and reinitialize this variable using a while loop as long as it matches the current index being used for the canvas.)
- Now when you start your program, you should see your initial selection, then each time click inside one of the images, you should get some other corresponding image. Test this extensively to make sure you don't get the same index twice when you click on one of the character parts. You might print the indices to the JavaScript console to make sure things are working correctly.
-
Test your program so you see what is required, and then save a copy of the sketch file as sketch-v2.js . If you get to this point successfully, you will earn 2 points of the 3 points.
-
Next, update your sketch so that if you form a character made up of all three of its correct parts (so the character will look normal, not strange or funny), then the program will display the images with a bright green border that flashes once per second. For this part, you should set the frameRate to 1.
- You will need to update your draw function so that it checks the indices used for the three parts of the character. If these are all the same, then you should set some boolean variable (e.g. match) to true, otherwise set it to false.
- If the local boolean variable is true, then flash a thick green border around the outer edge of the canvas in front of the card images. To flash the border, draw it when the frameCount is even and don't when the frameCount is odd.
- Test your program so you see what is required, and then save a copy of the sketch file as sketch.js . If you get to this point successfully, you will earn 3 points of the 3 points.
Be sure to store the code and html index file for this assignment in a subfolder named according to our conventions in your handin folder. Remember that you could lose up to 1 point if your code is formatted poorly. If you submit just the final program without any of the prior versions, you will not receive the full credit on the assignment.
Open-ended Project 08: Composition with Curves (3 points)
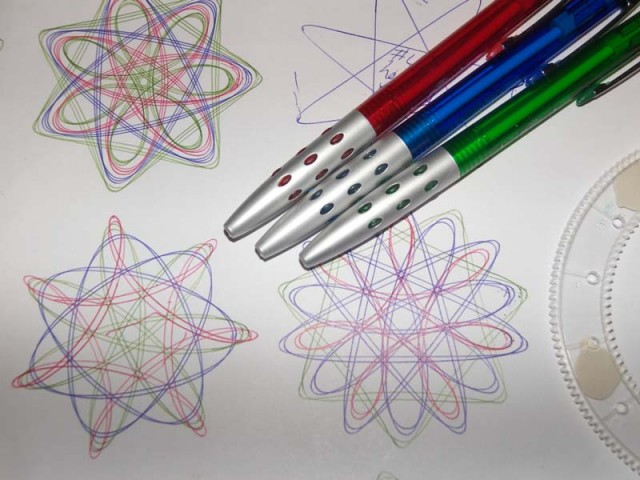
The Spirograph was a toy with pens and gears for drawing curve patterns.
Mathematical curves allow for unique, expressive and surprising ways of generating and controlling graphics. This open-ended Project invites you to you experiment and play with the aesthetics of curves.
- Browse the Mathworld curves site.
- Select a curve from the site (look at the algebraic curves first). In a canvas no larger than 480 x 480 pixels, develop an interactive composition using this curve. Feel free to use any graphical primitives, colors, and visual strategies you wish. You can layer the curve with other elements if you wish. Play.
-
Please note that not every Mathworld curve comes with a helpful diagram or an easy-to-implement equation. We recommend selecting curves whose equations take one of the following standard forms:
- the standard explicit form y = f(x) (i.e. y is a function of x)
- or curves which take the parametric form y = f(t), x = g(t) (i.e. x and y are both functions of another variable t)
- or curves with the polar form r = f(theta) (i.e. r is a function of an angle theta)
- View the examples below for some sample code that deals with polar and parametric curves.
- Create a simple interaction in which the mouseX and mouseY are used to continuously govern at least one (and preferably at least two) parameters of the curve. For this purpose (see the example below) we highly recommend you use the p5.js map() and constrain() functions.
- Your code should adhere to our style guidelines.
Here is an example that displays an epitrochoid and a cranioid, switching between them when the mouse is clicked:


var nPoints = 100;
var EPITROCHOID = 0; // Cartesian Parametric Form  [x=f(t), y=g(t)]
var CRANIOID = 1;    // Polar explicit form   [r =f(t)]

var titles = ["1. Epitrochoid", "2. Cranioid"];
var curveMode = EPITROCHOID;

function setup() {
    createCanvas(400, 400);
    frameRate(10);
}

function draw() {
    background(255);

    // draw the frame
    fill(0);
    noStroke();
    text(titles[curveMode], 20, 40);
    stroke(0);
    noFill();
    rect(0, 0, width-1, height-1);

    // draw the curve
    push();
    translate(width / 2, height / 2);
    switch (curveMode) {
    case EPITROCHOID:
        drawEpitrochoidCurve();
        break;
    case CRANIOID:
        drawCranioidCurve();
        break;
    }
    pop();
}

//--------------------------------------------------
function drawEpitrochoidCurve() {
    // Epicycloid:
    // http://mathworld.wolfram.com/Epicycloid.html

    var x;
    var y;

    var a = 80.0;
    var b = a / 2.0;
    var h = constrain(mouseY / 8.0, 0, b);
    var ph = mouseX / 50.0;

    fill(255, 200, 200);
    beginShape();
    for (var i = 0; i < nPoints; i++) {
        var t = map(i, 0, nPoints, 0, TWO_PI);

        x = (a + b) * cos(t) - h * cos(ph + t * (a + b) / b);
        y = (a + b) * sin(t) - h * sin(ph + t * (a + b) / b);
        vertex(x, y);
    }
    endShape(CLOSE);

}

//--------------------------------------------------
function drawCranioidCurve() {
    // http://mathworld.wolfram.com/Cranioid.html

    // NOTE: given a curve in the polar form  r = f(theta),
    // 1. sweep theta from 0...TWO_PI,
    // 2. then compute r as a function of theta,
    // 3. then compute x and y using the circular identity:
    //    x = r * cos(theta);
    //    y = r * sin(theta);

    var x;
    var y;
    var r;
    var a = 40.0;
    var b = 10.0;
    var c = 100.0;

    var p = constrain((mouseX / width), 0.0, 1.0);
    var q = constrain((mouseY / height), 0.0, 1.0);

    fill(200, 200, 255);
    beginShape();
    for (var i = 0; i < nPoints; i++) {
        var t = map(i, 0, nPoints, 0, TWO_PI);

        // cranioid:
        r =
            a * sin(t) +
            b * sqrt(1.0 - p * sq(cos(t))) +
            c * sqrt(1.0 - q * sq(cos(t)));

        x = r * cos(t);
        y = r * sin(t);
        vertex(x, y);
    }
    endShape(CLOSE);
}

//--------------------------------------------------
function mousePressed() {
    curveMode = 1 - curveMode;
}
Please note that there are an infinity of different ways that you can render your curve(s)! For example, a program is shown below to draw five different ways of rendering a circle. Also, please note that many curves on MathWorld are “open” (such as spirals and parabolas), and can’t be “closed” (like a circle); those curves are totally great and just fine too!

function setup() {
    createCanvas(750, 200);
    frameRate(10);
}

function draw() {
    background(255, 200, 200);
    fill(255, 255, 255, 64);
    var nPoints = 20;
    var radius = 50;
    var separation = 125;

    // draw the circle normally
    push();
    translate(1*separation, height / 2);
    beginShape();
    for (var i = 0; i < nPoints; i++) {
        var theta = map(i, 0, nPoints, 0, TWO_PI);
        var px = radius * cos(theta);
        var py = radius * sin(theta);
        vertex(px,py);
        ellipse(px, py, 3,3);
    }
    endShape(CLOSE);
    pop();

    // draw the circle as a sequence of little elements
    push();
    translate(2*separation, height / 2);
    for (var i = 0; i < nPoints; i++) {
        var theta = map(i, 0, nPoints, 0, TWO_PI);
        var px = radius * cos(theta);
        var py = radius * sin(theta);
        rect(px - 5, py - 5, 10, 10);
    }
    pop();

    // draw the circle as a starburst
    push();
    translate(3 * separation, height / 2);
    for (var i = 0; i < nPoints; i++) {
        var theta = map(i, 0, nPoints, 0, TWO_PI);
        var px = radius * cos(theta);
        var py = radius * sin(theta);
        line(0, 0, px, py);
    }
    pop();

    // draw the circle as a wiggly circle
    push();
    translate(4*separation, height / 2);
    beginShape();
    for (var i = 0; i < nPoints; i++) {
        var theta = map(i, 0, nPoints, 0, TWO_PI);
        var px = radius * cos(theta);
        var py = radius * sin(theta);
        vertex(px + random(-5, 5), py + random(-5, 5));
    }
    endShape(CLOSE);
    pop();

    // draw the circle as a dotted line
    push();
    translate(5*separation, height / 2);
    var qx = 0;
    var qy = 0;
    for (var i = 0; i <= nPoints; i++) {
        var theta = map(i, 0, nPoints, 0, TWO_PI);
        var px = radius * cos(theta);
        var py = radius * sin(theta);
        if ((i % 2 == 0) && (i > 1)) {
            line(qx, qy, px, py);
        }
        qx = px;
        qy = py;
    }
    pop();
}
Handing in your work
Your handin folder handin-08 should have the two folders described above.
You will zip up the handin-08 folder and submit this to Autolab. Your overall folder organization should look something like this (indentation indicates subfolders):
  handin-08
    andrewID-08-assignment
      index.html
      sketch.js
      sketch-v1.js
      sketch-v2.js
    andrewID-08-concepts.pdf
    andrewID-08-project
      index.html
      sketch.js
NOTE: You might not have all of the backup versions shown if you don't complete the technical assignment.
Once you are ready to submit, zip (compress) the handin-08 folder (which will likely be named handin-08.zip) and hand in the ZIP FILE into the Deliverable 8 submission area on Autolab. Once you handin, check your handin history and click on the magnifying glass to look at what you submitted to make sure it looks right. IF YOU SUBMIT THE WRONG ZIP FILE, YOU RISK GETTTING A 0 ON THIS DELIVERABLE!
You may submit as many times as you’d like (in case you find inspiration and want to improve your work) up until the deadline. If you submit up to one day late, even if you submitted on time, you will be marked late. We only grade the final submission you upload to us via Autolab.