This tutorial is intended for people with some familiarity with machine learning who are interested in using Minorthird. It also assumes that you have a working copy of Java, some knowledge of Java, and a copy of Minorthird on your classpath. You will probably want to run this tutorial in a freshly-created directory.
I tested these commands under Windows, but of course they will work anywhere else, since Java's so platform independent. Assuming, of course, you understand about shell quotations and stuff. A JAR file of the exact version of Minorthird I used in creating this tutorial can be found here (7Mb or so). You can use it this for the tutorial if you replace every "java" command with "java -cp minorthird-20070122.jar".
Minorthird is primarily designed for learning how to extract named entities from text.
We'll start out by experimenting with a small toy example, derived from seven short sentences (which William typed in late one night in a whimsical mood while writing some unit tests.)
The substrings in bold are person names, and the task we will consider is learning to detect these names. A fairly common way to using learning methods for this sort of named entity recognition (NER) problem to reduce the task of identifying substrings to the task of classifying tokens. For example, the first sentence might lead to these training examples for a learner, where positive examples are part of a name and negative examples are not:
| Token | Class Label | Features |
|---|---|---|
| Hello | NEG | ... |
| there | NEG | ... |
| , | NEG | ... |
| William | POS | ... |
| Cohen | POS | ... |
| , | NEG | ... |
| and | NEG | ... |
| welcome | NEG | ... |
| to | NEG | ... |
| CMU | NEG | ... |
| . | NEG | ... |
The table above doesn't give any features, but some natural features of an example would be the value of the token and whether or not it is capitalized. Similar features might also used for words in a window a few tokens to the left or right of the example:
| Token | Class Label | Features |
|---|---|---|
| Hello | NEG | tokenValue=hello tokenCapitalized=true tokenToRightValue=there tokenToRightCapitalized=false... |
| there | NEG | tokenValue=there tokenToRightValue=comma tokenToLeftValue=hello tokenToRightCapitalized=false... |
| , | NEG | ... |
| Token | Class Label | Features |
|---|---|---|
| Hello | NEG | tokenValueIsHello=1 tokenCapitalized=1 tokenToRightValueIsThere=1 tokenToRightCapitalized=0... |
| there | NEG | tokenValueIsThere=1 tokenToRightValueIsComma=1 tokenToLeftValueIsHello=1 tokenToRightCapitalized=0... |
| , | NEG | ... |
Ok - so now we know, in principle, how to reduce learning to do information extraction task to learning how to do classification. Later on, we'll come back to this, and discuss how to automatically reduce NER to classification using Minorthird. For now, let's get concrete in another way, and look at how to use Minorthird to learn a classifier.
Part of Minorthird is a package of standard machine-learning
methods. The name of this package is
edu.cmu.minorthird.classify. (Aside: Minorthird uses a
somewhat cumbersome Java convention for naming packages, designed to
make sure that class names don't clash; every Minorthird class starts
with edu.cmu.minorthird.)
Minorthird's classify package contains lots of Java code that is
called when you learn extractors. However, the classify package can
also be used as a stand-alone package. The package uses a fairly
simple format for examples. To continue, download this sample file, which
approximately follows the example above, and save it to the file
sample1-tokens-binary.data. If you open it in a text
editor, you will see something like this:
k trainStrings[0] NEG tokens.cap.t=1.0 tokens.eq.charTypePattern.X+x+=1.0 tokens.eq.lc.hello=1.0 right.token_0.eq.charTypePattern.x+=1.0 right.token_0.eq.lc.there=1.0
k trainStrings[0] NEG left.tokenNeg_1.cap.t=1.0 tokens.eq.charTypePattern.x+=1.0 tokens.eq.lc.there=1.0 left.tokenNeg_1.eq.charTypePattern.X+x+=1.0 left.tokenNeg_1.eq.lc.hello=1.0 right.token_0.eq.charTypePattern.,=1.0 right.token_0.eq.lc.,=1.0
k trainStrings[0] NEG right.token_0.cap.t=1.0 tokens.eq.charTypePattern.,=1.0 tokens.eq.lc.,=1.0 left.tokenNeg_1.eq.charTypePattern.x+=1.0 left.tokenNeg_1.eq.lc.there=1.0 right.token_0.eq.charTypePattern.X+x+=1.0 right.token_0.eq.lc.william=1.0
k trainStrings[0] POS tokens.cap.t=1.0 right.token_0.cap.t=1.0 tokens.eq.charTypePattern.X+x+=1.0 tokens.eq.lc.william=1.0 left.tokenNeg_1.eq.charTypePattern.,=1.0 left.tokenNeg_1.eq.lc.,=1.0 right.token_0.eq.charTypePattern.X+x+=1.0 right.token_0.eq.lc.cohen=1.0
k trainStrings[0] POS tokens.cap.t=1.0 left.tokenNeg_1.cap.t=1.0 tokens.eq.charTypePattern.X+x+=1.0 tokens.eq.lc.cohen=1.0 left.tokenNeg_1.eq.charTypePattern.X+x+=1.0 left.tokenNeg_1.eq.lc.william=1.0 right.token_0.eq.charTypePattern.,=1.0 right.token_0.eq.lc.,=1.0
...
(I added the bold for clarity). The data file has one example on each line, and each example corresponds to a token from the example sentences above. The different parts of each example are separated by spaces. Let's step through the first example, left to right, and explain what each part is.
Another way of looking at this data is to type in the command
% java edu.cmu.minorthird.classify.Train -data sample1-tokens-binary.data -gui
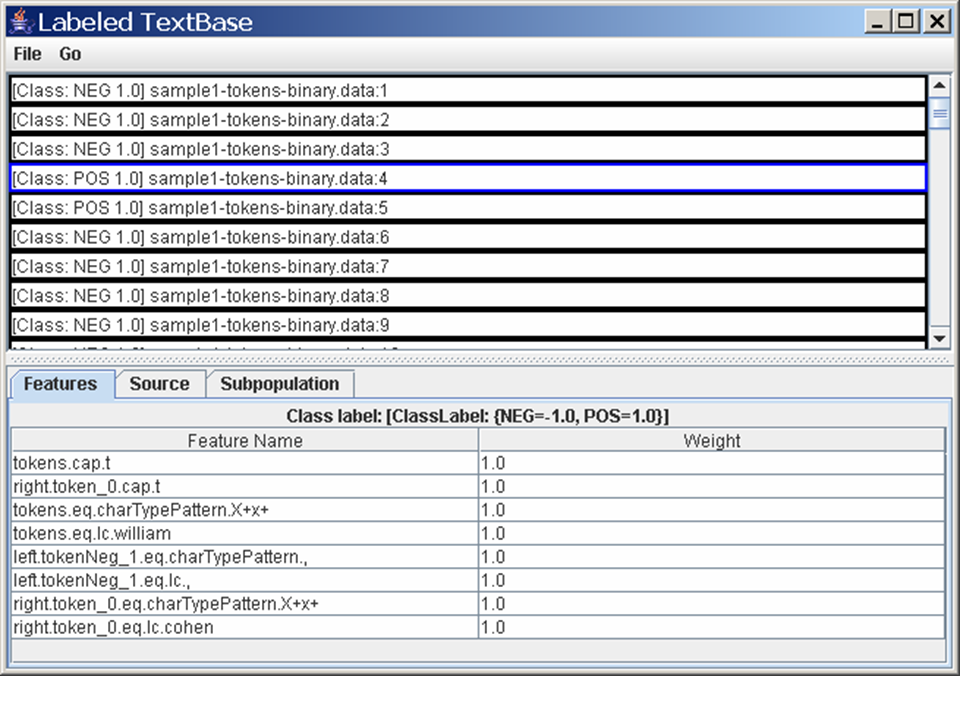
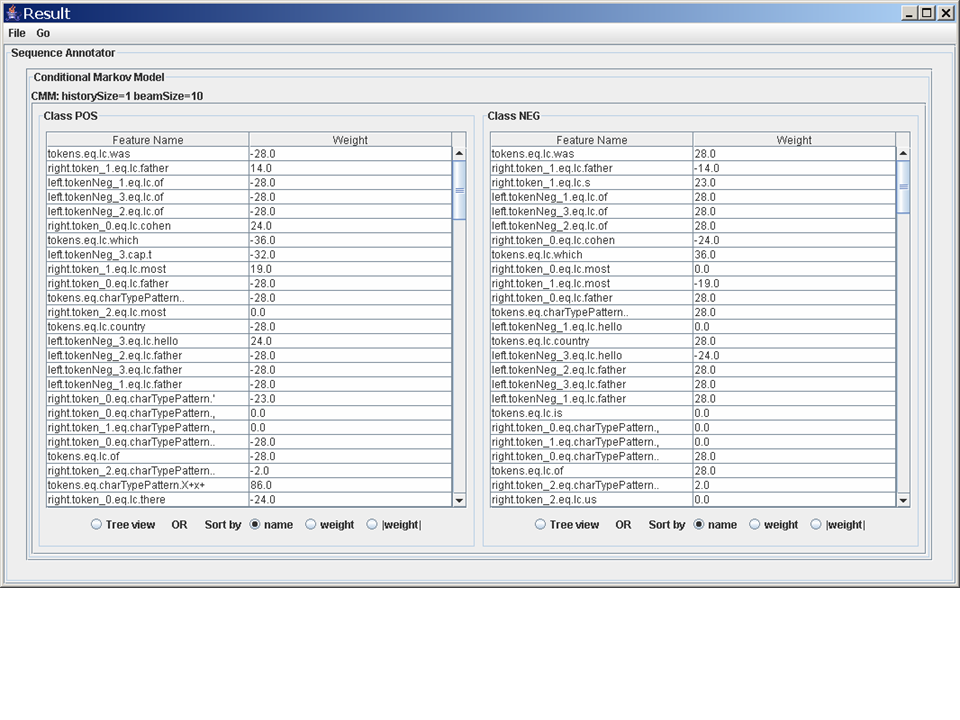
Ok - now let's do something with the data. Go back to the first window and hit the button labeled "Start task". Wait for the button labeled "View Results" to become active - when it's no longer grey (this won't take long), press it. You'll see another new window pop up, which one which shows you the classifier that was learned.
An important hint: not all the error output from Minorthird gets sent to the GUI window. If things don't seem to be working for you, always look at your console window to see if there are any errors.
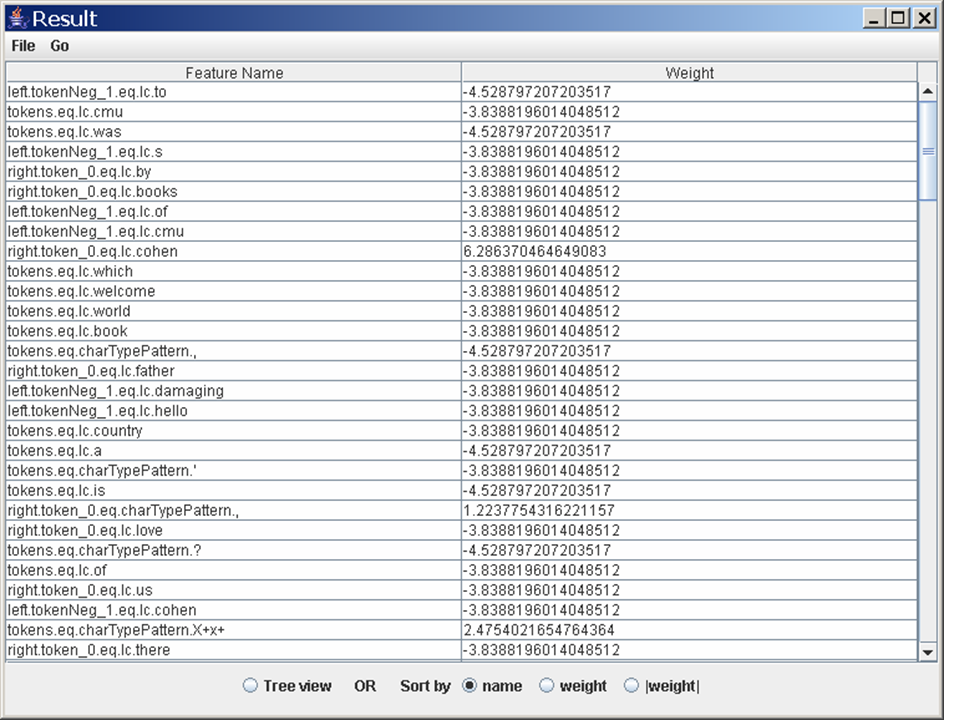
Many of Minorthird's classifiers are linear combinations of features (or are based on linear combinations). The right column of the window shows the weights given to each feature. The radio buttons on the bottom let you pick among different schemes for sorting the feature values: by feature name, by feature value, or by absolute value. There's also a "tree view", which heirarchically structures the features. Initially the features are unsorted.
Minorthird contains a number of different learners, and it obviously provided some default one here. So far, we don't even know what learner was used, let alone how to change it, or modify the parameters.
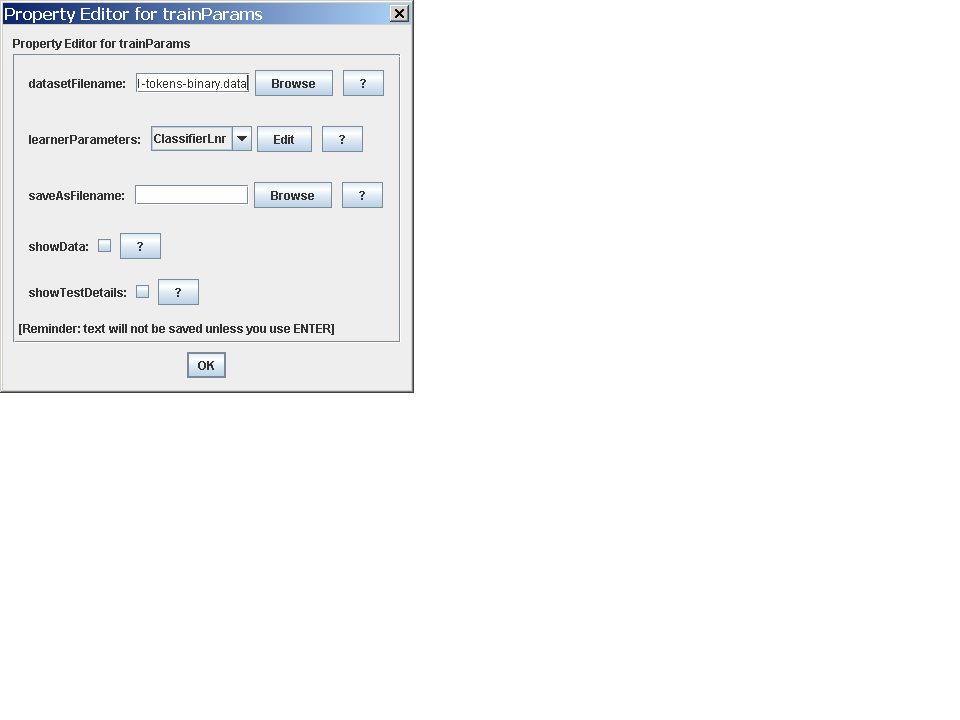
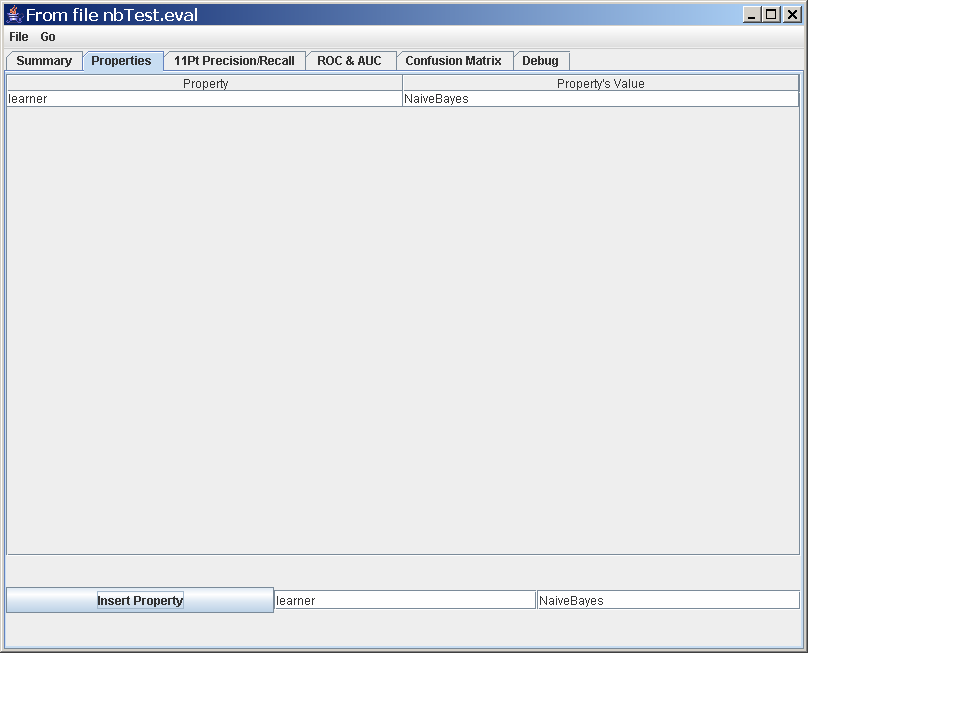
At the top of the screen is a subpane labeled "Parameter modification", which contains a pulldown list (containing only a single item, "DataClassicationTask") and next to that a button labeled "Edit". Hit the edit button: a similar-looking subwindow will pop up, labeled "Property Editor". Hit the edit button a second time, and you'll see a window with the promising label Property Editor for trainParams. We want to change the learner, so hit the Edit button the for learnerParameters. You will now, finally, see a "Property Editor" with a pull-down list containing the string "NaiveBayes".
Just to get the hang of things, do the following:
At this point, I recommend you mess around a little to see what sort of learners are available in the GUI, and what sort of classifiers are output. Notice that some of these classifiers (e.g. "AdaBoost", "BatchVersion") are meta-learning algorithms, which include other learners that can be configured.
One other useful option to investigate in the "trainParams" Property Editor window is the "saveAsFilename". Filling in something here will force the final classifier to be saved. (Bug: the showTestDetails option doesn't do anything and shouldn't be there.)
What's going on with all these windows? What you're looking at is really just an interactive way of creating and editing some Java objects that will be used to guide an experiment. It's not much of a GUI - but if you're trying to understand what sorts of things are possible in Minorthird, it's perhaps a helpful way of exploring the space. And it has the advantage that it is created automatically, using Java reflection - so as soon as we write a new learning method, you can immediately see it in the GUI.
You can also use Minorthird from the command line, by just leaving off the -gui
option. The command line above isn't very useful, because it doesn't save a classifier,
after it learns one. You can learn a classifier and save it with commands like these
#use default learner
% java edu.cmu.minorthird.classify.Train -data sample1-tokens-binary.data -saveAs naiveBayes.ser
#specify a learner
% java edu.cmu.minorthird.classify.Train -data sample1-tokens-binary.data -saveAs decisionTree.ser -learner "new DecisionTreeLearner()"
".ser" for a "serialized
Java object". Minorthird can construct many different types of
classifiers, all of which are stored using Java's
serialization tools.) The argument to the -learner
is simply passed in to Java (actually an interpreted version called
BeanShell) and used to construct a Minorthird ClassifierLearner
object. You can look at the Minorthird
Javadocs for the classify package if you want to construct your
own special learner. A warning: Minorthird will give you an
unfriendly-looking stack dump if Java doesn't understand your learner.
(This actually sometimes contains some useful information about what
went wrong.)
If you prefer shorter command lines, there is a trick: you can prepare
a "config file" like this one, the complete
contents of which I will reproduce below:
#specify the data to learn from
data=sample1-tokens-binary.data

#specify the learner
learner=new AdaBoost(new DecisionTreeLearner(2,2),20)
-config
myConfig.txt
as a short cut: e.g., the following two commands
are equivalent, except for the name of the file that's created:
% java edu.cmu.minorthird.classify.Train -data sample1-tokens-binary.data -learner "new AdaBoost(new DecisionTreeLearner(2,2),20)" -saveAs ab1.ser
% java edu.cmu.minorthird.classify.Train -config myConfig.txt -saveAs ab2.ser
If you download this test
data, you can also test the programs you learn using the
Test program, using these commands:
% java edu.cmu.minorthird.classify.Test -test sample1-test-tokens-binary.data -loadFrom naiveBayes.ser
% java edu.cmu.minorthird.classify.Test -test sample1-test-tokens-binary.data -loadFrom decisionTree.ser
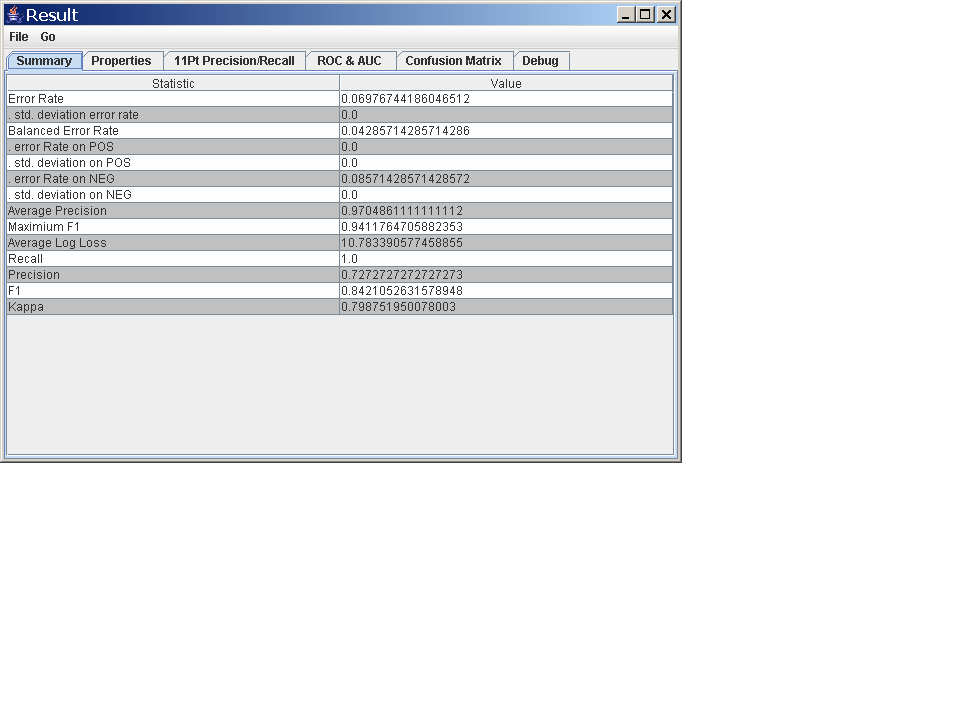
This should print out some summary statistics on the screen, something like this:
java edu.cmu.minorthird.classify.Test -test sample1-test-tokens-binary.data -loadFrom naiveBayes.ser -saveAs nbTest.eval
*** Minorthird: Version 11.6.11.22 ***
option: test=sample1-test-tokens-binary.data
option: loadFrom=naiveBayes.ser
Error Rate: 0.06976744186046512
. std. deviation error rate: 0.0
Balanced Error Rate: 0.04285714285714286
. error Rate on POS: 0.0
. std. deviation on POS: 0.0
. error Rate on NEG: 0.08571428571428572
. std. deviation on NEG: 0.0
Average Precision: 0.9704861111111112
Maximium F1: 0.9411764705882353
Average Log Loss: 10.783390577458855
Recall: 1.0
Precision: 0.7272727272727273
F1: 0.8421052631578948
Kappa: 0.798751950078003
Another way to look at the results is graphically. When Minorthird
tests a classifier, it creates a Java object (called an Evaluation)
which you can save to a file, or visually inspect. The command
% java edu.cmu.minorthird.classify.Test -test sample1-test-tokens-binary.data -loadFrom naiveBayes.ser -saveAs nbTest.eval -showResult
nbTest.eval, and also pop up a swing window that lets you look at the
results in a number of different ways (e.g., to view an ROC curve
or a precision-recall curve). A warning: for this tiny sample set,
there are few errors, so the ROC curves and precision-recall curves
are sometimes invisible.
If you want to really see how a classifier is working, use the option -showTestDetails,
for instance with
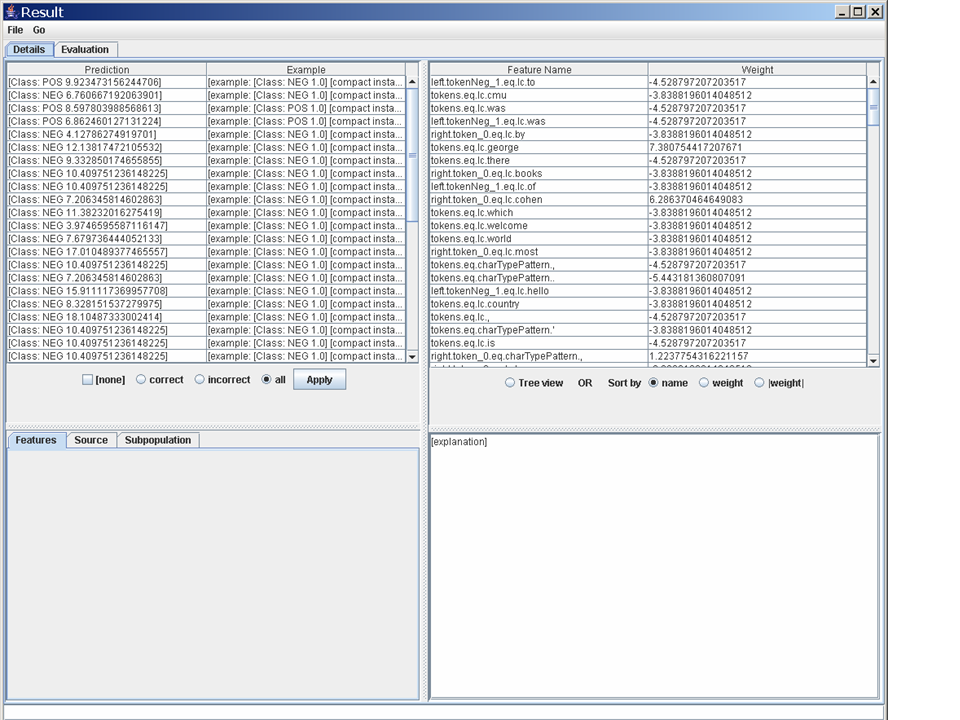
% java edu.cmu.minorthird.classify.Test -test sample1-test-tokens-binary.data -loadFrom naiveBayes.ser -showResult -showTestDetails
The upper-right pane shows the classifier being tested. The
upper-left pane shows the predicted value made by the classifier for
each test example. (The string describing a test example starts out
with a string describing its actual - e.g., [example: [Class:
NEG 1.0]...] is a negative example.) Below this are some
filters. Check the radio button "incorrect" and hit the "Apply"
button to see a smaller list of three incorrect predictions - all of
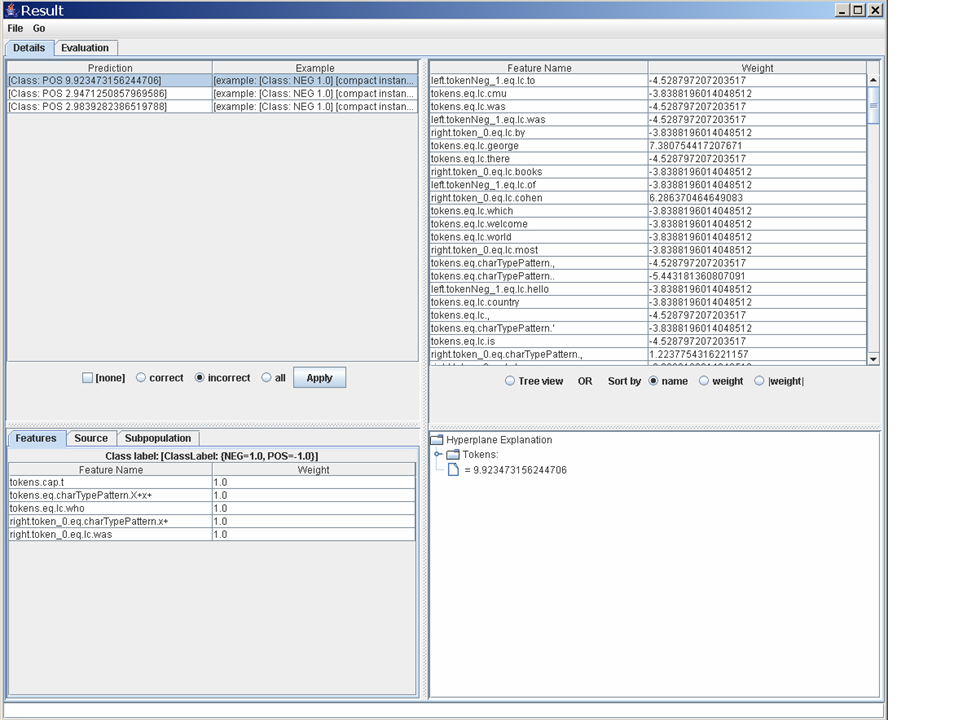
which are false positive errors. Click on the first of these
examples, and you will see something
like this. The lower-left pane shows a view of the example: the
appears to be a capitalized version of the word "who", with no tokens
to the left, and the token "was" to the right.
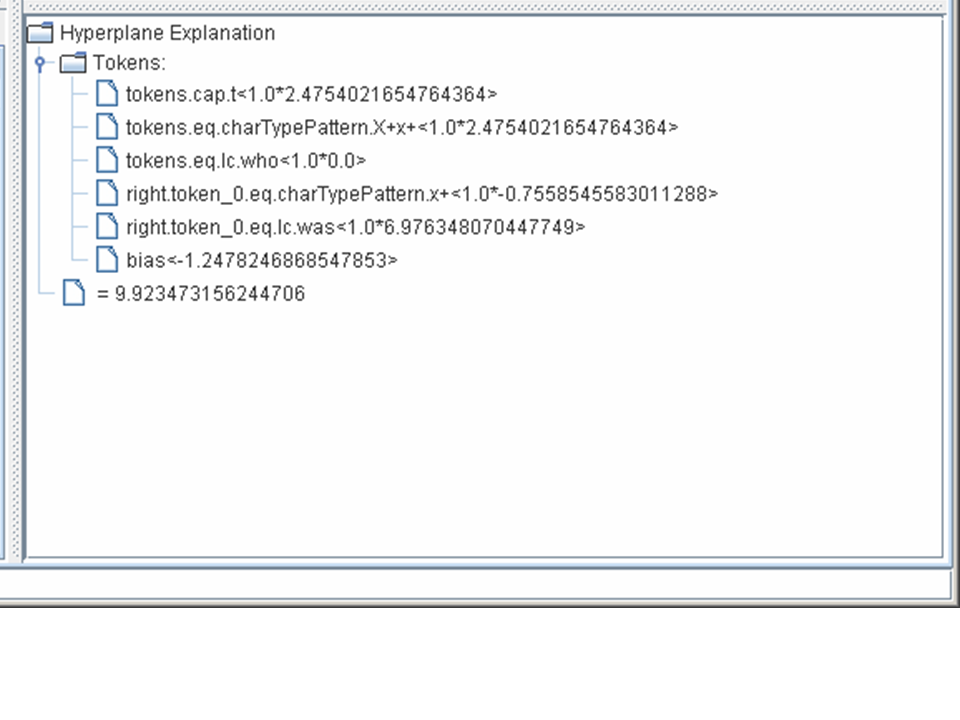
The lower-right pane shows an explanation of the prediction that was made. If you open up the subnodes of the explanation you can see how each feature contributed to the classification.
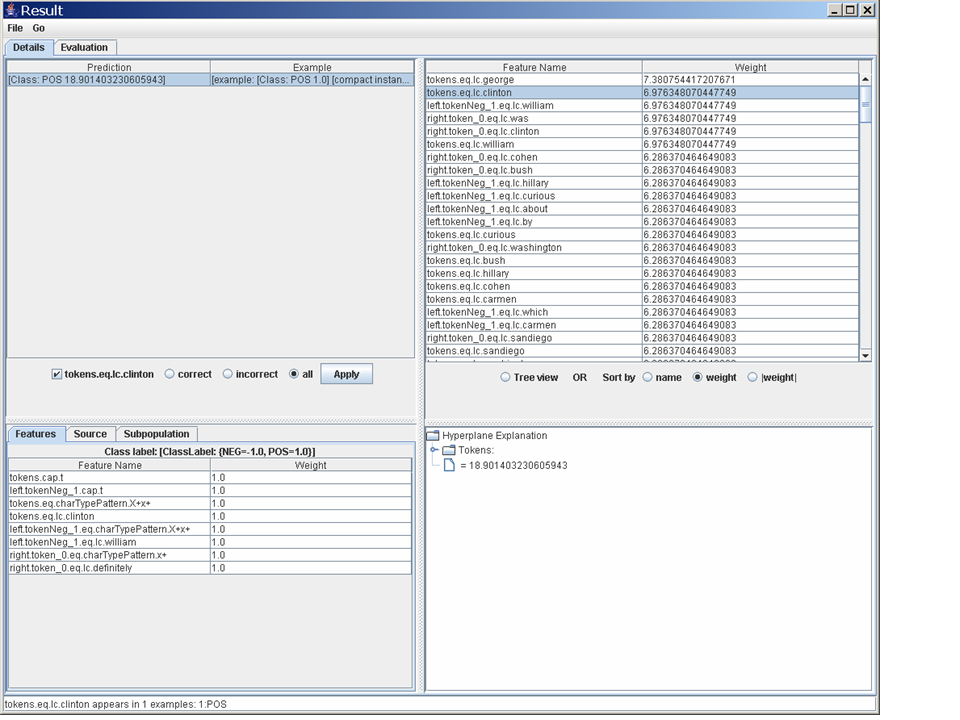
A final demo of this tool. Go to the upper-right pane, sort the
features by weight, and click on the second feature:
tokens.eq.lc.clinton. The message window on the bottom
will now contain a summary of how often that feature appeared in the
test data, and the feature will have been moved to where the
filters appear below the upper-left pane, with a check-box next
to it. Check that box, move the radio button to "all", and hit
"Apply". Finally select the single positive example that appears in
the list in the upper-left pane. You should see something like this window. This shows you
the example that contains that feature, what its features are, and how
(and why) it was classified by the classifier.
A warning: these viewers are great for small test sets, but
take a lot of memory. Use all the viewers, but particularly the
-showTestDetails option, with care on larger datasets.
% java edu.cmu.minorthird.classify.experiments.Evaluation nbTest.eval
% java edu.cmu.minorthird.classify.experiments.EvaluationGroup nbTest.eval dtTest.eval
gnuplot.
% java edu.cmu.minorthird.classify.experiments.Evaluation nbTest.eval
% gunzip -c dtTest.eval
[POS,NEG]
NEG 2.9766216671438923 NEG
NEG 4.340420741472285 NEG
POS 3.322545484752822 POS
POS 3.4662239457862545 POS
NEG 4.340420741472285 NEG
...
When you want to do a cross-validation experiment, training and testing with separate programs
is cumbersome. Minorthird lets you do this in one go with the TrainTest program. Try the following
command
% java edu.cmu.minorthird.classify.TrainTest -data sample1-tokens-binary.data -learner "new DecisionTreeLearner()" -splitter l
-splitter l means to do a
leave-one-out-experiment. In Minorthird, this means that for
each subpopulation S, a classifier
C(S) will be trained and tested. C(S) will be tested on
S, and trained on all the data from a subpopulation other than
S. For this data, Minorthird will train seven classifiers, one
for each sentence.
The result of a TrainTest experiment is an evaluation, not a
classifier. If you use the -saveAs option to the
TrainTest, program, you can save this evaluation - exactly as you can
save the evaluation for Test. You can also use the
-showResult and -showTestDetails option,
exactly as with a regular Test, but there are a few differences. The
viewer will have seven new subpanes, each associated with one of the
seven test partitions, and each subpane containing a detailed,
four-pane inspector of one classifier's performance on one test
sentence. There is also an overall evaluation that pools results
across the different test partitions.
splitter options are:
k5: a five-fold cross-validations10: a stratified ten-fold cross-validationr70: one test with 70% of the data used for training and the remainder for testing.
Sometimes there is a tradeoff between making learning methods easy to use, and making them easy to implement. Minorthird is primarily an SDK for writing and using learning algorithms, and secondarily a toolkit for doing experiments with learning - so when this tradeoff comes up, we often go a with a framework that leads to easy-to-implement learners.
An example of this is the way binary classification is treated. When you're implementing, binary classifiers are an (easy) special case: the classifier only needs to return single real number y to indicate the prediction (positive or negative, the sign y) and confidence (the magnitude of y). In Minorthird you can implement a special BinaryClassifierLearner which learns a special BinaryClassifier; or you can implement a more general learning, which learns multi-class classifier.
To prepare a dataset for a BinaryClassifierLearner, you must use the
two special classes POS and NEG. To prepare a dataset for a general
learner, you can use any class names you like. This sample file contains a non-binary
dataset, with the classes trueNameBegin (for the first
token in a "trueName"), trueNameContinue (for subsequent
tokens in a "trueName") and NEG (for all other tokens).
If you download the sample1-tokens.data file above, and
try and run Minorthird with the default learner, it will fail with an
error message, like this:
java edu.cmu.minorthird.classify.TrainTest -data sample1-tokens.data
*** Minorthird: Version 11.6.11.22 ***
option: data=sample1-tokens.data
java.lang.IllegalStateException: can only learn binary example data: requested schema is [ExampleSchema: [POS, NEG, trueNameBegin, trueNameContinue]]
	at edu.cmu.minorthird.classify.OnlineBinaryClassifierLearner.setSchema(OnlineBinaryClassifierLearner.java:20)
	at edu.cmu.minorthird.classify.ClassifierTeacher.train(ClassifierTeacher.java:22)
	at edu.cmu.minorthird.classify.experiments.Tester.evaluate(Tester.java:36)
	at edu.cmu.minorthird.classify.TrainTest$DataClassificationTask.doMain(TrainTest.java:158)
	at edu.cmu.minorthird.classify.TrainTest$DataClassificationTask.callMain(TrainTest.java:205)
	at edu.cmu.minorthird.classify.TrainTest.main(TrainTest.java:316)
There are a number of learners which can handle multi-class data,
however. On the GUI menu, the available multi-class learners are
MaxEntLearner and KnnLearner. You can also
convert your favorite binary learner (say, NaiveBayes) to a
multi-class learner: for instance, you can construct a
OneVsAllLearner that uses YFBL in an inner loop to
distinguish each class from all the others, and then combines the
results to construct a multi-class classifier. Here are some
examples:
% java edu.cmu.minorthird.classify.TrainTest -data sample1-tokens.data -splitter l -learner "new MaxEntLearner()"
% java edu.cmu.minorthird.classify.TrainTest -data sample1-tokens.data -splitter l -learner "new MultiClassSVMLearner()"
% java edu.cmu.minorthird.classify.TrainTest -data sample1-tokens.data -splitter l -learner "new KnnLearner()"
% java edu.cmu.minorthird.classify.TrainTest -data sample1-tokens.data -splitter l -learner "new OneVsAllLearner(\"new NaiveBayes()\")"
% java edu.cmu.minorthird.classify.TrainTest -data sample1-tokens.data -splitter l -learner "new OneVsAllLearner(\"new VitorBalancedWinnow()\")"
Important: Notice that the argument to
OneVsAllLearner is a
string, not a Java object. The OneVsAllLearner
will pass this string to BeanShell several times - once for each
class, in fact - in order to create several copies of the learner
specified.
Minorthird has several algorithms for learning sequential classifiers. The dataset for a sequential classifier looks much like an ordinary dataset, with two important differences:
*
* lines (or between a * line and the beginning/end of the file) are
considered to be a sequence of labeled examples.
Here is an example of a sequential
dataset. Save this file to sample1-tokens.seqdata.
You can learn and apply classifiers and perform experiments with
sequential learners just as you can with ordinary learners: the only
difference is that you need to include the extra argument -type
seq in your command lines. The following commands should all
work.
% java edu.cmu.minorthird.classify.TrainTest -type seq -data sample1-tokens.seqdata -splitter l -learner "new CRFLearner()"
% java edu.cmu.minorthird.classify.TrainTest -type seq -data sample1-tokens.seqdata -splitter l -learner "new CollinsPerceptronLearner()"
% java edu.cmu.minorthird.classify.TrainTest -type seq -data sample1-tokens.seqdata -splitter l -learner "new CMMLearner(new MaxEntLearner(),1)"
% java edu.cmu.minorthird.classify.TrainTest -type seq -data sample1-tokens.seqdata -splitter l -learner "new CMMLearner(new MultiClassSVMLearner(),1)"
CMMLearner constructor
is the number of history features used by the inner learner. If you
want to use an ordinary non-sequential learner on a sequential
dataset, one way to do that is to set the history to zero:
% java edu.cmu.minorthird.classify.TrainTest -type seq -data sample1-tokens.seqdata -splitter l -learner "new CMMLearner(new MultiClassSVMLearner(),0)"
It is awkward use the minorthird.classify routines to
perform "named entity recognition by token classification", as
outlined above, for several reasons.
First, NER performance is usually measured by statistics like F1 at
the entity level, which doesn't map directly to any measurement at all
at the level of individual tokens. Second, it's hard to understand
what's going on, since the examples are no longer directly associated
with the text they came from. This is important for debugging, and
feature engineering.
However, Minorthird has additional facilities to:
minorthird.ui. We'll explore some of them below.
To get started, use the command:
% java edu.cmu.minorthird.ui.ViewLabels -labels sample1.train
sample1.train is built-in
to Minorthird (for debugging and unit tests, mostly) and contains the seven example sentences shown above.
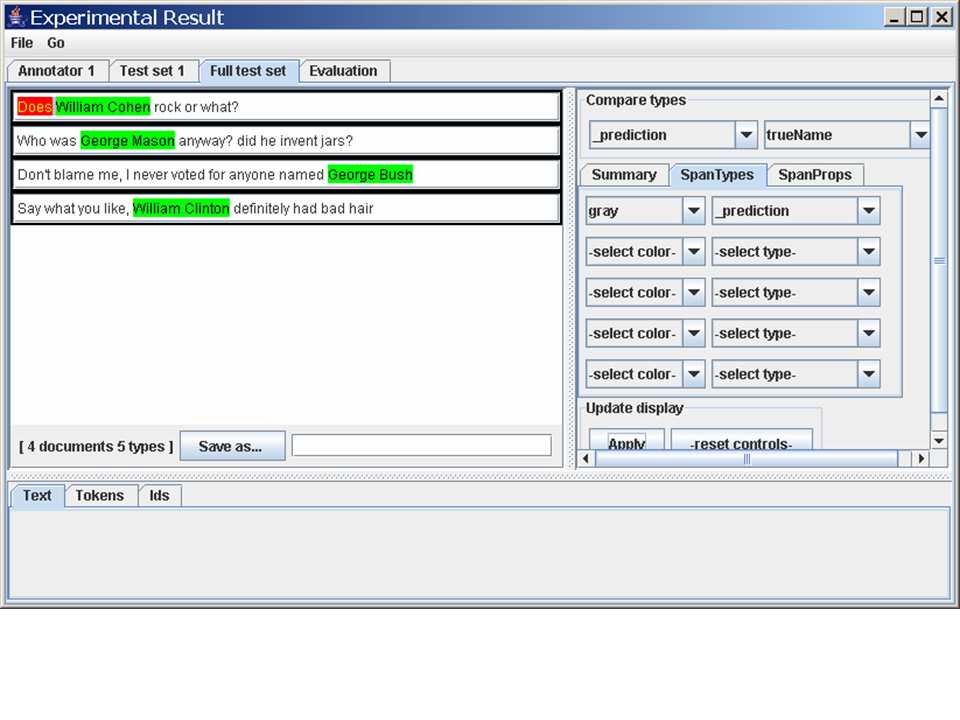
In the right-hand window, click on the "SpanTypes" tab, pull down
"blue" and "trueName", and then click "Apply". Finally click on the
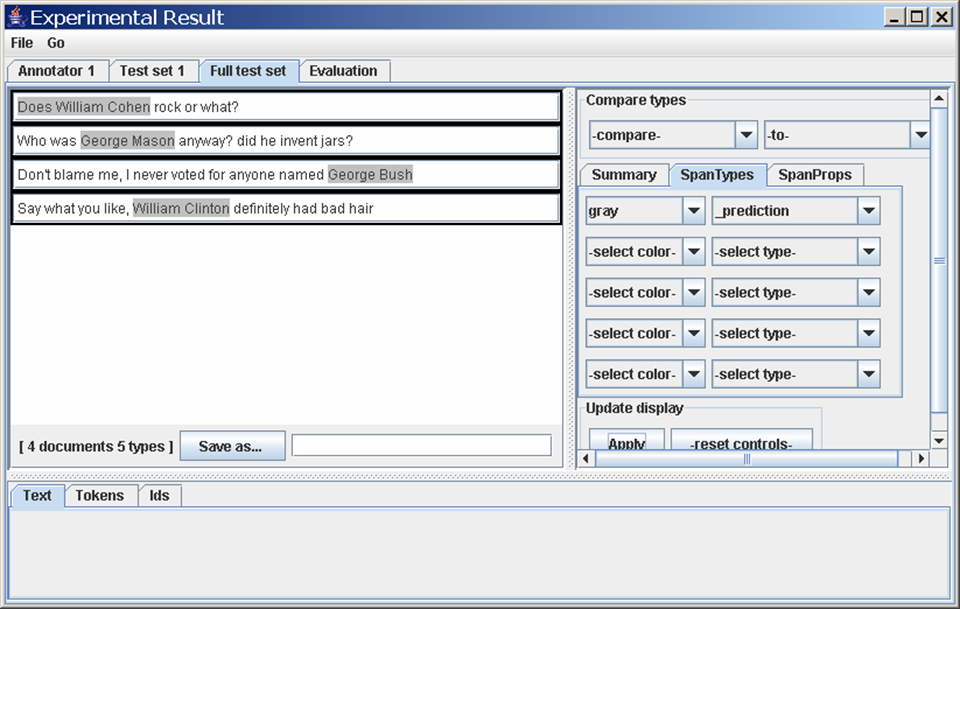
topmost sentence ("William Clinton is a former US president.") and you
should see something like this.
What you're looking at is a small labeled corpus. The top-left window is an overview of the corpus. The top-right window controls what labeled "spans" are highlighted. The bottom window zooms into a particular document that's been highlighted - you can also see how the document has been tokenized, or how it's been named.
Minorthird supports several types of labelings. You can assign a "type" to a span (a sequence of adjacent tokens), or you can assign a "property" to a span. You can also assign properties to tokens (these are visible if you zoom into a document and select the token view). Normally, when you're learning an NER system, span types (or properties) are used to generate the labels that will be predicted by the learned NER, and token properties are used to extend the features that are used by the NER to do the prediction.
Warning: Minorthird allows spans that overlap - for instance, the span "bigram" contains every bigram. The viewer does not display these properly.
Now try the command:
% java edu.cmu.minorthird.ui.TrainExtractor -labels sample1.train -gui
To go ahead and train something, you'll need to specify four things (top to bottom).
Now, close the editor windows out with "Oks" and hit "Start Task". When the task finishes, view the result. You should see something like this. This is a viewer for a sequentially-learned voted perceptron classifier. Use the "File" menu on the viewer to save this as "vp1.serialized" (the "serialized" extension is tacked on automatically when you use the File menu).
To test a previously-trained extractor, use this command:
% java edu.cmu.minorthird.ui.TestExtractor -labels sample1.test -spanType trueName -loadFrom vp1.serialized -gui
You can also do this in one go from the command line:
% java edu.cmu.minorthird.ui.TrainTestExtractor -labels sample1.train -test sample1.test -spanType trueName -showResult
The default learner is a little like naive Bayes - fast, but not
optimal. You may want to customize it. Use the command
% java edu.cmu.minorthird.ui.TrainTestExtractor -labels sample1.train -test sample1.test -spanType trueName -gui
annotationType is the label that is added to an labeled corpus
when an extractor is run. By default this is "_prediction", but you
can change this if you like.sequenceClassifierLearner is the learning method that will be
used on this dataset. There are a number of possibilities, which
should be familiar to you from the sequential learning section above.spanFeatureExtractor controls how a
span is converted to a classification instance. (In this case, a span
will always contain a single token, but that's not always true.) The
taggingReduction determines how labels are put on these
instances. Set the featureWindowSize=1 for the
spanFeatureExtractor, and set the
taggingReduction to
BeginContinueOutsideReduction.
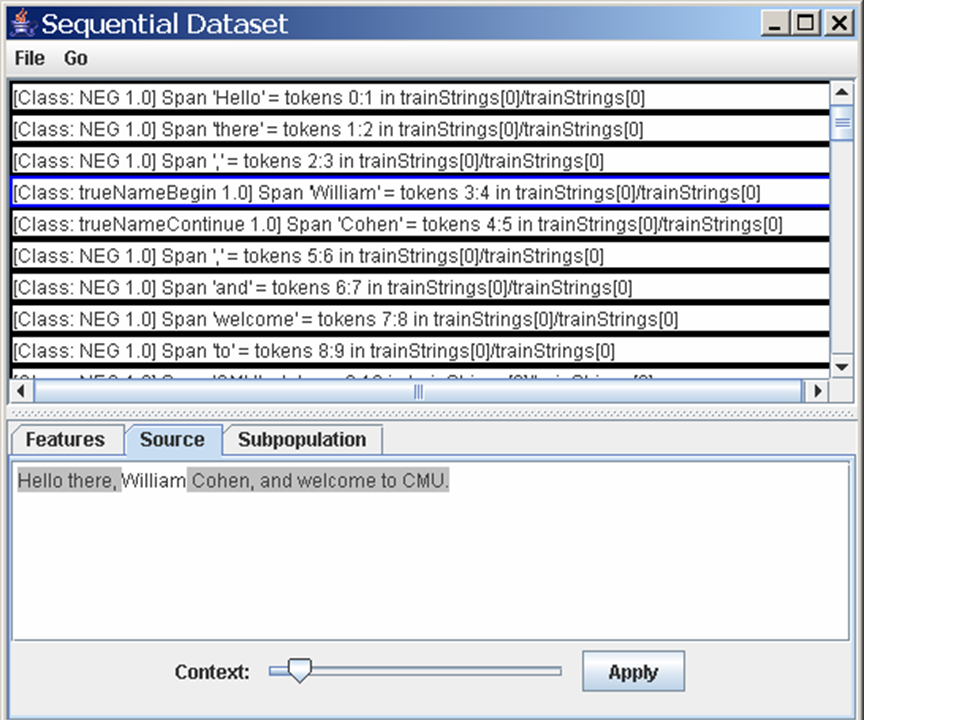
Close out the editor windows, and hit "Start Task". Before the task
finishes, a window will pop up displaying a dataset. This is much
like the one we saw before, but has a
couple of differences. First, it includes some features named stuff
like "previousLabel.1.NEG" which explicitly describe the nearby labels
in a sequence - this is because we're viewing a
SequentialDataset instead of a Dataset.
Second, it includes backpointers from the examples being viewed to the
spans used to create those examples. To see this, select the
"William" token from the top pane, and the "Source" tab on the bottom
pane. You should see something like this.
There are a number of ways to load labeled text data into Minorthird.
One simple way is illustrated by this sample
tarball, which you can download and untar
% tar -xvzf sample-text.tgz
seminar-subset. The files in this directory
contain stuff like this:
<paragraph>Art Department Lecture Series Continues with Baltimore Artist <speaker>Joyce Scott</speaker>
    <sentence><speaker>Joyce Scott</speaker> has studied traditional Navajo rug weaving, traditional
and contemporary Japanese theatre techniques, and traditional Native
American beadwork</sentence>.  <sentence>Her work centers around political and social issues,
particularly issues of race and gender</sentence>.  <sentence>Small sculptures of beads and
thread, which at first look toy-like, are actually social commentaries
about the psychological and physical dangers of being an
African-American and a woman in our society</sentence>.</paragraph>
<paragraph>    <sentence><speaker>Ms. Scott</speaker> will be speaking Tuesday, November 29, at <stime>5:00 p.m</stime>. in
<location>2315 Doherty Hall</location></sentence>.  <sentence>Admission is free</sentence>.  </paragraph>
paragraph, speaker,
sentence, and etc.
Sometimes, of course, you don't want Minorthird to preprocess
XML tags. You can control this by setting a Java "system property",
like this:
% java -Dedu.cmu.minorthird.sgmlPattern=xyzzy edu.cmu.minorthird.ui.ViewLabels -labels seminar-subset
In this case, you need another way to load in labeled spans.
Minorthird also allows (in fact, encourages, and uses heavily!)
stand-off annotation---externally-stored labels for a set of
documents. Stand-off annotation from the file foo.labels
is automatically loaded when you load in files from dirctory
foo. As an example if you download this file and name it
seminar-subset.labels, two words in the document named
cmu.andrew.official.career-center-1495_0 will be
annotated as buzzwords when you ui.ViewLabels the
seminar-subset corpus. The file, by the way, is:
addToType cmu.andrew.official.career-center-1495_0 203 10 buzzword
addToType cmu.andrew.official.career-center-1495_0 246 13 buzzword
closeAllTypes cmu.andrew.official.career-center-1495_0
addToType "command" are the byte
offset at which the span starts, the length of the span in bytes, and
the type to be associated with the span. The
closeAllTypes span indicates that this document has been
completely labeled, and is necessary when you're using stand-off
annotation to define a learning task.
ui package, the
-help option will often a listing of the valid
command-line options.
% java edu.cmu.minorthird.ui.PreprocessTextForExtractor -labels foo -spanType trueName -saveAs foo.seqData
% java edu.cmu.minorthird.util.gui.ViewerFrame vp1.serialized