Group: Fedya Kleshchev, Mukul Bhatt, Michael Lynes
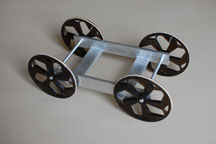
We created a toy car made of an aluminum body and plexiglass wheels using rapid prototyping design techniques. Our original concept was to create a powered car that would climb up a wall, flip over and reverse direction. We realized that we did not have the resources to accomplish this and, therefore, we redesigned our toy. We decided to create our toy using two different methods: laser cutting for the wheels and milling for the chassis.
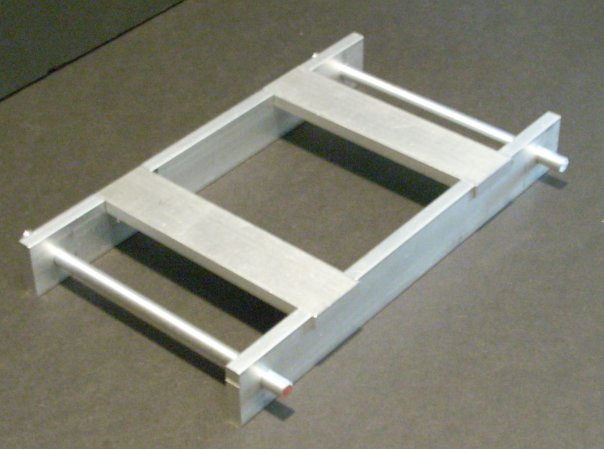
We decided to create the chassis out of aluminum. The machine we used to manufacture the chassis was the mill. We took aluminum bars, cut them down to size on the band saw, and did our finishing cut on the mill. After we cut it to size, we milled out the two slots so the cross bars could fit into the main bars. Since we had to create two pairs of identical pieces, and so that they were exactly the same size, we clamped them together and milled them at the same time. After each cut we deburred the edges with a file. For the axles we took quarter inch aluminum round and cut it down to size on the band saw. After that, we smoothed the edges down on the belt sander.
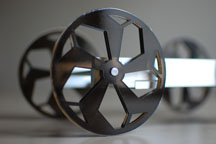
We created the wheels from 0.1 inch plexi glass on the laser cutter. We had originally wanted the wheels to be .25 inches thick. However, the laser cutter was not powerful enough to cut through this thickness. Therefore, we cut two pieces of plexi for each wheel and glued them together. The design was based on the Lamborghini Reventon rims. The process to produce the part involved first designing the wheel in Solidworks to virtually assemble it before production. Then the lines from drawings were exported to autocad as a .dxf file. Lines for cutting were made red and set to hairline width, to avoid burning the plexi glass. The kerf (width) of the beam was not a factor but in more precise work, we would have to set the laser to cut on the inside or outside of the line. We had to set the laser power and speed to specific levels to avoid burning the machine, which is the primary danger for this way of fabrication.

The original idea for assembling the car was to use some sort of metal glue or hot glue. We ran into complications with the hot glue peeling off the metal. Our solution was to scratch the mating surfaces and use the hot glue as a pressure wedge instead of bonding the parts together. Once we assembled the chassis, we inserted the axles and glued the wheels onto the axles. The friction was sufficient.

We familiarized ourselves with laser cutting, which is a useful and effienct method of cutting parts for prototypes. The benefits of laser cutting, are that it is fast and accurate and very cheap. The main drawbacks are that we can only cut two-dimentional parts and weak lasercutters do not work on metal. We also got more profficient on the mill and got some experience working with aluminum. Our finished product ended up looking like our original design but not like our original concept. Through this project, we learned about different manufacturing processes used in rapid prototype desgin.