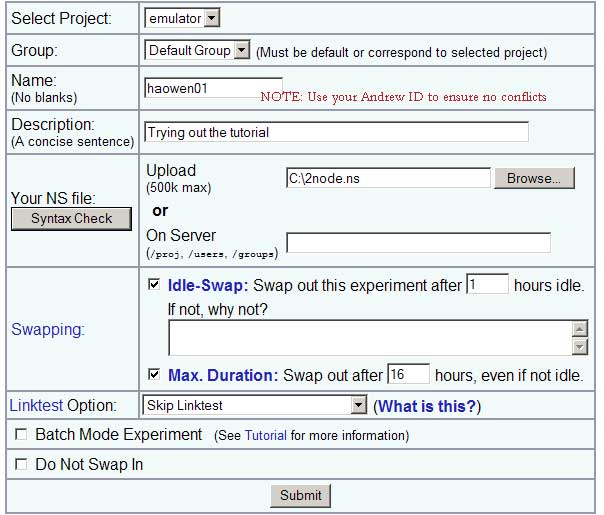
Select Project "Emulator" and "Default Group", and upload this example NS-script which configures two laptops in Ad Hoc mode. Fill in other fields, select "Skip Linktest" and press "submit". Then, wait for a few minutes before you receive an email from CMUlab saying that your experiment is created.
Upon receiving that email, you can swap in the experiment, and after another 5-10 minutes, you will receive another email saying that you experiment is swapped in and active now. In case there are not enought free nodes available (2 pcd610), you should wait until they are available.
Now you are ready to run an experiment. First of all, let's make sure the wireless interfaces are up on nodew1 and nodew2. From emucontrol-1.ece.cmu.edu, you can ssh to nodew1 and nodew2 without using password.
	userID@emucontrol-1:~> ssh nodew1.<experimentID>.emulator.cmcl.cs.cmu.edu
and
 	userID@emucontrol-1:~> ssh nodew2.<experimentID>.emulator.cmcl.cs.cmu.edu
and then run "iwconifg ath0" on both nodes, to check the wireless interface. We provide several useful scripts that handle wireless interface "ath0", such as "down" and "hocStart", in $EMU_HOME/run/emuNode. You may want to copy that folder to your home directory:
userID@emucontrol-1:~> cp $EMU_HOME/run/emuNode ~/To restart the ath0, you can run "down" followd by "hocStart" on nodew1 (nodew2). Once you verify that the wireless interface is up, find out the IP addresses of interface ath0 on nodew1 and nodew2.If the IP address is not set up correctly, you need to manually assign an IP address to interface ath0:
userID@nodew1.<experimentID>.emulator.cmcl.cs.cmu.edu: sudo ifconfig ath0 <IP Address>
Let's start with a very simple experiment: the channel between two nodes are clear. In another word, the pathloss between nodew1 and nodew2 are manually set to be low (70dB).
Before you start, make sure the example folder ($EMU_HOME/run/examples/) have been copied to ~/run/examples in your home directory.
Type the following commands to start the clearChannel experiment:
userID@emucontrol-1:~>emuRun ~/run/examples/tutorial/clearChannel.xml
Open another console, ssh to nodew1. You should be able to ping nodew2 through the wireless interface and get response successfully.
First, use "Ctrl+C" to terminate the clearChannel experiment. It is always a good habit to terminate one experiment before start next one. Now let's try to run a more realistic channel model and (defined in GUI.xml). Type the following commands on emucontrol-1:
userID@emucontrol-1:~>emuRun ~/run/examples/tutorial/GUI.xml
Notice that at the end of the messages there is a message with a URL in it.
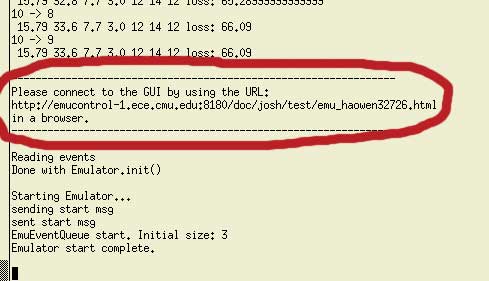
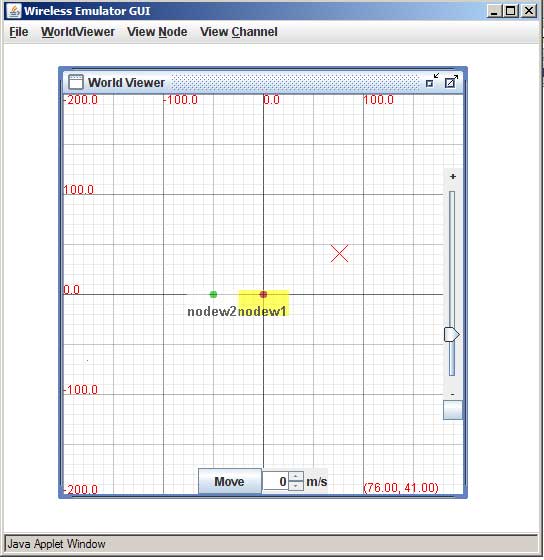
Open that URL up in your favourite JVM-equipped browser, and you will get a GUI like this:
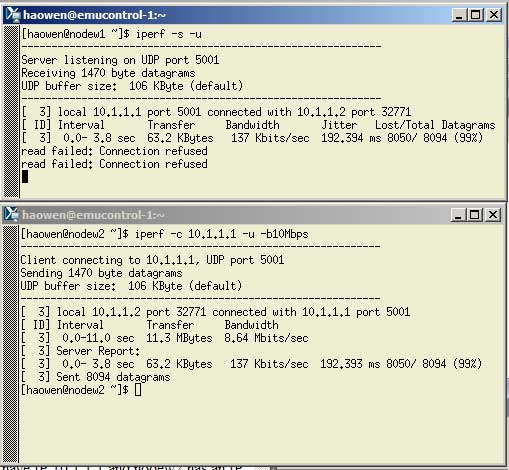
Now try to run an iperf test between nodew1 and nodew2. At the same time, move nodew2 away from nodew1 in the GUI to see the impact of pathloss. Here is an example iperf output:
You can also check the current pathloss between nodew1 and nodew2 from "View Channel" in the GUI.
More details on GUI can be found on the GUI page.
Remember to terminate "emuRun" using "Ctrl+C" once you are done with the exploring.There are several examples in the ~/run/examples/ folder. Now we will try to run the simpleRoute. Type the following commands on emucontrol-1:
userID@emucontrol-1:~>emuRun ~/run/examples/tutorial/simpleRoute.xml
Then open the URL and take a look how nodew1 and nodew2 move along the defined route using the GUI. Again, terminate "emuRun" using "Ctrl+C" once you are done.
The Emulator provides the Java Interface, through which users have full accesss to all the emulator functionality. Here we provide an example, which starts iperf test between two nodes. In order to start processes on nodes from emucontrol-1, we first need to start a node daemon(rmi server) on the each laptop using "startDaemon". This has been automated during the swap-in process. In case you reboot the node during the experiment, or manually stop java process and rmiregistry on the nodes, you can restart the daemon from emucontrol-new using the following commands:
	userID@emucontrol-1:~>startDaemon nodew1
	userID@emucontrol-1:~>startDaemon nodew2
The example java program is in "~/run/examples/tutorial/IperfTestExample.java". User need to compile the java file and put the class file in their own codebase:
userID@emucontrol-1:~>javac -d ~/codebase ~/run/examples/tutorial/IperfTestExample.java
Now, you can type the following command to start the iperf test example:
userID@emucontrol-1:~>emuRun ~/run/examples/tutorial/iperf.xml
The iperf results will be printed in the console where you start the "emuRun".
Congratulations! You have completed the tutorial. Please go ahead and try other examples in ~/run/examples/