| |
Just take a Homography of it...
Project 4 |
Introduction
The tool that is used the most in the project, as referenced in the title 'Life is a Homography,' is the homography transform. This transform is similar to the previously explored affine transform; however, the homography is capable of more degrees of motion. Some might call these transforms 'perspective' warps as they can change what plane an image is on. The basic equation for a homagrapy is as follows:
        a * x + b * y + c = wx'
        d * x + e * y + f = wy'
        g * x + h * y + 1 = w

                 or

        [x]   [ a b c ]   [wx']
        [y] * [ d e f ] = [wy']
        [1]   [ g h 1 ]   [w ]
This can be solved for using a set of linear equations derived using four source points and four destination points. In each of the following sections the homography function is used to varying degrees.
Rectification
The process of rectifying an image is simply computing a homography for the image based on some data points that a user gives. This warp allows for objects that are on one plane to be transformed to another plane. One basic example is a poster on a wall that is not aligned with the image plane. The user would select the points of the poster and the program would then 'flatten' the poster to the flat image plane. This has some dramatic results when trying to figure out what something should look like from another angle, one great example is looking at the floor patterns in paintings, or looking at writing at odd angles in photographs.
Manual Panoramic Mosaicing
This part of the project is more or less a proof of concept for the following automatic section. A user selects corresponding data points on two images that are related. The data points that are normally chosen are things like points of fences, or edges of walls, things that are easy to pin point. Once the user feels as though they have inputted enough, 10 or so points, the program computes a homography and warps one of the images to match the imaging plane of the other. Now using a simple blend, the program meshes the two images together to form one, bigger, new image.
Automatic Panoramic Mosaicing
Here is where the fun starts. The motivating reason behind making this process automated is that humans are not really good at pin-pointing data points. In some cases if one data point is off by only a little bit the homography function can get way out of hand. So an automatic process can help solidify the correlated points which leads to a sharper transform. This entire algorithm is based on the paper by Brown et al.
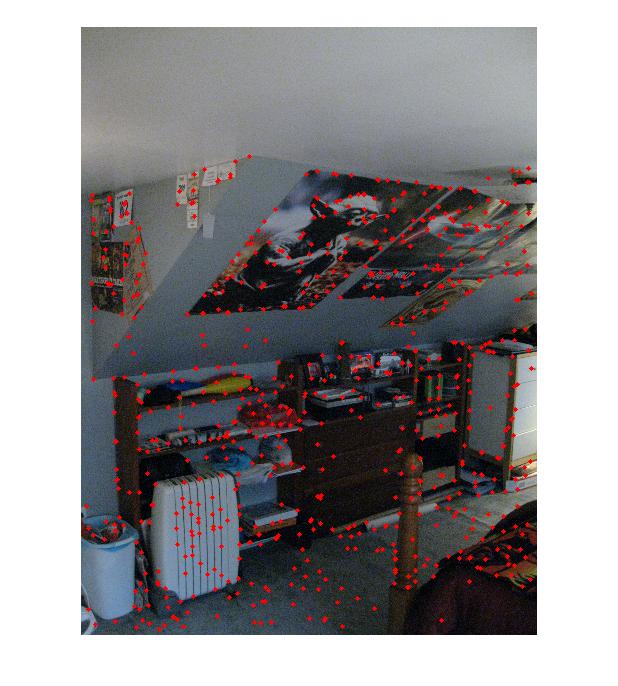
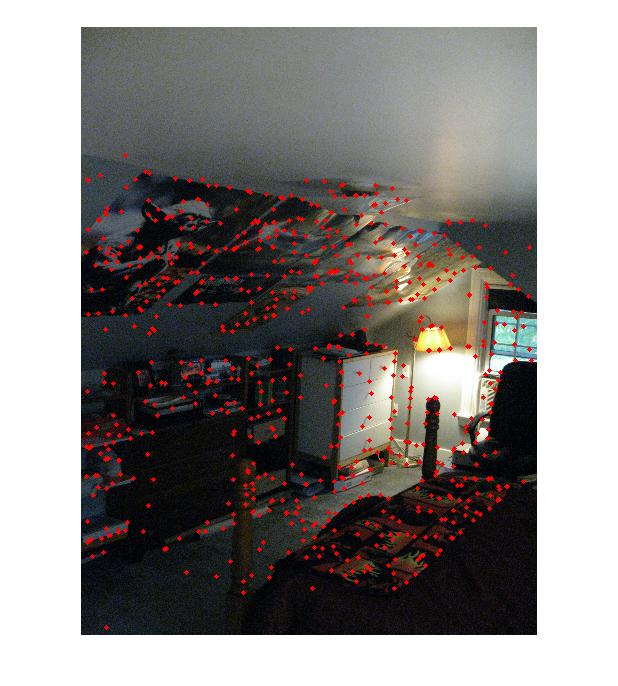
First things first. Points of interest need to be selected. A nifty algorithm called Harris interest point detection is used to detect all of the corners in an image. Corners are necessary because their location is finite. A line, in the case of normal edge detection, can span for any length of space, but a corner is in one specific point.

|

|
|
Once an adequate number of corners are found, they need to be sorted out. This poses a tricky situation, because you don't want to just limit on the 'strength' of the corner. This would lead to only strong corners being used in the rest of the algorithm. What you really want is a equal distribution of corners over the whole image. To achieve this an algorithm called Adaptive Non-Maximum Suppression is used where the strength of the corner as well as the distance it is from other strong corners is used to decide what corners to save. In most of the runs of my program I start with under 6000 Harris points and I use the ANMS algorithm to only keep 650 significant points.

|

|
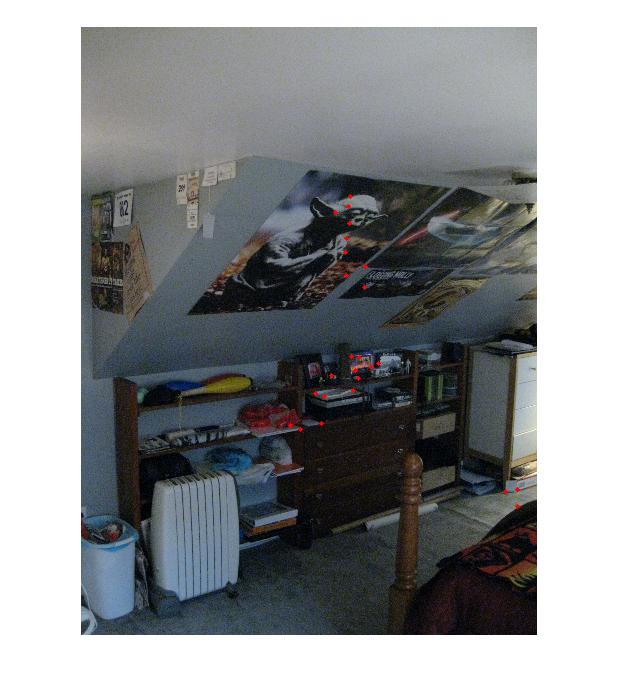
Now we have valuable data. Each point is a significant corner. For each of these data points a 40 x 40 patch is taken around them, which is then normalized and shrunk down to an 8 x 8 image. This fairly blurry image is all that is needed to match correlating points from one image to another. Using a sum of difference squared (very similar the the first project) matches between points are made, where every data point in one image gets matched up with a corresponding point in the other image. There is still a problem here. Because of the overlapping nature of the panoramas, many of these matches are not going to reflect the true match, so a method to sort out the relevant points is needed.
This is where RANSAC comes in to play. This algorithm turns out to be rather powerful at detecting outliers. The basics of the algorithm is selecting 4 pairs, and computing a homography using them. This homography will be very specific to those 4 pairs of points. This homography is used against the rest of the data set to determine the number of other matches the fit this transform. If the points are good matches then there will be quite a few pairs that will match the homography, however if a point is an outlier, then it will simply be passed over as not matching any other points. This process can be boiled down to data point democracy. Them more data points that agree on a transform, the more likely the transform is to be the correct one.

|

|
Now, after all of that you are left with a set of data points that correctly describe the transform. These points are simply pushed in to the warp from the above section and a panorama is outputed using the same homograpy to warp to blend process.
Tour of a Room (Tour of an Image)
If you make the assumption that a given room is rectangular. You can have quite a lot of fun pulling apart an image of that room. In this section the user defines where the corners of the room are, and selects there the vanishing point is for the room. Through the use of a GUI this process is rather simplified, and visually easy to determine. Using this segmented data, parts of the room can be identified and pulled apart. Using 4 different homographys, one for the left wall, right wall, ceiling and floor, the planes of the image can be rectified to their proper plane instead of the imaging plane. From here each of these rectifications can be mapped to a 3D structure that matches the approximate dimensions of the room. Matlab can take care of the rest... This provides for some rather interesting visualizations.
Summary
As always, this was a very enjoyable project. There was some issue first wrapping my head around the homography function, but after that was pounded out the rest was mainly figuring out how to manipulate it to give you the results you are looking for. The blending function I use blew up very fast. There is a case for every possible position of the source image and morphed image, leading to a lot of redundant, yet different code. When selecting data points manually it was very clear that my human hands on a mouse selecting pixels on a scaled down image of the original was not very accurate, I am guessing that I had an error the size of 10 to 15 pixels. Thus making the automatic section rather necessary. After working on the first two parts, the tour of the room was logically a very simple application of the homography transform. It is apparent that this concept is rather limited to very rectangular rooms, with little to no things occupying the space, like people or desks. As I was looking through my photographs, I realized that I didn't really have any images that fit the assumptions.
Future work
If I were able to work on this forever the next step I would take would be to make the tour of the room more representative of the actual room. From looking at images, a lot of rooms that are captured don't have flat ceilings or parallel walls. So figuring out the dimensions of the room first, then taking, and pulling apart the image, I think, could provide some interesting results. In addition to this, adding support of objects in the middle of the room, as discussed in class would be nice. Also it is apparent that my dimensions of the room is not quite adequate, there is some cases where the lines don't quite match up. I feel as though if I had another week, this part could reach a significantly more refined level.
As I was working with the ANMS and RANSAC, I though about how it might be used to do things like project 1's image alignment. I would love to go back and try this sort of image alignment on those images.
Sharp Warps:
RANSAC is amazing!
The first time a 3D room was actually working
A Class assignment that I think I will actually use in the future
Blurry Images:
Getting used to the Homographys
ironing out offsets for matching
wrapping my head around MATLab's 3D plotting
|
| |

|