


William Wedler
Computational Photography
15-463 Fall 2007
The goal of this project is to generate a morph animation where my face is smoothly morphed into my classmate's. Morphing combines both geometry and coloring of objects from multiple images. The first frame is a photo of me and the last is a photo of my classmate. The intermediate frames of the animation are morphed images that feature varying degrees of my photo and my classmate's.
An image morph is achieved with a combination of a warp and a cross dissolve. The cross dissolve is accomplished with alpha blending, but accomplishing good results with the warp are not as easy.
The purpose of warping the images is to distort the apparent shape of features in the photographs. For example, when morphing from a photo with a frown to a smile, the shape of the lips and mouth must be warped. However, the images should not be uniformly warped. Just because the mouth changes shape and the corners move does not mean that the ears should change location. A warp can be accomplished by a transformation. Transformations are useful for increasing and decreasing scale, rotating, translating and performing other modifications. However, no single transformation applied to an entire image can achieve the desired warp, because transformations are linear operations. So in order to use linear operations to successfully warp the image, many transformations are applied to discreet sections of the photo.
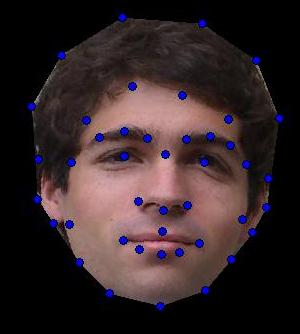
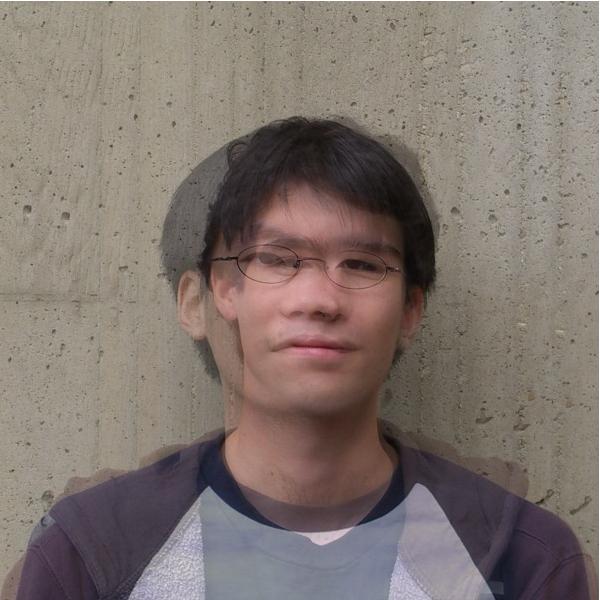
When warping one image to another, some areas of the images must correspond to each other. These corresponding areas form the boundaries of the discreet sections that the photos are to be partitioned into. An example of points that logically should correspond are the eyes. The eyes of a photo in one picture should correspond to the eyes of another photo when they are morphed together. Other corresponding points include the mouth, nose, chin and boundaries like edges of hair. To preserve points and ensure correspondence, they are manually selected for each image. To help with processing the images in this class, standard point correspondences were used. Below is my photo with correspondence points labeled, my classmate's photo with correspondence points labeled, and a map of the standard labeling scheme.


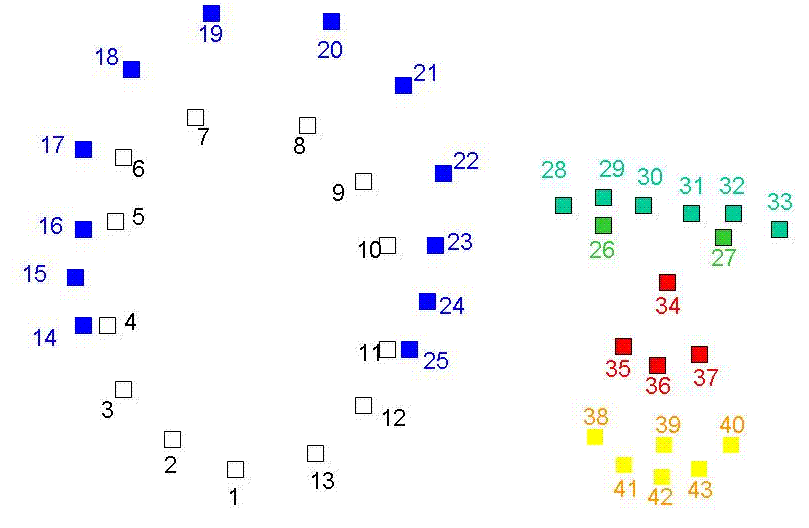
Once the correspondence points are defined for an image, it can be partitioned by a triangulation of those points. To compute the average shape of two images, a new set of points is made where the X and Y location of each point is based on a weighted combination of he X and Y location of the same point in each image. The average then is when each image contributes 50% to the X and Y location. The next images show the mesh of two photos and then the average mesh between those photos


Each triangle in the mesh bounds regions in the photos where a single transformation over that region can give good results. Earlier, I mentioned that a transformation to change the appearance of the mouth should not be applied to the ears. Now, since the triangles are based on logical correspondence points, its is assumed that a transformation of one region in a triangle can be applied to the entire triangle. The next step is the find the correct transformation.

Consider the triangle in the figure above. The vertices of each triangle form a basis, so to transform points from one triangle to another, a change of basis is performed. This change of basis is an affine combination. The vertices of the blue triangle are transformed to match the vertices of the red triangle. Likewise, any pixel contained in the blue triangle can be transformed to match any point on the red triangle.
Once the transformation between two triangles is found as an affine combination, the points in one can be transformed to form the new triangle. This transformation is how the faces are warped. The warping effect is performed by an inverse transformation, where each pixel in the target triangle is determined based on the transformation between the triangles. The inverse transformation is used to ensure that eah pixel and only each pixel in the target triangle gets assigned a value.
The starting image and the ending image are warped triangle by triangle by applying the affine combination to transform each pixel in the triangles. This warping forces the image to take on the shape of the intermediate image, as defined by the points in the intermediate image mesh. The results of warping my photo and my classmate's photo to our average shape are shown below.

The cross dissolve used for morphing is simple Alpha Blending. If the photos are blended with 50% alpha each at each pixel and no warping, results will be a blur between the two images as shown below. Alpha blending helps combine the photos into one, but can not do the entire morph alone.
The morphed image is formed by first warping each photo and then blending the warped regions. The results of the average face shape and 50% alpha for each face is shown below. The results are not too bad, but can certainly be improved.

I generated a morph sequence between myself and my classmate, Andrei Aiordachioaie. The morph was done as 61 frames where the first frame is the original image of me and the last frame is the original image of Andrei. Small resolution versions of all 61 frames of the morph are shown below.
The 600x600 resolution images along with an WMV video are in the Morph60 directory.
The Mean Face is actually rather pleasant, as researchers have found. I am referring to generating the average face of all the faces in the fall 2007 class. This average, or mean face represents a smoothed over facade with individual irregularities averaged out. The averaging process in effect removes irregularities that could be considered noise, or just distinguishing features from classmate to classmate. The mean face is shown below.

As you may have noticed, my original approach gave some rough results. Two improvements that I made included aligning the images based on point number 43 and also adding points to the mesh. By adding regularly spaced points on the mesh, the entire image can be included in the cross dissolve, instead of just the region around the head. Finally, when aligning the images, I could not crop them so I mirrored the edges for a less noticeable modification than leaving areas of black. The modified mesh is shown below.

What difference does it have? Compare the mean face from no modified mesh and the mean face with the modified mesh. The augmented mesh version is a bit more interesting than the original, shown below.
